Friday, November 15, 2019

Mobile Video Game Updates

In 2015, we built Candy Kid as a simple maze chase video game on Windows PC using an older version of MonoGame published on Android and iOS. In 2018, we built 3D City "Shoot 'em up" using similar process.

Now both Google and Apple require apps + games be 64-bit compliant. Apple will stop support for 32-bit on iOS 11.0. Plus, Google require updates on Google Play to target minimum Android 9 (API level 28) or higher.

All these factors mandate upgrades to our mobile games to be rebuilt using latest version of MonoGame 3.7.
Let's check it out!

TL;DR
Too Long; Didn't Read
  1. Install all pre-requisite software on Windows + Mac. Check for updates to get latest dependencies
  2. Launch Android + iOS projects. Update all settings to increment build version numbers and codes
  3. Rebuild + upload the updated binaries to relevant online stores then tag all archived source code

Pre-Requisites
Reference previous instructions for Android and iOS ports. This post assumes software already published. Install the following software on Windows and Mac. Install "Mobile development with .NET" for Xamarin.
  Windows   [Android]   Mac Os/X   [iOS]
Note: Check for updates on all Visual Studio IDEs to get latest the frameworks tools and dependencies.

IMPORTANT
If, for any reason, there are issues updating any IDEs mentioned here then simply Run as Administrator.

Pipeline
Previous posts used older versions of MonoGame which meant the Content Pipeline was arguably not built correctly. Upgrade to MonoGame 3.7 and build the Content Pipeline correctly using the Content.mgcb file.

Launch the MonoGame Pipeline tool. Navigate to project Content folder. Open Content.mgcb. Click Content root node. Under Properties select relevant Platform. Create following folders and add content accordingly:

Data
Import any ASCII text files or XML configuration files. Set the Build Action in the Properties section to Copy.

Fonts
Typically import pre-built XNB binary files from previous games e.g. Emulogic.xnb. Set Build Action to Copy. However, if you create custom spritefont files copy the TTF file also otherwise "Could not find font file" error.

Sound
Import all music and sound effects as MP3. Some WAV files sounded strange as built sound effects. Convert WAV files to MP3. Set Build Action to Build. Set Processor to Song for music otherwise set to Sound Effect.

Textures
Import all 2D images as PNG. Some JPG files rendered strange as built textures. Convert JPG files to PNG. Also, convert BMP files to PNG. Set Build Action to Build. Set Processor to Texture for all imported images.


Google
On November 1, 2019 apps + games on Google Play required to target Android 9 (API level 28) or higher. After this date, Google Play Console will prevent any APK updates submitted with targetSdkVersion < 28.

Therefore, install Android 9 (API level 28) or higher. Launch Android Studio. File | Settings... | Appearance and Behavior | System Settings | Android SDK. Note default location may be different from Visual Studio:
 Android Studio  %USERPROFILE%\AppData\Local\Android\Sdk
 Visual Studio [VS]  C:\Program Files (x86)\Android\android-sdk

Actually, it may be easier to align Android SDK location in Android Studio to that of Visual Studio because all Android game code will be built using MonoGame from Visual Studio. Therefore, update Android SDK path:
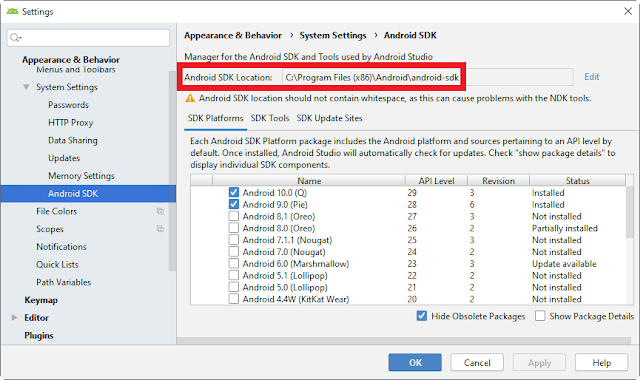
Ensure SDK Tools are also installed. Verify SDK Platforms installed in "platforms" sub-folder and SDK Tools installed in "build-tools". Finally, add "platform-tools" folder to System %PATH% to use adb at cmd prompt.

Upgrade
Currently VS2019 does not include MonoGame project templates. Therefore, launch VS2017 and create new MonoGame Android project e.g. 3D City. Close and re-open in VS2019. The benefits to be explained shortly.

Assume previous version 3D City 1.0.0 already exists on Google Play. Import existing content per previous build under the Content folder as explained above. Import existing code. Right click project and Properties:

Application
Compile using Android version (Target Framework). Choose Android 9.0 (Pie) as minimum Android version.

Application Manifest
 Key  Value  Element  Attribute
 Application name  3D City  application  android:label
 Package name  com.steveproxna.x3dcity  manifest  package
 Application icon  @drawable/Icon  application  android:icon
 Version number  2  manifest  android:versionCode
 Version name  1.1.0  manifest  android:versionName
 Minimum Android version  Android 9.0 (API Level 28 - Pie)  uses-sdk  android:minSdkVersion
 Target Android version  Android 9.0 (API Level 28 - Pie)  uses-sdk  android:targetSdkVersion

AndroidManifest.xml
<?xml version="1.0" encoding="utf-8"?>
<manifest package="com.steveproxna.x3dcity" android:versionCode="2" android:versionName="1.1.0">
  <uses-sdk android:minSdkVersion="28" android:targetSdkVersion="28" /">
  <application android:label="3D City" android:icon="@drawable/Icon">
    <meta-data android:name="android.max_aspect" android:value="2.1" />
  </application>
</manifest>

Application Options
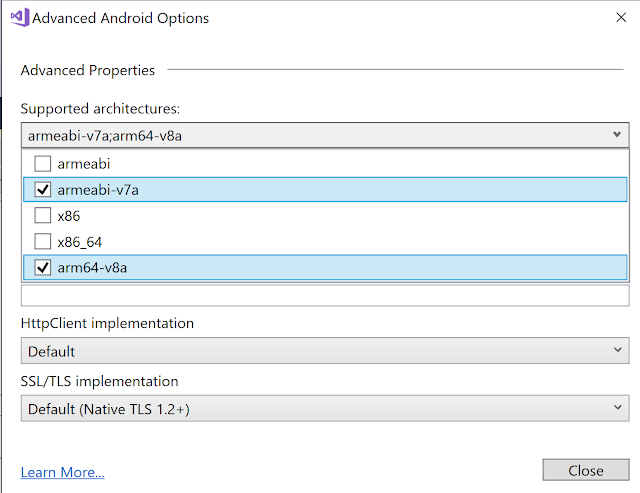
Click the Advanced button. Target the following 2x Supported architectures: armeabi-v7a and arm64-v8a.
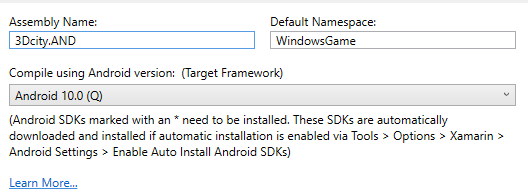
Currenlty, Android 10.0 (Q) is available although this API level 29 seems to be missing from Visual Studio Tools menu | Android | Android SDK Manager. However, here is a workaround to circumvent the problem:

Launch Android Studio. Install Android 10 (API level 29) as above. Ensure android-29 exists in Android SDK "platforms" folder and 29.0.2 in "build-tools". Launch Visual Studio 2019. Update Android version in project:
Upload
Launch VS2019. Open MonoGame Android project. Attach Android device. Select Release build configuration. Clean and rebuild solution. Right click project | Archive... After the archive is generated choose Distribute...

Ad Hoc
Select distribution channel: Ad Hoc. Select Signing Identity or Create Android Keystore. Save APK. Enter the password. Open Folder. Navigate to "signed-apks" subfolder. Here is the signed APK that can be installed:
# Start | run | cmd
# cd signed-apks
# adb devices
adb install -f *.apk

Google Play
Select distribution channel: Google Play. Select Signing Identity. Continue. Click "+". Login to Google Play | Settings | API access. Select existing OAuth client. Download JSON and extract the Client ID + Secret here:

TROUBLESHOOTING
If you receive any of the following 403 errors while attempting to upload latest Android build then read on:

This release is not compliant with the Google Play 64-bit requirement
This can occur if you have not selected arm64-v8a in the Android project properties Application Options. If after selecting arm64-v8a you receive NoAudioHardwareException then must upgrade MonoGame to 3.7.1.

The apk must be signed with the same certificates as the previous version
This can occur when you have signed previous Android build using keystore typically on different computer. Export Android keystore as needed and ensure critical information like keystore alias and password are safe.

Here is a good overall guide for finding the Android keystore. Below is quick summary for all configurations:
 Windows  %USERPROFILE%\AppData\Local\Xamarin\Mono for Android\Keystore\alias\alias.keystore
 Mac OS/X   $HOME/Library/Developer/Xamarin/Keystore/alias/alias.keystore

Don’t forget to backup your keystore file! Here is how to retrieve the alias and do not forget the password:
# Search for Alias name in the output from the following command
cd %USERPROFILE%\AppData\Local\Xamarin\Mono for Android\Keystore\alias
keytool -list -v -keystore alias.keystore


Apple
Apple will stop support for 32-bit apps on iOS 11.0. Therefore, any 32-bit apps will need to be upgraded to 64-bit. Also, Apple may require paid apps be upgraded within every two years to remain on the App Store.

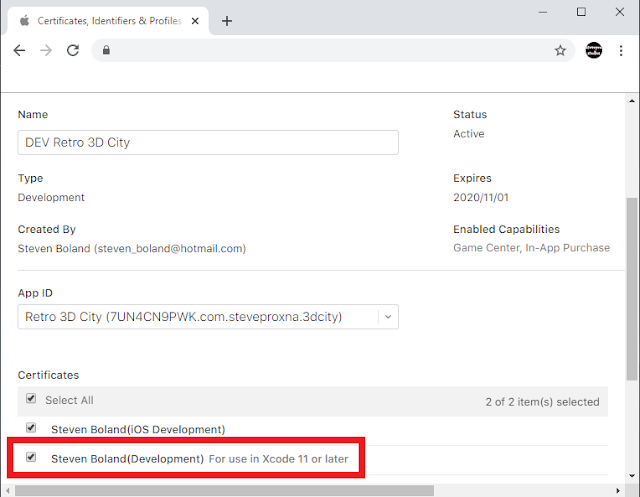
Sign in developer.apple.com. Ensure all developer provisioning profiles use certificates for Xcode 11 or later:
Upgrade
Currently VS2019 does not include MonoGame project templates. Therefore, launch VS2017 and create new MonoGame iOS project e.g. 3D City. However, do NOT click "Pair to Mac" here because you may be prompted to install Mono version incompatible with this version of Visual Studio. Instead, close and re-open in VS2019.

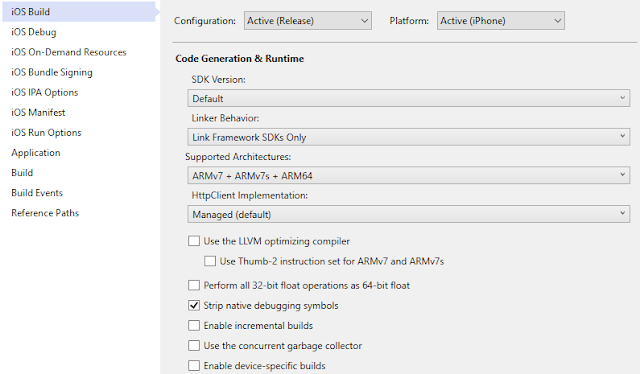
Assume previous version 3D City 1.0.0 already exists on the App Store. Import existing content per previous build under the Content folder as explained above. Import existing code. Right click project and Properties:
Info.plist
 CFBundleName  3D City
 CFBundleDisplayName  3D City
 CFBundleIdentifier  com.steveproxna.3dcity
 CFBundleVersion  1.1.0
 CFBundleShortVersionString  1.1
 MinimumOSVersion  7.0
 UISupportedInterfaceOrientations  UIInterfaceOrientationLandscapeLeft
 UIStatusBarHidden  true
 UIRequiresFullScreen  true
 UIDeviceFamily  1, 2
 XSAppIconAssets  Assets.xcassets/AppIcon.appiconset

IMPORTANT
Currently there seems to be inconsistency with AppIcon assets creation on Windows and Mac. Therefore, launch MonoGame iOS project in Visual Studio for Mac. Open Info.plist | Click "Use Asset Catalog" here.

This action creates the AppIcon.appiconset under Assets.xcassets folder whereas Windows creates under Media.xcassets which means App icon may not appear on iOS device! Also, ensure Content.json is correct.


Upload
Launch Visual Studio for Mac. Open MonoGame iOS project. Attach iOS device. Select Release configuration. Clean and rebuild solution. Right click project | Archive for Publishing. After the archive is generated choose Sign and Distribute...

Ad Hoc
Select distribution channel: Ad Hoc. Choose provisioning profile | Publish | Save IPA file | Reveal in Finder. Launch Xcode | Window | Devices + Simulators. Select iOS device. Click "+". Navigate and open IPA file.


App Store
Launch browser. Sign in to iTunes Connect. Select published app e.g. 3D City. Click "+" Version or Platform. Choose iOS. Enter new Store Version Number | Create. Enter "What's New in this Version" text. Save data.

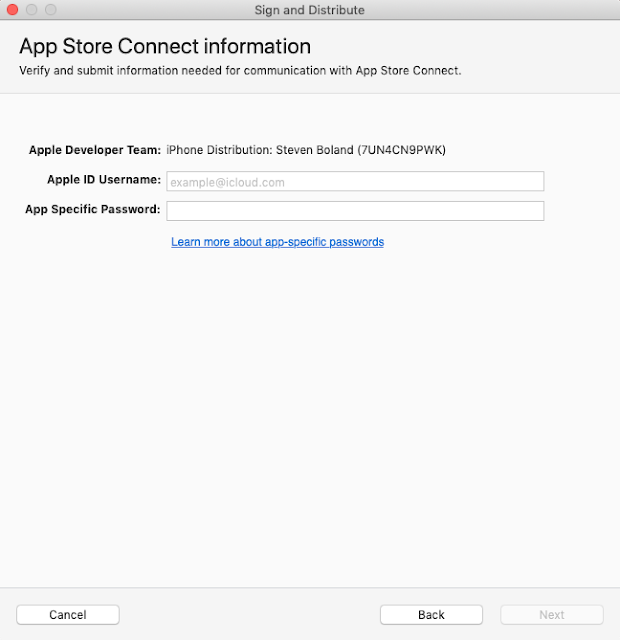
Sign in Apple ID web site. In Security section under "APP-SPECIFIC PASSWORDS" click "Generate Password". In the popup window enter, for example "3DCity" | Create. Apple will generate a new app specific password.

Select distribution channel: App Store | Upload. Choose provisioning profile. Enter Apple ID and App Specific Password. Next | Publish. Choose file name | Save IPA. This process should upload build to iTunes Connect.
Finally once build has completed processing select it in iTunes Connect. Save. Complete following questions:
 Export Compliance
 Have you added or made changes to encryption features since your last submission of this app?

 NO 
 Advertising Identifier
 Does this app use the Advertising Identifier (IDFA)?

 NO 

IMPORTANT
If you receive Publishing Failed error "Invalid Toolchain: You app was built with unsupported version of Xcode or SDK" then you must upgrade to Xcode 11.2.1 because Apple deprecated Xcode 11.2 after Nov 5th 2019.

Right click MonoGame iOS project | Archive... | App Store | Save IPA file. Upload on Mac Application Loader:
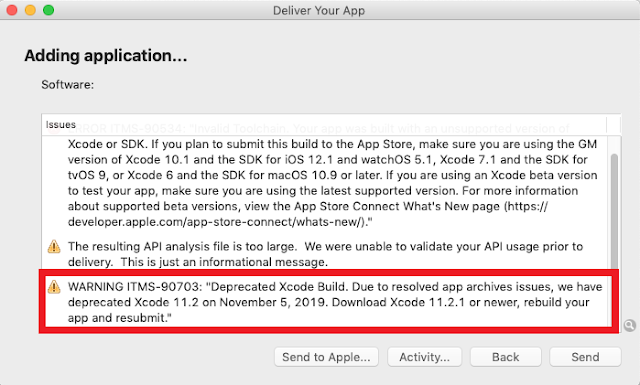
Also, if you receive Publishing Failed error "Failed to parse PList data type" then simply increment the build version number CFBundleVersion in Info.plist. Align project properties. Rebuild and upload to iTunes again.


TROUBLESHOOTING
If you receive any of the following crashes while attempting to run latest iOS build on device then read on:

Got a SIGABRT while executing native code. This usually indicates a fatal error in the mono runtime used
For some strange reason the following code with IDictionary<Byte, T> worked previously but now crashes. Fortunately, there is a workaround to this issue: simply use the Int16 type as the key instead of type Byte.
// This code will crash on iOS device!
private IDictionary<Byte, Vector2> BasePositions { get; private set; }
private IDictionary<Byte, Rectangle> BasePositions { get; private set; }

// This code will work without crash.
private IDictionary<Int16, Vector2> BasePositions { get; private set; }
private IDictionary<Int16, Rectangle> BasePositions { get; private set; }

Microsoft.Xna.Framework.Content.ContentLoadException: 'The content file was not found.'
This general exception can occur when MonoGame project has not built the Content as described above i.e. New MonoGame project using version 3.7. Open Content.mgcb. Add all content relative to this content file.

Also, I believe it helps to fully qualify Content path and remove default code to set Content RootDirectory:
// Delete or comment out default code.
// Content.RootDirectory = "Content";
// Fully qualify path to load content e.g. Image.png
Texture2D image = Content.Load("Content/Textures/Image");

Summary
To summarize, all games built in the past using MonoGame were 2D. However, now that all frameworks tools and dependencies are upgraded with latest MonoGame installed using correct build pipeline then we are in a good position to assemble 3D graphics and games on Windows deployed to Android and iOS cross platform!


Thursday, October 31, 2019

Linux Setup Cheat Sheet II

In the previous post, we discussed various options to set up Ubuntu Linux. Now let's install some software.
Let's check it out!

General
First, let's list some general purpose commands that can be applied + executed anywhere. Launch Terminal:
 Command  Description
 hostname  Confirm host computer name
 whoami  Confirm user executing command
 sudo su  Run as administrator
 sudo apt-get update  General all-purpose update
 sudo apt-get -f install  Install outstanding packages
 sudo dpkg -i *.deb  Install any Debian package
 sudo tar -xvzf *.tar  Extract tar ball [tape archive] file
 sudo add-apt-repository *  Add package to repository
 sudo add-apt-repository --remove *  Remove package repository
 shutdown -r now  Shuts down Ubuntu Linux

Java
By default, Java may not be installed but is a good idea to install because a lot software may be dependent. Launch Terminal and enter the following commands:
sudo apt install openjdk-11-jre-headless  # version 11.0.3+7-1ubuntu2~19.04.1, or
sudo apt install default-jre              # version 2:1.11-71
sudo apt install openjdk-8-jre-headless   # version 8u212-b03-0ubuntu1.19.04.2
sudo apt install openjdk-12-jre-headless  # version 12.0.1+12-1
sudo apt install openjdk-13-jre-headless  # version 13~13-0ubunt1

Repeat if you would like to install javac but install JDK this time instead of JRE. Enter these new commands:
sudo apt install openjdk-11-jdk-headless  # version 11.0.3+7-1ubuntu2~19.04.1, or
sudo apt install default-jdk              # version 2:1.11-71
sudo apt install openjdk-8-jdk-headless   # version 8u212-b03-0ubuntu1.19.04.2
sudo apt install ecj                      # version 3.16.0-1
sudo apt install openjdk-12-jdk-headless  # version 12.0.1+12-1
sudo apt install openjdk-13-jdk-headless  # version 13~13-0ubunt1

Various
Here is a list of general software applications that I believe are handy to have installed. Launch Terminal:
sudo apt-get install git
sudo apt-get install subversion
sudo apt-get install curl
sudo apt-get install python
sudo apt-get install python3

Browser
Download Google Chrome as default browser. Save *.deb file in Downloads folder and install from Terminal:
cd ~/Downloads
sudo dpkg -i google-chrome-stable_*.deb
By default, certain packages may not be installed for this software. If this is true then enter the commands:
sudo apt-get update
sudo apt-get install libgconf2-4
sudo apt-get install libnss3-1d
sudo apt-get install libxss1
sudo apt-get -f install

Source Control
In the previous post, we setup a folder share and made it possible to copy + paste files across from host to virtual machine. However, it may be easier to install source control client to simply pull + push files directly.

GitEye
Download GitEye is available completely free but only includes very limited features. Good for starting point:
cd ~/Downloads
mkdir GitEye
mv GitEye*.zip GitEye
cd GitEye
unzip GitEye*.zip
rm GitEye*.zip
./GitEye

SmartGit
Download SmartGit as full-featured and similar product to SourceTree but it requires a commercial licence:
cd ~/Downloads
tar -xzvf smartgit*.tar.gz
rm smartgit*.tar.gz
cd smartgit/bin
./smartgit.sh

GitKraken
Download GitKraken as a great compromise. This software is full-featured like SourceTree available for free: Note: GitKraken can launch Terminal [a handy feature] but seems only from using Alt+T keyboard shortcut.
cd ~/Downloads
sudo dpkg -i gitkraken*.deb

IDEs
Now we'd like to build our own software so let's install various Integrated Development Environments [IDEs].

VS Code
Visual Studio Code is a popular lightweight IDE available cross platform on Windows, Mac OS/X and Linux. Install directly from Ubuntu Software. Otherwise, launch the Terminal and enter the following commands:
curl https://packages.microsoft.com/keys/microsoft.asc | gpg --dearmor > microsoft.gpg
sudo mv microsoft.gpg /etc/apt/trusted.gpg.d/microsoft.gpg
sudo sh -c 'echo "deb [arch=amd64] https://packages.microsoft.com/repos/vscode stable main" > /etc/apt/sources.list.d/vscode.list'

sudo apt-get update
sudo apt-get install code # or code-insiders
Note: if there's an issue with Visual Studio Code install then try sudo apt-get --fix-broken install + try again.


Geany
Geany is a lightweight IDE using the GTK2 toolkit and may seem to be popular for C development on Linux. Launch Terminal and enter the following commands:
sudo add-apt-repository ppa:geany-dev/ppa
sudo apt-get update
sudo apt-get install geany geany-plugins-common

Code Blocks
Code Blocks seems to be popular IDE for Sega Genesis development. Install directly from Ubuntu Software.


CLion
CLion is a commercial IDE from JetBrains for C/C++ available cross-platform on Windows, Mac OS/X and Linux using CMake build system. Download CLion. Launch Terminal and enter these following commands:
cd ~/Downloads
tar -xvzf CLion-*.tar.gz
cd CLion*
cd bin
./clion.sh

Dotnet
Specifically .NET Core is now open source and available cross platform on Windows, Mac OS/X and Linux! Launch Terminal and enter the following commands:
wget -q https://packages.microsoft.com/config/ubuntu/19.04/packages-microsoft-prod.deb -O packages-microsoft-prod.deb
sudo dpkg -i packages-microsoft-prod.deb

# Install .NET Core Runtime
sudo apt-get install apt-transport-https
sudo apt-get update
sudo apt-get install dotnet-hosting-2.0.6

# Install the .NET SDK
sudo apt-get install apt-transport-https
sudo apt-get update
sudo apt-get install dotnet-sdk-2.2

# Verify installation
dotnet --version
dotnet --list-sdks
dotnet --list-runtimes
IMPORTANT
If you receive an error message similar to Unable to locate package dotnet-sdk-2.2 then refer to this guide.


Miscellaneous
After installing IDEs for C/C++ let's install a static code analysis debugging and profiling tool like Valgrind:
sudo apt install valgrind
# Example "HelloWorld"
cd ~/CLionProjects/HelloWorld/cmake-build-debug
valgrind ./HelloWorld --lead-check=yes

Also, if you would like to take a screenshot then use [Alt +] PrintScr to save in output ~/Pictures directory.


Games
Finally, let's install some emulators in order to play + test 8-bit and 16-bit SEGA retro video games on Linux.

Kega Fusion
Download Kega Fusion as emulator for general Sega retro video games. Launch Terminal + run commands:
cd ~/Downloads
sudo dpkg -i Kega-fusion_3.63-2_i386.deb
sudo apt-get -f install

Gens GS
Download Gens GS as emulator for Sega Genesis retro video games. Launch Terminal and run commands:
cd ~/Downloads
sudo apt-get update
sudo dpkg -i Gens_2.16.7_i386.deb
sudo apt-get -f install

Emulicious
Download Emulicious as emulator for Sega retro video games with great debugger! Launch Terminal + run:
cd ~/Downloads
mkdir Emulicious
mv Emulicious.zip Emulicious
cd Emulicious
sudo unzip Emulicious.zip
rm Emulicious.zip
java -jar Emulicious.jar

Doom
Finally, there is an awesome YouTube video documenting how to setup Doom on Linux. All notes found here!


Summary
Now we have Ubuntu installed with a ton of Ubuntu software we are in a good spot to progress with Linux. Being open source it is also possible to modify the Linux kernel which would be a phenomenal next step!

Sunday, September 15, 2019

Linux Setup Cheat Sheet

Linux is everywhere! Linux is free open source operating system based on Unix OS. Linux powers 90% of the world's fastest servers thus is the backbone of the Internet. Linux dominates mobile platforms and the cloud. Let's check it out!

Windows
Install Ubuntu Linux on Windows using VirtualBox. Download VirtualBox and install. Follow all the prompts. Next, follow all instructions here to create the virtual machine to host Ubuntu. I have tweaked some inputs:
 Step  Key  Value
 VM Name and OS Type  Version  Ubuntu (64-bit)
 Memory  Base Memory Size  8 GB
 Virtual Hard Disk  Start up Disk  Create new hard disk
 Create New Virtual Disk  File type  VDI (VirtualBox Disk Image)
 Virtual disk storage details  Storage details  Fixed size
 Virtual disk file location and size  Size  100 GB

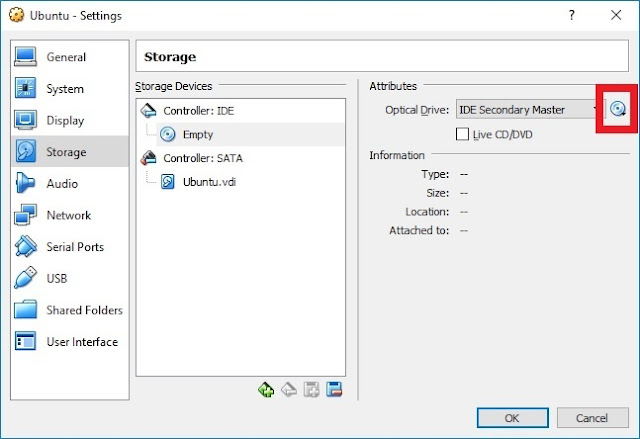
Complete virtual hard drive: click Create. Download Ubuntu 19.04. In VirtualBox, click Settings | Storage | Controller IDE | Empty | Optical Drive: IDE Secondary Master. Click icon | Choose Virtual Optical Disk File...

Navigate to downloaded Ubuntu ISO file | OK. In VirtualBox, double click Ubuntu [Powered Off] to Start the virtual machine. Next, follow all instructions here for the Ubuntu installation. I have tweaked some inputs:
 Step  Key  Value
 Welcome  Option  Install Ubuntu
 Keyboard layout*  English  English (US)
 Updates and other software  What apps would you like to install  Normal installation
 Installation type  Computer has no detected OS  Erase disk and install Ubuntu
 Where are you?  City  Leave default selection
* IMPORTANT do not change keyboard layout here as can corrupt buttons! You can always change it later.

The final install step "Who are you?"
 Key  Value
 Your name  Steven Boland
 Your computer's name  stevepro-VirtualBox
 Pick a username  stevepro
 Choose a password  password
 Confirm your password  password

Troubleshooting
VT-x is not available (VERR_VMX_NO_VMX) After Windows 10 Update
You may receive this error on Windows 10 especially after a Windows Update. If so then try the following;
  • Launch the Terminal command prompt Run as Administrator
  • Start | Programs | right click Command Prompt | Run as administrator
  • Type the following command: dism.exe /Online /Disable-Feature:Microsoft-Hyper-V
Restart computer when prompted. Note: Windows may perform additional updates one or two more times.


Hyper-V Manager
If you are still experiencing issues running Ubuntu Linux on Windows using VirtualBox because of the Microsoft hypervisor then try host Ubuntu using the Hyper-V Manager. Start | run | Hyper-V Manager.

Next, follow all instructions here to create a Linux virtual machine on Windows 10 using Hyper-V. Verify Hyper-V is supported with systeminfo.exe command and that Hyper-V is enabled via Windows features.

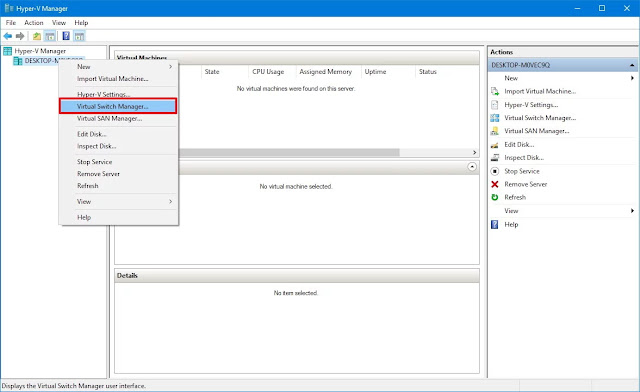
In Hyper-V Manager choose Action menu | Virtual Switch Manager | New virtual network switch | External. Create Virtual Switch e.g. "MyVirtualSwitch". Choose network adapter as External Network | Apply | OK.

Create virtual machine: Action menu | New | Virtual Machine | Ubuntu. Use default location. Use default Generation 1. Choose "MyVirtualSwitch" | Finish. Follow steps as above to complete Ubuntu installation.


Windows Subsystem for Linux
Windows Subsystem for Linux [WSL] is an optional feature in Windows that provides a kernel compatibility layer based on Ubuntu. This layer allows Linux programs to run on a Windows 10 version of the Bash shell.

Determine if your Windows 10 64-bit version supports WSL: Settings | System | About. Version >= 1607. Follow YouTube instructions: Enable Developer Mode via Settings | Update & Security then For developers.

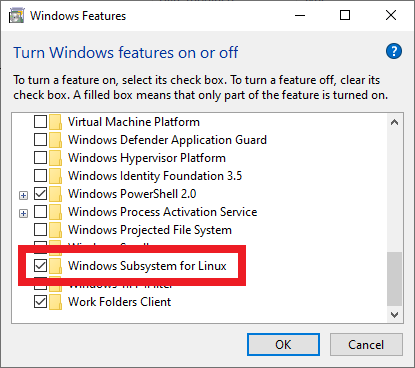
Enable Windows Subsystem for Linux: Control Panel | Programs and Features | Turn Windows features on. Finally, launch Microsoft store. Search for Ubuntu. Install and Launch. Set username and password to begin. From cmd prompt type bash to shell out. Windows files are mapped from /mnt directory thus C:\ => /mnt/c


Mac OS/X
Install Ubuntu Linux on Mac OS/X using VirtualBox. Download VirtualBox and install. Follow all the prompts. Next, follow all instructions here to create the virtual machine to host Ubuntu. Repeat install like Windows!


Setup
This section assumes Ubuntu Linux is installed irrespective of the platform. Now, let's do some basic setup: Login and verify an Internet connection: Settings (top right hand side) | System Settings | Network | Wired.

Resolution
Typically, the initial display will not max out monitor resolution so let's fix that: Show Applications (bottom right) | Settings | Display. Choose resolution that makes sense for monitor size. Use Landscape orientation. In VirtualBox, View menu. Choose Scaled Mode. Drag screen borders to maximize remaining monitor space.

Guest Additions
In order to copy + paste between the host and virtual machine enable Guest Editions. In VirtualBox Devices menu | Insert Guest Additions CD image. Follow all prompts and choose "Y" accordingly. Restart Ubuntu VM.

After installation, choose Ubuntu virtual machine | Settings | General | Advanced. Ensure that both "Shared Clipboard" and "Drag n' Drop" are set to Bidirectional. If this doesn't work then launch Terminal commands:
sudo apt-get update
sudo apt-get install virtualbox-guest-x11

Keyboard
Settings | Region & Language. Choose Language English (US) and Format for keyboard layout that you like. Also, you may switch the Command and Control key if you are on a Mac for consistency. Launch Terminal:
cd /usr/share/X11/xkb/symbols
sudo cp pc pc_bak
sudo gedit pc
key <LCTL> {    [ Super_L       ]   };
key <LWIN> {    [ Control_L     ]   };
key <RCTL> {    [ Super_R       ]   };
key <RWIN> {    [ Control_R     ]   };
sudo rm -rf /var/lib/xkb/*

Shortcuts
Following Keyboard, update Terminal keyboard shortcuts for copy and paste consistency. Launch Terminal menu | Preferences | Shortcuts | Edit. Choose Copy and press Ctrl+C and choose Paste and press Ctrl+V. Also, handy Files Manager shortcuts: Ctrl+D to create [bookmark] link to folder and Ctrl+L to show path.

Applications
Remove any unwanted applications from Favorites. Add any new applications to Favorites accordingly. E.g.: Show Applications | Search "Terminal". Double Terminal to launch. Right click Terminal | Add to Favorites.

Folder Share
In order to share files between the host and virtual machine enable folder share: Show Applications | Files | Other Locations. Connect to Server "smb://host-pc" | Connect. Enter Windows Username and Password and WORKGROUP for Domain. Otherwise, choose Domain as the Local Area Network [LAN] domain accordingly.

Screen Lock
Finally, you may like to disable screen lock for long periods of time. Settings | Privacy | Screen Lock | Off.

IMPORTANT
If, for any reason, changes made don't replicate then it may be necessary to simply restart virtual machine.


Summary
Now that Ubuntu Linux is installed on computer whichever configuration chosen it is time to install software! This will be the topic in the next post.

Saturday, August 31, 2019

3D City Code Complete II

3D City is a simple "Shoot 'em up" video game originally programmed by StevePro Studios in New Zealand January 1988. The game was written using BASIC programming language built against the Sega SC-3000.

In 2016, 3D City was re-written in C / Z80 assembler to target the Sega Master System. In 2018, 3D City was re-written in XNA to celebrate its 30yr anniversary and was ported to Windows [UWP], Android and iOS.

Click here for more information on the classic 8-bit retro version for 3D City on the Sega Master System.
Let's check it out!

IMPORTANT
Simpsons Trivia techniques were used to port 3D City XNA to Windows, Android and iOS using MonoGame.

Create solution in Visual Studio and build the entire game using XNA. Write all game code in an external library to be consumed by multiple thin clients for all destination platforms. Add any experimental clients.
 Alias  Name  Development  Framework  Description  Source Code
 XNA  Windows Game  Visual Studio 2010  XNA 4.0  Game server  Download
 WP7  Windows Phone 7  Visual Studio 2010  XNA 4.0  Game client  Download
 WIN  Windows Project  Visual Studio 2015  MonoGame 3.6  Game client  Download
 AND  Android Project  Visual Studio 2017  MonoGame 3.4  Game client  Download
 IOS  iOS Project  Visual Studio 2017  MonoGame 3.5  Game client  Download
 WP8  Windows Phone 8  Visual Studio 2015  MonoGame 3.6  Game client  Download
 UWP  Windows Universal Project  Visual Studio 2017  MonoGame 3.6  Game client  Download

Publishing
Choose a unique game title, short description and bullet points to be applied consistently across stores.
 Title  Retro 3D City
 Short description  Retro style 80s rails based shooter arcade video game
 Keywords  80s, retro, arcade, video, game
Do you love to blast away innocent fighter ships in an infinite pixelated universe?
If so then this 80s retro style rails based shooter arcade video game is for you!

Use your skill to defeat the relentless attack of the rebel star fighters throughout 18x levels of hyperactive destruction! Two main modes: Easy vs. Hard plus unlimited continues to navigate the continual, high-paced frantic and exhaustive action.


Cheats
  • Press "1988" text bottom right on Splash screen to play secret speed metal music
  • Press the large "3D City" yellow title on the intro screen five times for invincibility
  • Press the small white "-- 3D City --" text in the top middle to go back, quit or exit

Summary
3D City has come along way in 30yrs: from humble beginnings written in BASIC for the Sega SC-3000, to C / Z80 for the Sega Master System and finally re-written again for modern day desktop and mobile platforms.

If you love to blast away innocent fighter ships then grab yourself a free copy on Windows, Android or iOS!

Wednesday, May 1, 2019

Platform Explorer Code Complete

In the old days of Game Creation with XNA, there was a popular Microosft XNA project called "Platformer". This starter kit contained code + content to demo basic game mechanics of a simple platform video game.

Therefore, the "Platformer" starter kit seemed a good candidate project to port to the Sega Master System. Enter Platform Explorer!

Inspired from previous posts on Sega Console Programming and devkitSMS Programming Setup, Platform Explorer is my fourth 8-bit video game written in C / Z80 assembler to target Sega Master System (SMS). Let's check it out!

Note: previous titles published for the Master System include 3D City, Candy Kid Demo + Simpsons Trivia.
Download source code here.

Sega Retro Gaming post documents how to play video games like Platform Explorer using a Fusion emulator.
devkitSMS Programming Setup post documents development environment required to build C / Z80 source.

Instructions
Simple: move joystick Left or Right to run and Button1 to jump. Avoid all enemies + guards and watch out for the pits! After feedback from the community, you can now choose game speed as Slow [motion] or Fast.

After the third iteration, the first 10x levels are Tutorial and the currently remaining 40x levels are available "New Game". There is capacity for 80-100 levels. Please let me know if you'd like to design some levels J

Tools
Here is a list of Tools and frameworks that were used in the development of this project:
 KEY  VALUE
 Programming  devkitSMS
 Compiler  sdcc 3.6
 Assembler  WLA-DX
 IDE  Visual Studio 2015
 Languages  C / Z80
 Graphics  BMP2Tile 0.43 / GIMP 2 / paint.net
 Music  Mod2PSG2 / vgm2psg
 Emulators  Emulicious / Fusion / Meka

ROM Hacking
You can hack this ROM! Download + dump PlatformExplorer into Hex Editor, e.g. HxD, and modify bytes:
 ADDRESS  VARIABLE  DESCRIPTION
 0x004F  DelaySpeed  Used during dev disables screen delays.
 0x0050  Invincible  Non-zero value enables auto invincible.
 0x0051  Difficulty  Set value to 1=Hard otherwise use Easy.
 0x0052  Game Speed  Set value to 1=Slow otherwise use Fast.
 0x0053  World No.  Set start world no to zero-based value.
 0x0054  Round No.  Set start round no to zero-based value.
 0x0055  Music Off  Set 0=music to play otherwise disabled.
 0x0056  Sound Off  Set 0=sound to play otherwise disabled.
 0x0057  Enemy move  Set value non-zero to disable movement.

Bonuses
  • Player will receive free man for every 20x gems collected during game.
  • Player will also receive bonus 5x gems on collecting all gems in level.

Cheats
  • Press Button2 five times on Start screen and you will be invincible each game this is actioned.
  • Press Button2 three times while holding down on Difficulty screen to navigate to select screen.
  • Press and hold Button2 during game play to reset player to original starting spot in each level.
  • Press and hold Button2 while holding down to secretly quit out game back to the Start screen.

Credits
Extra special thanks goes to sverx for the devkitSMS. Plus StevePro Studios would like to thank eruiz00 and haroldoop for sharing source code from SMS Homebrew projects. Many ideas here were used in this project!

Homebrew
The Homebrew community at SMS Power celebrates Sega 8-bit preservation and fanaticism each year with its annual competitions. Therefore, this is always an opportunity to participate by entering these games!

Platform Explorer presented the challenge of reverse engineering the original Platformer starter kit code written for a more modern CPU with floating point functionality and run on an 8-bit system with no FPU!

Thankfully, "Writing a platformer for the TIC-80 fantasy console" blog post was available and helped to build more optimized code by pre-calculating physics velocity + acceleration and caching in integer lookup tables.

Promotion
A simple video was made to promote this game. But a special mention must go out ARCADE MAN for all his work producing some amazing videos for the Coding and Hack entries in the SMS Power! 2019 Competition.

Summary
To summarize, the 2019 Coding Competition featured fewer entries than last year as opposed to the Hacks. The quality of the hacks in 2019 was really high and actually scored higher than coding competition entries!

The hacks are mainly based around the KiddEd editor. Explanations about how to use editor are found here: Create an IPS patch in editor. Download "Alex Kidd in Miracle World" ROM and use Lunar IPS to patch ROM.

This video tutorial demos how to patch ROMs with IPS patches. Maybe something to try for a future project!

Sunday, April 28, 2019

devkitSMS Programming Sample III

In 2017, we checked out devkitsms to setup productive development environment to build 8-bit retro video games for the Sega Master System. In 2018, we streamlined this build process to develop Simpsons Trivia.

However, as projects became larger they seemed longer to build. Plus it didn't seem possible to debug step through C source code. Look for opportunities to improve the process further as we build Platform Explorer! Let's check it out!

Game
Platform Explorer is an open source port of the XNA Platform starter kit for the Sega Master System. This video game was also an entry in the SMS Power! 2019 Coding Competition. Download source code here.

Software
Follow all instructions from the previous post: this documents how to setup the pre-requisite software.
Note: ensure you have downloaded and installed the devkitSMS and Small Device C Compiler [SDCC].

Checklist
Here is a checklist of tasks to complete in order to try and improve the existing development environment:
  • Graphics changes and BMP2Tile update
  • Visual Studio 2015 upgrade and setup
  • Code file separation and build times
  • Various code architectural updates
  • Debug step through code support
  • Performance tweaks then polish

Graphics
Previous work on SMS graphics progressed from MS Paint to Gimp to use Indexed mode with max 16 colors to conform to the 4bpp (bits per pixel) constraints. However, this was only with 256x192 full screen images.

Now, we would like to save multiple individual image files, for example, for sprite animations and share the color palette such that it can be used across all relevant tiles. Therefore, here is how to import the palette:

Launch Gimp | Open an image you would like the palette shared. Image | Mode | Indexed to generate the 16 color palette (4bpp). Windows | Dockable dialogs | Palettes. Right click list and enter the following info:
Now there will new custom 4bpp 16-color palette at %USERPROFILE%\.gimp-2.8\palettes. Finally, extend previous process after Image | Mode | Indexed choose Colors | Map | Set Colormap... Palette: Platformer.

BMP2Tile
Upgrade to Version 0.43 for -fullpalette option to Output 16 colors rather than as many present in image.
bmp2tile.exe raw\back_tiles.bmp -savetiles "back_tiles (tiles).psgcompr" -noremovedupes -planar -tileoffset 0 -exit
bmp2tile.exe raw\back_tiles.bmp -savetilemap "back_tiles (tilemap).bin" -exit
bmp2tile.exe raw\back_tiles.bmp -savepalette "back_tiles (palette).bin" -fullpalette -exit

Visual Studio
In 2017, we were inspired by this suggestion to use Visual Studio as an IDE to better navigate files in larger projects and help automate the development build system. Now it is time to upgrade from VS2008 to 2015.

The motivation here assumes a point where it is difficult / impossible to use Visual Studio 2008 on Windows PC. Plus Visual Studio 2015 has a cool feature to easily Toggle Header / Code files for increased productivity. Replicate all instructions here: Setup External Tools to integrate the build process directly from within Visual Studio and connect "Run Batch File" command to Ctrl+1 hot key and automatically build and execute code!

Formatting
Formatting is important because formatted code makes it easier to read, understand, maintain and debug. Visual Studio 2015. Tools menu | Options... | Text Editor | C/C++ | Formatting | Spacing. Update settings:

Setup
Create folder C:\PlatformExplorerSMS. Create the following sub-folders: asm, crt0, dev, gfx, lib, psg, tmp. Note: tmp sub-folder contains dummy PSGlib.h and SMSlib.h header files used for debugging - more soon. IMPORTANT: more information on which files reside in sub-folders and why can be found at here and here.

Separation
As projects became larger they seemed longer to build. Traditionally, this has been because all the code has been spread across multiple header files and with only 1x main.c which forces a complete rebuild each time.

Therefore, in an attempt to improve build compile times, we'd like to separate interface from implementation code: keep header files lean with goal that static code in translation units need not be constantly recompiled!

Note: here object files would have to be version controlled and build script may change during development.

Timing
In order to test hypothesis that separating code improves compilation speed then record build script times:
:: Calculate the start timestamp
set _time=%time: =0%
set /a _hours=100%_time:~0,2%%%100,_min=100%_time:~3,2%%%100,_sec=100%_time:~6,2%%%100,_cs=%_time:~9,2%
set /a _started=_hours*60*60*100+_min*60*100+_sec*100+_cs

sdcc -c -mz80 --opt-code-speed --peep-file ..\peep-rules.txt --std-c99 _sms_manager.c
sdcc -c -mz80 --opt-code-speed --peep-file ..\peep-rules.txt --std-c99 _snd_manager.c
sdcc -c -mz80 --opt-code-speed --peep-file ..\peep-rules.txt --std-c99 global_manager.c
sdcc -c -mz80 --opt-code-speed --peep-file ..\peep-rules.txt --std-c99 debug_manager.c
sdcc -c -mz80 --opt-code-speed --peep-file ..\peep-rules.txt --std-c99 hack_manager.c
:: continue compiling remaining implementation [*.c] files

sdcc -c -mz80 --opt-code-speed --peep-file peep-rules.txt --std-c99 main.c

:: Calculate the difference in cSeconds
set _time=%time: =0%
set /a _hours=100%_time:~0,2%%%100,_min=100%_time:~3,2%%%100,_sec=100%_time:~6,2%%%100,_cs=%_time:~9,2%
set /a _duration=_hours*60*60*100+_min*60*100+_sec*100+_cs-_started

:: Populate variables for rendering (100+ needed for padding)
set /a _hours=_duration/60/60/100,_min=100+_duration/60/100%%60,_sec=100+(_duration/100%%60%%60),_cs=100+_duration%%100

echo.
echo Time taken: %_sec:~-2%.%_cs:~-2% secs
echo

Coding
The following coding changes + enhancements have been made throughout Platform Explorer development:

devkitSMS
The original SMSlib.h and PSGlib.h header files do not seem to have include guard clauses which means they can't be included more than once so let's create wrappers for them. In fact, this is beneficial for debugging.
// _sms_manager.h
#ifndef _SMS_MANAGER_H_
#define _SMS_MANAGER_H_

void devkit_SMS_init();
void devkit_SMS_displayOn();
void devkit_SMS_displayOff();
void devkit_SMS_mapROMBank( unsigned char n );
// ...

// input
unsigned int devkit_SMS_getKeysStatus();
unsigned int devkit_PORT_A_KEY_UP();
unsigned int devkit_PORT_A_KEY_DOWN();
// ...
unsigned int devkit_PORT_A_KEY_1();
unsigned int devkit_PORT_A_KEY_2();

// #defines
unsigned char devkit_SPRITEMODE_NORMAL();
unsigned int devkit_VDPFEATURE_HIDEFIRSTCOL();

#endif//_SMS_MANAGER_H_
Note: repeat this process for PSGlib.h. Also, don't forget to upgrade PSGlib to include PSGResume() API.

Screen
As projects get larger there will be more screens. Therefore, refactor and channel through screen manager:
// screen_manager.c
#include "screen_manager.h"
#include "global_manager.h"
#include "enum_manager.h"

// Screens
#include "splash_screen.h"
#include "intro_screen.h"
// ...
#include "over_screen.h"

static void( *load_method[ MAX_SCREEENS ] )( );
static void( *update_method[ MAX_SCREEENS ] )( unsigned char *screen_type );

static unsigned char curr_screen_type;
static unsigned char next_screen_type;

void engine_screen_manager_init( unsigned char open_screen_type )
{
  next_screen_type = open_screen_type;
  curr_screen_type = screen_type_none;

  // Set load methods.
  load_method[ screen_type_splash ] = screen_splash_screen_load;
  load_method[ screen_type_intro ] = screen_intro_screen_load;
  // ...
}

void engine_screen_manager_update()
{
  if( curr_screen_type != next_screen_type )
  {
    curr_screen_type = next_screen_type;
    load_method[ curr_screen_type ]();
  }

  update_method[ curr_screen_type ]( &next_screen_type );
}

Input
Remove previous + current input state that was injected into methods and channel through input manager:
// input_manager.c
#include "input_manager.h"
#include "_sms_manager.h"

// Must be static to persist values!
static unsigned int curr_joypad1 = 0;
static unsigned int prev_joypad1 = 0;

// Private helper methods.
static unsigned char engine_input_manager_hold( unsigned int data );
static unsigned char engine_input_manager_move( unsigned int data );

// Public method.
void engine_input_manager_update()
{
  prev_joypad1 = curr_joypad1;
  curr_joypad1 = devkit_SMS_getKeysStatus();
}

// main.c
for (;;)
{
  if( devkit_SMS_queryPauseRequested() )
  {
    // ...
  }

  devkit_SMS_initSprites();
  engine_input_manager_update();
  engine_screen_manager_update();

  devkit_SMS_finalizeSprites();
  devkit_SMS_waitForVBlank();
  devkit_SMS_copySpritestoSAT();

  devkit_PSGFrame();
  devkit_PSGSFXFrame();
}

Banks
In 2017, Astro Force by eruiz00 gave a great example on how to reference bank information generated from bmp2tile and folder2c in code to lookup data stored in arrays, for example, to load banked sprite animation:
// anim_object.h
extern const unsigned char *player_anim_data[];
extern const unsigned char player_anim_bank[];

//anim_object.c
#include "anim_object.h"
#include "..\banks\bank2.h"

const unsigned char *player_anim_data[] =
{
  player_idle__tiles__psgcompr,
  player_run_left_01__tiles__psgcompr,
  player_run_left_02__tiles__psgcompr,
  // ...
  player_run_rght_04__tiles__psgcompr,
  player_run_rght_05__tiles__psgcompr,
};
const unsigned char player_anim_bank[] =
{
  player_idle__tiles__psgcompr_bank,
  player_run_left_01__tiles__psgcompr_bank,
  player_run_left_02__tiles__psgcompr_bank,
  // ...
  player_run_rght_04__tiles__psgcompr_bank,
  player_run_rght_05__tiles__psgcompr_bank,
};

// anim_manager.c
static void player_load( unsigned char index, unsigned int tile )
{
  const unsigned char *data = ( const unsigned char * ) player_anim_data[ index ];
  const unsigned char bank = ( const unsigned char ) player_anim_bank[ index ];

  devkit_SMS_mapROMBank( bank );
  devkit_SMS_loadPSGaidencompressedTiles( data, tile );
}

Levels
In 2018, Duckslayer Adventures by haroldoop gave a great example of how levels could be stored externally in text files then converted into byte arrays using folder2c. The byte arrays are then interpreted for drawing:
 KEY  VALUE
 .  Blank
 #  Block
 @  Platform
 $  Optional
 1  Player
 X  Exit
 G  Gem
 P  Power
  // Level0101
  ................
  .P..............
  .@@...........@@
  ..........A.....
  ..G...$@@@@....G
  .@@...........@@
  ................
  .G............G.
  .@@...........@@
  .@@.1.......X.@@
  .####$$$$$$#####
  ..###$$$$$$####.

Structs
Finally, as seen in many code samples from haroldoop, structs are used extensively to store data especially data accessed globally throughout the code base. Platform Explorer uses this idea coupled with "manager":
// hack_object.h
typedef struct tag_struct_hack_object
{
  unsigned char hack_delayspeed;
  unsigned char hack_invincible;
  unsigned char hack_difficulty;
  unsigned char hack_game_speed;

} struct_hack_object;

 
// hack_manager.h
#include "hack_object.h"

void engine_hack_manager_init();
extern struct_hack_object global_hack_object;


// hack_manager.c
#include "hack_manager.h"
#include "global_manager.h"
#include "enum_manager.h"

#define PEEK( addr)        (* ( unsigned char *)( addr ) )
#define POKE( addr, data ) (* ( unsigned char *)( addr ) = ( data ) )

#define HACKER_START       0x0050

// Global variable.
struct_hack_object global_hack_object;

void engine_hack_manager_init()
{
  struct_hack_object *ho = &global_hack_object;
  ho->hack_delayspeed = 0;
  ho->hack_invincible = 0;
  ho->hack_difficulty = 0;
  ho->hack_game_speed = 0;

#ifndef _CONSOLE
  ho->hack_delayspeed = PEEK( HACKER_START - 1 );
  ho->hack_invincible = PEEK( HACKER_START + 0 );
  ho->hack_difficulty = PEEK( HACKER_START + 1 );
  ho->hack_game_speed = PEEK( HACKER_START + 2 );
#endif
}

Debugging
Visual Studio is useful IDE for navigating a large code base. However, as the game code currently targets SDCC compiler it does not seem possible to debug step through the devkitSMS specific API source calls.

Nonetheless, leverage the _CONSOLE conditional compilation statement and implement the following code. Here, it is possible to debug step through all ANSI-C code at least trusting devkitSMS code works correctly.
// _sms_manager.c
#include "_sms_manager.h"
#include "info_manager.h"
#include <stdbool.h>

#ifdef _CONSOLE
#include "..\..\tmp\SMSlib.h"
#else
#include "..\..\lib\SMSlib.h"
#endif

void devkit_SMS_init()
{
  SMS_init();
}
void devkit_SMS_displayOn()
{
  SMS_displayOn();
}
void devkit_SMS_displayOff()
{
  SMS_displayOff();
}
void devkit_SMS_mapROMBank( unsigned char n )
{
  SMS_mapROMBank( n );
}
// ...

// Sega header.
#ifdef _CONSOLE
#else
  SMS_EMBED_SEGA_ROM_HEADER( productCode, revision );
  SMS_EMBED_SDSC_HEADER( verMaj, verMin, dateYear, dateMonth, dateDay, author, name, descr );
#endif
Remember: tmp sub-folder contains dummy PSGlib.h and SMSlib.h header files that facilitate debugging.

Performance
In order to process collision detections in Platformers, it is commonplace to take the absolute value of the distance of two points + use for comparison. Unfortunately, there was noticeable delay with this function:
int abs( int v )
{
  return v * ( ( v < 0 ) * ( -1 ) + ( v > 0 ) );
}
After examining code this function invoked multiple times per frame it was clear that abs() could be replaced with simple if statement. Being able to debug step through C code helped ensure this still worked as before!

Polish
Also, as projects become larger, more content is required. Therefore, to ensure polish throughout the game it was critical that the VRAM was cleared properly between large graphic content loads to avoid any glitches.
// intro_screen.c
void screen_intro_screen_load()
{
  // Unload VRAM each begin to remove any unwanted graphics glitches...!
  devkit_SMS_displayOff();
  engine_asm_manager_clear_VRAM();
  engine_text_manager_clear_all();

  engine_content_manager_load_back_tiles();
  engine_content_manager_load_sprites();
  engine_content_manager_load_title();
  // ...
  devkit_SMS_displayOn();
}
Deployment
Finally, a big shout out to Calindro who helped deploy updated versions of Platform Explorer during the competition + for outlining is always better to stick with Power of 2 ROM sizes for compatibility reasons.

Summary
To summarize, once again the SMS Power! community has been awesome and by members sharing their code this has helped immensely with Platform Explorer doing so well in the 2019 Coding Competition J