Now both Google and Apple require apps + games be 64-bit compliant. Apple will stop support for 32-bit on iOS 11.0. Plus, Google require updates on Google Play to target minimum Android 9 (API level 28) or higher.
All these factors mandate upgrades to our mobile games to be rebuilt using latest version of MonoGame 3.7.

Let's check it out!
TL;DR
Too Long; Didn't Read
- Install all pre-requisite software on Windows + Mac. Check for updates to get latest dependencies
- Launch Android + iOS projects. Update all settings to increment build version numbers and codes
- Rebuild + upload the updated binaries to relevant online stores then tag all archived source code
Pre-Requisites
Reference previous instructions for Android and iOS ports. This post assumes software already published. Install the following software on Windows and Mac. Install "Mobile development with .NET" for Xamarin.
| Windows [Android] | Mac Os/X [iOS] |
|
|
IMPORTANT
If, for any reason, there are issues updating any IDEs mentioned here then simply Run as Administrator.
Pipeline
Previous posts used older versions of MonoGame which meant the Content Pipeline was arguably not built correctly. Upgrade to MonoGame 3.7 and build the Content Pipeline correctly using the Content.mgcb file.
Launch the MonoGame Pipeline tool. Navigate to project Content folder. Open Content.mgcb. Click Content root node. Under Properties select relevant Platform. Create following folders and add content accordingly:
Data
Import any ASCII text files or XML configuration files. Set the Build Action in the Properties section to Copy.
Fonts
Typically import pre-built XNB binary files from previous games e.g. Emulogic.xnb. Set Build Action to Copy. However, if you create custom spritefont files copy the TTF file also otherwise "Could not find font file" error.
Sound
Import all music and sound effects as MP3. Some WAV files sounded strange as built sound effects. Convert WAV files to MP3. Set Build Action to Build. Set Processor to Song for music otherwise set to Sound Effect.
Textures
Import all 2D images as PNG. Some JPG files rendered strange as built textures. Convert JPG files to PNG. Also, convert BMP files to PNG. Set Build Action to Build. Set Processor to Texture for all imported images.
On November 1, 2019 apps + games on Google Play required to target Android 9 (API level 28) or higher. After this date, Google Play Console will prevent any APK updates submitted with targetSdkVersion < 28.
Therefore, install Android 9 (API level 28) or higher. Launch Android Studio. File | Settings... | Appearance and Behavior | System Settings | Android SDK. Note default location may be different from Visual Studio:
| Android Studio | %USERPROFILE%\AppData\Local\Android\Sdk |
| Visual Studio [VS] | C:\Program Files (x86)\Android\android-sdk |
Actually, it may be easier to align Android SDK location in Android Studio to that of Visual Studio because all Android game code will be built using MonoGame from Visual Studio. Therefore, update Android SDK path:
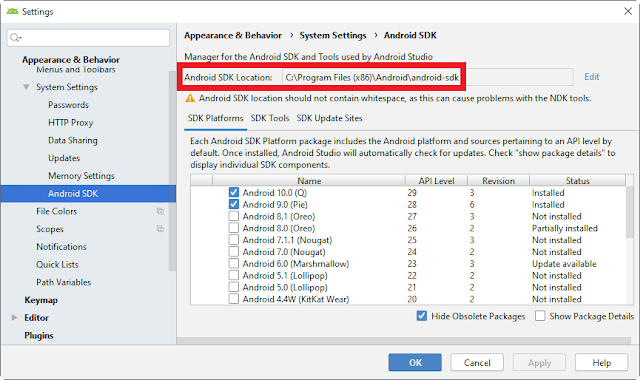
Ensure SDK Tools are also installed. Verify SDK Platforms installed in "platforms" sub-folder and SDK Tools installed in "build-tools". Finally, add "platform-tools" folder to System %PATH% to use adb at cmd prompt.
Upgrade
Currently VS2019 does not include MonoGame project templates. Therefore, launch VS2017 and create new MonoGame Android project e.g. 3D City. Close and re-open in VS2019. The benefits to be explained shortly.
Assume previous version 3D City 1.0.0 already exists on Google Play. Import existing content per previous build under the Content folder as explained above. Import existing code. Right click project and Properties:
Application
Compile using Android version (Target Framework). Choose Android 9.0 (Pie) as minimum Android version.
Application Manifest
| Key | Value | Element | Attribute |
| Application name | 3D City | application | android:label |
| Package name | com.steveproxna.x3dcity | manifest | package |
| Application icon | @drawable/Icon | application | android:icon |
| Version number | 2 | manifest | android:versionCode |
| Version name | 1.1.0 | manifest | android:versionName |
| Minimum Android version | Android 9.0 (API Level 28 - Pie) | uses-sdk | android:minSdkVersion |
| Target Android version | Android 9.0 (API Level 28 - Pie) | uses-sdk | android:targetSdkVersion |
AndroidManifest.xml
<?xml version="1.0" encoding="utf-8"?>
<manifest package="com.steveproxna.x3dcity" android:versionCode="2" android:versionName="1.1.0">
  <uses-sdk android:minSdkVersion="28" android:targetSdkVersion="28" /">
  <application android:label="3D City" android:icon="@drawable/Icon">
    <meta-data android:name="android.max_aspect" android:value="2.1" />
  </application>
</manifest>
Application Options
Click the Advanced button. Target the following 2x Supported architectures: armeabi-v7a and arm64-v8a.
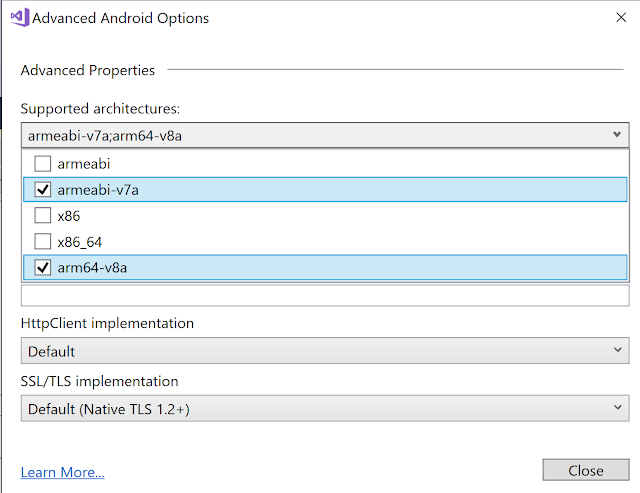
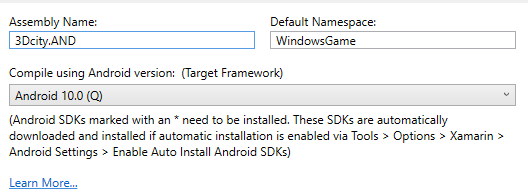
Currenlty, Android 10.0 (Q) is available although this API level 29 seems to be missing from Visual Studio Tools menu | Android | Android SDK Manager. However, here is a workaround to circumvent the problem:
Launch Android Studio. Install Android 10 (API level 29) as above. Ensure android-29 exists in Android SDK "platforms" folder and 29.0.2 in "build-tools". Launch Visual Studio 2019. Update Android version in project:
Upload
Launch VS2019. Open MonoGame Android project. Attach Android device. Select Release build configuration. Clean and rebuild solution. Right click project | Archive... After the archive is generated choose Distribute...
Ad Hoc
Select distribution channel: Ad Hoc. Select Signing Identity or Create Android Keystore. Save APK. Enter the password. Open Folder. Navigate to "signed-apks" subfolder. Here is the signed APK that can be installed:
# Start | run | cmd
# cd signed-apks
# adb devices
adb install -f *.apk
Google Play
Select distribution channel: Google Play. Select Signing Identity. Continue. Click "+". Login to Google Play | Settings | API access. Select existing OAuth client. Download JSON and extract the Client ID + Secret here:

TROUBLESHOOTING
If you receive any of the following 403 errors while attempting to upload latest Android build then read on:
This release is not compliant with the Google Play 64-bit requirement
This can occur if you have not selected arm64-v8a in the Android project properties Application Options. If after selecting arm64-v8a you receive NoAudioHardwareException then must upgrade MonoGame to 3.7.1.
The apk must be signed with the same certificates as the previous version
This can occur when you have signed previous Android build using keystore typically on different computer. Export Android keystore as needed and ensure critical information like keystore alias and password are safe.
Here is a good overall guide for finding the Android keystore. Below is quick summary for all configurations:
| Windows | %USERPROFILE%\AppData\Local\Xamarin\Mono for Android\Keystore\alias\alias.keystore |
| Mac OS/X | $HOME/Library/Developer/Xamarin/Keystore/alias/alias.keystore |
Don’t forget to backup your keystore file! Here is how to retrieve the alias and do not forget the password:
# Search for Alias name in the output from the following command
cd %USERPROFILE%\AppData\Local\Xamarin\Mono for Android\Keystore\alias
keytool -list -v -keystore alias.keystore
Apple
Apple will stop support for 32-bit apps on iOS 11.0. Therefore, any 32-bit apps will need to be upgraded to 64-bit. Also, Apple may require paid apps be upgraded within every two years to remain on the App Store.
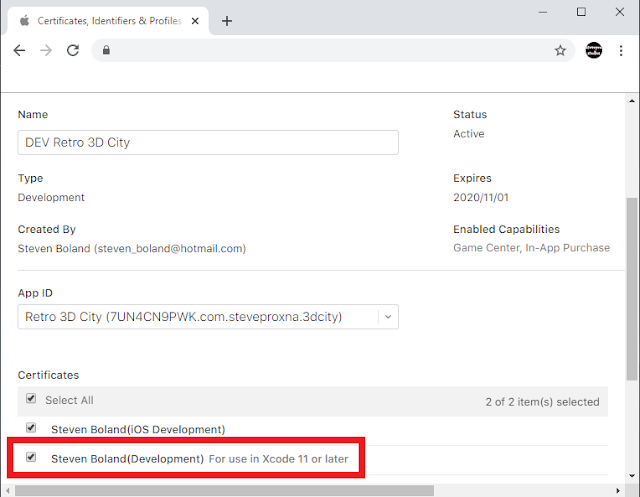
Sign in developer.apple.com. Ensure all developer provisioning profiles use certificates for Xcode 11 or later:
Upgrade
Currently VS2019 does not include MonoGame project templates. Therefore, launch VS2017 and create new MonoGame iOS project e.g. 3D City. However, do NOT click "Pair to Mac" here because you may be prompted to install Mono version incompatible with this version of Visual Studio. Instead, close and re-open in VS2019.
Assume previous version 3D City 1.0.0 already exists on the App Store. Import existing content per previous build under the Content folder as explained above. Import existing code. Right click project and Properties:
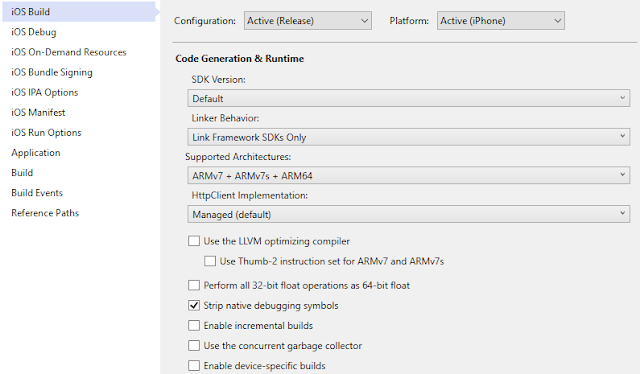
Info.plist
| CFBundleName | 3D City |
| CFBundleDisplayName | 3D City |
| CFBundleIdentifier | com.steveproxna.3dcity |
| CFBundleVersion | 1.1.0 |
| CFBundleShortVersionString | 1.1 |
| MinimumOSVersion | 7.0 |
| UISupportedInterfaceOrientations | UIInterfaceOrientationLandscapeLeft |
| UIStatusBarHidden | true |
| UIRequiresFullScreen | true |
| UIDeviceFamily | 1, 2 |
| XSAppIconAssets | Assets.xcassets/AppIcon.appiconset |
IMPORTANT
Currently there seems to be inconsistency with AppIcon assets creation on Windows and Mac. Therefore, launch MonoGame iOS project in Visual Studio for Mac. Open Info.plist | Click "Use Asset Catalog" here.
This action creates the AppIcon.appiconset under Assets.xcassets folder whereas Windows creates under Media.xcassets which means App icon may not appear on iOS device! Also, ensure Content.json is correct.
Upload
Launch Visual Studio for Mac. Open MonoGame iOS project. Attach iOS device. Select Release configuration. Clean and rebuild solution. Right click project | Archive for Publishing. After the archive is generated choose Sign and Distribute...
Ad Hoc
Select distribution channel: Ad Hoc. Choose provisioning profile | Publish | Save IPA file | Reveal in Finder. Launch Xcode | Window | Devices + Simulators. Select iOS device. Click "+". Navigate and open IPA file.
App Store
Launch browser. Sign in to iTunes Connect. Select published app e.g. 3D City. Click "+" Version or Platform. Choose iOS. Enter new Store Version Number | Create. Enter "What's New in this Version" text. Save data.
Sign in Apple ID web site. In Security section under "APP-SPECIFIC PASSWORDS" click "Generate Password". In the popup window enter, for example "3DCity" | Create. Apple will generate a new app specific password.
Select distribution channel: App Store | Upload. Choose provisioning profile. Enter Apple ID and App Specific Password. Next | Publish. Choose file name | Save IPA. This process should upload build to iTunes Connect.
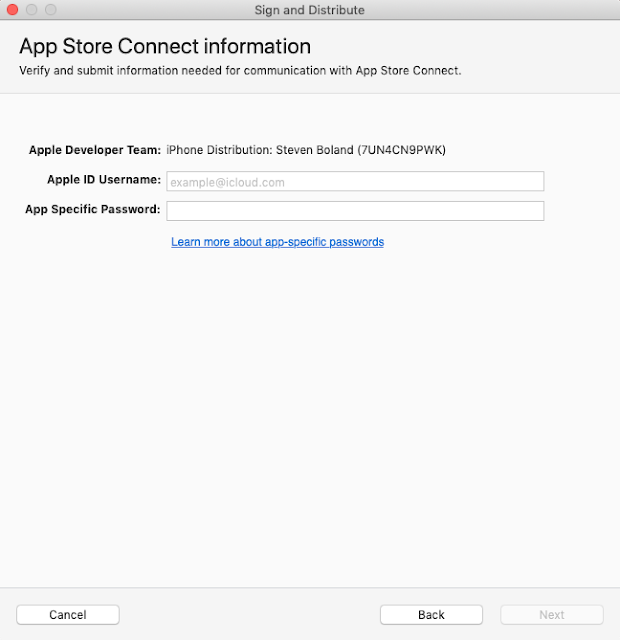
Finally once build has completed processing select it in iTunes Connect. Save. Complete following questions:
| Export Compliance Have you added or made changes to encryption features since your last submission of this app? |
NO |
| Advertising Identifier Does this app use the Advertising Identifier (IDFA)? |
NO |
IMPORTANT
If you receive Publishing Failed error "Invalid Toolchain: You app was built with unsupported version of Xcode or SDK" then you must upgrade to Xcode 11.2.1 because Apple deprecated Xcode 11.2 after Nov 5th 2019.
Right click MonoGame iOS project | Archive... | App Store | Save IPA file. Upload on Mac Application Loader:
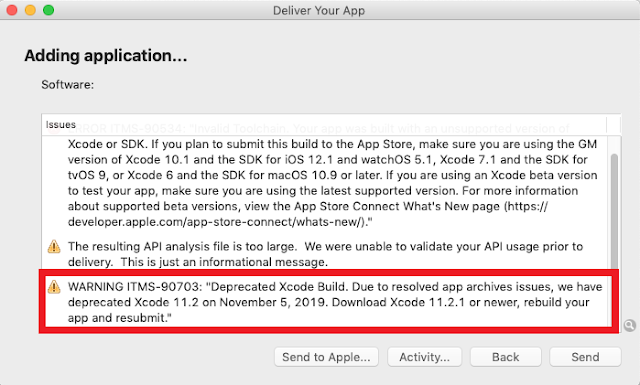
Also, if you receive Publishing Failed error "Failed to parse PList data type" then simply increment the build version number CFBundleVersion in Info.plist. Align project properties. Rebuild and upload to iTunes again.
TROUBLESHOOTING
If you receive any of the following crashes while attempting to run latest iOS build on device then read on:
Got a SIGABRT while executing native code. This usually indicates a fatal error in the mono runtime used
For some strange reason the following code with IDictionary<Byte, T> worked previously but now crashes. Fortunately, there is a workaround to this issue: simply use the Int16 type as the key instead of type Byte.
// This code will crash on iOS device!
private IDictionary<Byte, Vector2> BasePositions { get; private set; }
private IDictionary<Byte, Rectangle> BasePositions { get; private set; }

// This code will work without crash.
private IDictionary<Int16, Vector2> BasePositions { get; private set; }
private IDictionary<Int16, Rectangle> BasePositions { get; private set; }
Microsoft.Xna.Framework.Content.ContentLoadException: 'The content file was not found.'
This general exception can occur when MonoGame project has not built the Content as described above i.e. New MonoGame project using version 3.7. Open Content.mgcb. Add all content relative to this content file.
Also, I believe it helps to fully qualify Content path and remove default code to set Content RootDirectory:
// Delete or comment out default code.
// Content.RootDirectory = "Content";
// Fully qualify path to load content e.g. Image.png
Texture2D image = Content.Load("Content/Textures/Image");
Summary
To summarize, all games built in the past using MonoGame were 2D. However, now that all frameworks tools and dependencies are upgraded with latest MonoGame installed using correct build pipeline then we are in a good position to assemble 3D graphics and games on Windows deployed to Android and iOS cross platform!


No comments:
Post a Comment