
As an example, we wrote the main loop of a simple "Shoot 'em up" game that simply moves a target sprite around the screen based on user input; preferably the joystick.
However, a machine code program suffers from the disadvantage that it is tedious and cumbersome to manually translate each mnemonic to the corresponding opcode plus calculate all jump relative offsets.
This can be resolved by using assembly language and an assembler to generate machine code routines. Goal: write performance intensive code in assembly language directly and generate the machine code.
Setup
Follow all instructions from previous post to get setup with Sega programming before continuing.
Launch Sega BASIC Level 3 ROM, that is, double click Sega BASIC Level 3 V1 (SC-3000) [b1].sc.
Activate keyboard to begin typing: Inputs menu, Sega Keyboard. Next, open the Memory Editor:
|
 Note: all machine code generated during this post will commence at 16-bit memory address: &HF000.
Tutorial
Type in the following program. Important: ensure you save state before RUN: Main menu, Save State.
Note: file is stored at C:\PathToMeka\Saves\Sega BASIC Level 3 V1 (SC-3000) [b1].S00
10 CALL &HF000
RUN
The program will crash! There are currently no machine code instructions available at address &HF000. Therefore, install an assembler and write assembly language directly to generate the machine code.
Installation
In this post, we target the Sega SC-3000 hardware: an 8-bit home computer based on the Z80 chip.
There are many assemblers available for the Z80 chip but the Z80 Simulator IDE is one of the best:
|
|
 Open the Assembler: Tools menu, Assembler.
 Create a new assembly file: File menu, New.
Type in the following assembly language:
.ORG    0F000H
        RET
Save the assembly file: File menu, Save As, Hello.asm.
 Generate the machine code: Tools menu, Assemble (F7).
This action will generate 3x new files: Hello.hex, Hello.lst and Hello.obj;
Note: the file that contains the raw binary data is stored in Hello.obj.
Launch the Hex Editor, that is, double click HxD.exe.
 Open the binary file: File menu, Open, Hello.obj.
Goto &HF000: Search menu, Goto, Offset: F000.
 Inspect the 16-bit memory address at F000; the hexadecimal &HC9 is stored there.
In the example, &HC9 in hexadecimal is the opcode for the RET instruction above.
Next, copy machine code generated from the assembly above to be consumed in BASIC program:
Select all machine code generated in Hello.obj, that is, from Block F000-F000 and copy (Ctrl-C).
In the Hex Editor, open the save file: File menu, Open, Sega BASIC Level 3 V1 (SC-3000) [b1].S00.
Goto &H706D: Search menu, Goto, Offset: 706D. Paste (Ctrl-V) machine code there, that is &HC9.

Launch Sega BASIC Level 3 ROM, that is, double click Sega BASIC Level 3 V1 (SC-3000) [b1].sc.
Next, load file that was modified above to save machine code into RAM: Main menu, Load State.
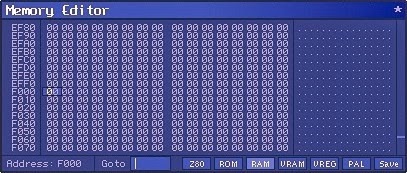
Activate keyboard to begin typing: Inputs menu, Sega Keyboard. Next, open the Memory Editor:
|
 Inspect the 16-bit memory address &HF000; the hexadecimal &HC9 will now be stored in RAM there.
Finally, type RUN again. On the surface, nothing appears to happen!
Therefore, check out previous post for machine code fundamentals.
Example
As an example, let's write the main loop of a simple "Shoot 'em up" style game, similar to the previous post, that simply moves a target sprite around the screen based on user input; preferably the joystick.
However, write the main loop in assembly language and generate the machine code routines accordingly.
Sample
The following code sample is reminiscent of the tutorial More on the Joystick and Machine Code Routine.
Follow the tutorial closely to better understand what machine code instructions are required and why.
Type in the following program. Important: ensure you save state before RUN: Main menu, Save State.
Note: file is stored at C:\PathToMeka\Saves\Sega BASIC Level 3 V1 (SC-3000) [b1].S00
10 REM SEGA ASSEMBLY PROGRAMMING
20 GOSUB 300
40 SZ=16:MAG1
60 MR=256-SZ:MD=192-SZ
70 TX=MR/2:TY=MD/2
80 SCREEN 2,2:CLS
90 COLOR,1,(0,0)-(255,191),1
100 REM MAIN LOOP
110 SPRITE 0,(TX,TY),0,9
120 CALL &HF000
130 STOP
300 RESTORE 350
310 FOR S=0 TO 3:READ S$:PATTERN S#S,S$:NEXT S
320 RETURN
350 DATA 000039202100012A, 2A01002120390000
360 DATA 00009C0484008054, 54800084049C0000
RUN
Again, on the surface, nothing appears to happen! Therefore, write the main loop in assembly language:
Launch Z80 Simulator: double click z80simulatoride.exe. Open the Assembler: Tools menu, Assembler.
Create a new assembly file: File menu, New. Type in the following assembly language:
.ORG    0F000H
START:  LD A,9BH
        OUT (0DFH),A
CHECK:  IN A,(0DCH)
        CP 0FFH     ; any movement?
        JR Z,CHECK
LEFT:   CP 0FBH     ; move left?
        JR NZ,RIGHT
        CALL READX
        DEC A
        CALL WRITE
        CALL DELAY
        JR CHECK
RIGHT:  CP 0F7H     ; move right?
        JR NZ,UP
        CALL READX
        INC A
        CALL WRITE
        CALL DELAY
        JR CHECK
UP:     CP 0FEH     ; move up?
        JR NZ,DOWN
        CALL READY
        DEC A
        CALL WRITE
        CALL DELAY
        JR CHECK
DOWN:   CP 0FDH     ; move down?
        JR NZ,SHOOT
        CALL READY
        INC A
        CALL WRITE
        CALL DELAY
        JR CHECK
SHOOT:  CP 0EFH     ; press fire?
        JR NZ,CHECK
        RET
READX:  LD HL,3B01H
        CALL 02C32H
        IN A,(0BEH)
        RET
READY:  LD HL,3B00H
        CALL 02C32H
        IN A,(0BEH)
        RET
WRITE:  CALL 02C44H
        OUT (0BEH),A
        RET
DELAY:  LD A,00H
        LD BC,0300H
LOOP:   DEC BC
        CP B
        JR NZ,LOOP
        JR CHECK
Save the assembly file: File menu, Save As, Code.asm.
 Generate the machine code: Tools menu, Assemble (F7).
This action will generate 3x new files: Code.hex, Code.lst and Code.obj;
Note: the file that contains the raw binary data is stored in Code.obj.
Launch the Hex Editor, that is, double click HxD.exe.
Open the binary file: File menu, Open, Code.obj.
Goto &HF000: Search menu, Goto, Offset: F000.
 Next, copy machine code generated from the assembly above to be consumed in BASIC program:
Select all machine code generated in Code.obj, that is, from Block F000-F071 and copy (Ctrl-C).
In the Hex Editor, open the save file: File menu, Open, Sega BASIC Level 3 V1 (SC-3000) [b1].S00.
Goto &H706D: Search menu, Goto, Offset: 706D. Paste (Ctrl-V) all copied machine code there.

Launch Sega BASIC Level 3 ROM, that is, double click Sega BASIC Level 3 V1 (SC-3000) [b1].sc.
Next, load file that was modified above to save machine code into RAM: Main menu, Load State.
Important: after load file, it may be necessary to soft reset emulator; press the "Scroll lock" key.
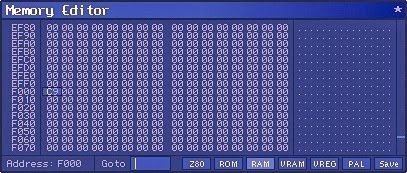
Activate keyboard to begin typing: Inputs menu, Sega Keyboard. Next, open the Memory Editor:
|
 Inspect the 16-bit memory address &HF000; all machine code copied will be now stored in RAM there.
Finally, type RUN again.
The graphics screen clears black and positions a red target sprite. Use the joystick to move target sprite.
Note: de-activate the keyboard to ensure the joystick takes precedence: Inputs menu, Sega Keyboard.
In this example, moving joystick left, right, up, or down moves sprite in that direction. Press fire to quit.
Important: if joystick not configured then try these keys: "J" = left, "M" = right, "7" = up, "U" = down.
 Experiment with different delay speeds at runtime by manipulating memory directly:
Note: original time delay is 0300 but is stored in memory as 00 03 (Little-endian).
|
 For completeness, here is the disassembled machine code from the tutorial in its entirety:
--------------------------------------------------
Z80    DISASSEMBLER     LISTING
Line   Addr Opcodes     Label   Instruction
--------------------------------------------------
0000   0000             .ORG    0F000H
0001   F000 3E 9B       START:  LD A,9BH
0002   F002 D3 DF               OUT (0DFH),A
0003   F004 DB DC       CHECK:  IN A,(0DCH)
0004   F006 FE FF               CP 0FFH  ; any movement?
0005   F008 28 FA               JR Z,CHECK
0006   F00A FE FB       LEFT:   CP 0FBH  ; move left?
0007   F00C 20 0C               JR NZ,RIGHT
0008   F00E CD 4F F0            CALL READX
0009   F011 3D                  DEC A
0010   F012 CD 61 F0            CALL WRITE
0011   F015 CD 67 F0            CALL DELAY
0012   F018 18 EA               JR CHECK
0013   F01A FE F7       RIGHT:  CP 0F7H  ; move right?
0014   F01C 20 0C               JR NZ,UP
0015   F01E CD 4F F0            CALL READX
0016   F021 3C                  INC A
0017   F022 CD 61 F0            CALL WRITE
0018   F025 CD 67 F0            CALL DELAY
0019   F028 18 DA               JR CHECK
0020   F02A FE FE       UP:     CP 0FEH  ; move up?
0021   F02C 20 0C               JR NZ,DOWN
0022   F02E CD 58 F0            CALL READY
0023   F031 3D                  DEC A
0024   F032 CD 61 F0            CALL WRITE
0025   F035 CD 67 F0            CALL DELAY
0026   F038 18 CA               JR CHECK
0027   F03A FE FD       DOWN:   CP 0FDH  ; move down?
0028   F03C 20 0C               JR NZ,SHOOT
0029   F03E CD 58 F0            CALL READY
0030   F041 3C                  INC A
0031   F042 CD 61 F0            CALL WRITE
0032   F045 CD 67 F0            CALL DELAY
0033   F048 18 BA               JR CHECK
0034   F04A FE EF       SHOOT:  CP 0EFH  ; press fire?
0035   F04C 20 B6               JR NZ,CHECK
0036   F04E C9                  RET
0037   F04F 21 01 3B    READX:  LD HL,3B01H
0038   F052 CD 32 2C            CALL 02C32H
0039   F055 DB BE               IN A,(0BEH)
0040   F057 C9                  RET
0041   F058 21 00 3B    READY:  LD HL,3B00H
0042   F05B CD 32 2C            CALL 02C32H
0043   F05E DB BE               IN A,(0BEH)
0044   F060 C9                  RET
0045   F061 CD 44 2C    WRITE:  CALL 02C44H
0046   F064 D3 BE               OUT (0BEH),A
0047   F066 C9                  RET
0048   F067 3E 00       DELAY:  LD A,00H
0049   F069 01 00 03            LD BC,0300H
0050   F06C 0B          LOOP:   DEC BC
0051   F06D B8                  CP B
0052   F06E 20 FC               JR NZ,LOOP
0053   F070 18 92               JR CHECK
Important: machine code programs will crash if there are errors; they are not as forgiving as BASIC. Therefore, ensure you save state before you RUN machine code programs: Main menu, Save State.
Summary
In this post, assembly programming was introduced to generate machine code to target Sega hardware.
However, all assembly programming and machine code written thus far require a BASIC program driver; Cartridge-based video games built for 8-bit Sega Retro Gaming consoles were written in pure assembly!
This can be resolved by using tools to write to SG-1000, SC-3000, and the Sega Master System directly. This will be the topic in the next post.
