Whereas Git: a distributed version control system, unlike most client-server systems, every Git directory is full-fledged repository [repo] complete with history + independent of network access or central server.
Differences like these may be challenging at first. Therefore, let's smooth the transition from SVN to Git:

Let's check it out!
Pre Requisites
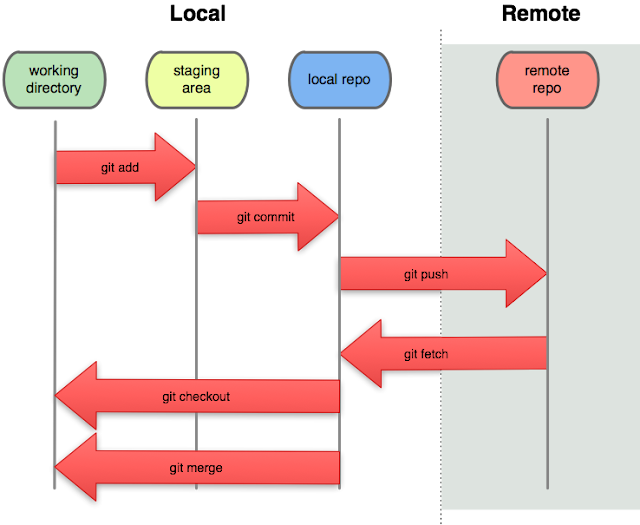
Here are the Atlassian Git tutorials this post makes reference to. Attached is basic diagram for Newbies:
 Note: in the simplest terms, git pull [not pictured] does a git fetch followed by a git merge.
Download Git distributed version control system for Windows or Mac. Setup Git global configuration here:
| Windows | C:\Users\<username>\.gitconfig |
| Mac OS/X | /Users/<username>/.gitconfig |
Here are basic commands to get and set Git global user name and user email throughout all repositories:
| User name |
git config --global --get user.name
git config --global user.name "SteveProXNA" |
| User email |
git config --global --get user.email
git config --global user.email "steven_boland@hotmail.com" |
Git Clients
There are free Git clients available for Windows and Mac such as GitHub Desktop and SourceTree however these show complex branched code which can be overwhelming for Newbies. Let's focus on simpler tools:
| SVN | GIT | |
| Windows | TortoiseSVN | TortoiseGit |
| Mac OS/X | svnx | Gitbox |
IMPORTANT:
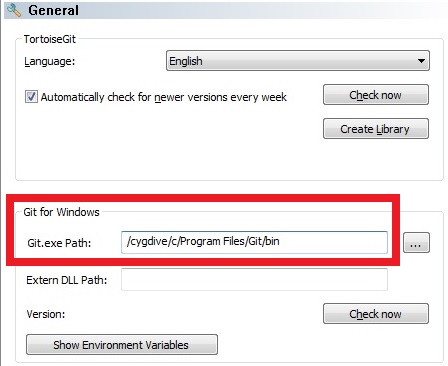
If you have Cygwin installed on Windows then ensure TortoiseGit settings do NOT use Unix Git.exe Path:

GitHub
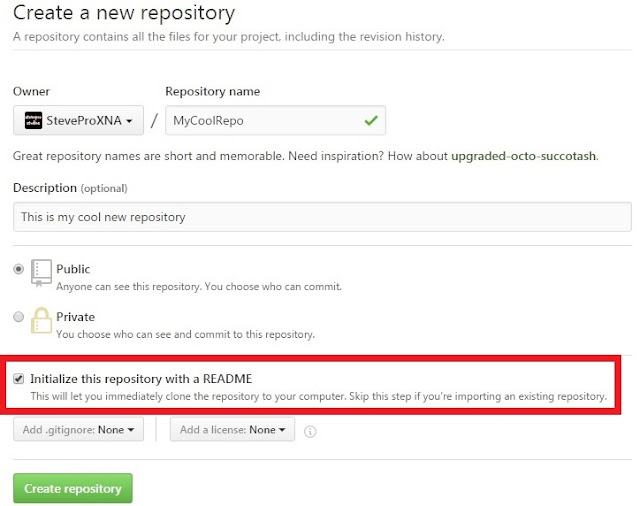
Create an account on github.com if you have not already done so. Read the guide is another good start. Choose Start a Project | Enter the name of your new repo e.g. "MyCoolRepo" and initialize with README:
 Launch command prompt. Type 3x variants of following git clone command to checkout local repository:
git clone https://github.com/SteveProXNA/MyCoolRepo.git MyCoolRepo
git clone https://<username>@github.com/SteveProXNA/MyCoolRepo.git MyCoolRepo
git clone https://<username>:<password>@github.com/SteveProXNA/MyCoolRepo.git MyCoolRepo
As a convenience, cloning automatically creates a remote connection called origin pointing back to the original repository. This makes it easier to interact with the repository. Also, default branch is master.
repo   local    master
repo   remote   origin/master
When you push to origin/master [remote] you will be prompted with whatever credentials are required. Note: here all git clone repos are done via https protocol. Checkout here for SSH git clone repo setup.
Configure current user name and email for repo activity, especially if you have multiple Github accounts:
| User name | git config --get user.name | git config user.name "SteveProXNA" |
| User email | git config --get user.email | git config user.email "steven_boland@hotmail.com" |
Note: local Git repo information can be found in hidden .git folder at root level where repository is cloned:
| Windows | C:\Users\<username>\GitHub\SteveProXNA\MyCoolRepo\.git\config |
| Mac OS/X | /Users/<username>/GitHub/SteveProXNA/MyCoolRepo/.git/config |
IMPORTANT:
If you push code changes using TortoiseGit then you may need to change Global User Info name + email; especially if you git clone repository using credentials that are different from the global GitHub account.
Windows Explorer | Right click MyCoolRepo directory | TortoiseGit | Settings | Git [OK] Configure source:

Before making any changes to the repo, prepare working environment to detect changes via Git tools:
| Windows | Explorer | Right click MyCoolRepo directory | TortoiseGit | Check for modifications |
| Mac OS/X | Finder | Navigate to MyCoolRepo directory | Drag MyCoolRepo into Gitbox application |
Command Prompt
Developers will add changes from the working directory to staging area and commit changes to local repo. When they push from local repo [master] to remote repo [origin/master] changes are available on server.
TortoiseGit + Gitbox can co-ordinate this activity, however, here are some command prompt equivalents:
| git status | List which files are staged, unstaged, and untracked. |
| git add file | Stages file from working directory to staging area. |
| git reset file | Unstages file from staging area to working directory. |
| git commit file | Commits file from staging area to the local repo. |
| git push | Push files from local repo to remote [origin] repo. [SVN Commit] |
| git clean -df | Remove untracked directories and untracked files from current directory. | git reset --hard | Reset staging area and working directory to match most recent commit.
Obliterates all uncommitted changes so be careful using this command! |
Commit Comparison
One of the more challenging aspects found during the SVN to Git transition is difference between commit.
SVN commits working copy changes from client to server whereas Git commits from staging area to local repo only; git status shows staged + unstaged files thus how do you list all local commits for next push?
Windows right click MyCoolRepo directory | Git Sync... | Click "Out ChangeList" tab | lists local commits.
Mac OS/X in Gitbox each commit listed but not yet pushed is displayed with a dot on the left hand side.
Logging
Whereas git status lets you inspect the working directory and staging area the git log command lets you list the project history, filter and search for specific changes and only operates on the committed history.
git status git log git log --grep="SteveProXNA" git log --author="SteveProXNA" git log --grep="commit" git log --merges |
git log -S"today" git log --oneline git log --graph --decorate --oneline git log --oneline master..MyNewBranch git log --pretty=format:"%cn committed %h on %cd" git log --after="2016-4-1" |
Command Prompt II
After developers (eventually) push changes from local repo to remote, here are some more commands:
| git branch | Lets you create, list, rename, and delete branches. |
| git checkout | Lets you navigate between branches created by git branch. | git merge | Lets you integrate independent lines of development into a single branch. |
| git rebase | Process of moving branch to new base commit to maintain linear history. |
| git fetch | Imports remote changes but does not integrate changes into local repo. |
| git pull | Equivalent to a git fetch followed by a git merge. [SVN Update] |
Branching
Unlike SVN, Git differentiates between local and remote branches: local branches exist only on the local machine for local user whereas remote branches are branches pushed to origin and are accessible to all.
git branch                              ; list local  branches
git branch -r                           ; list remote branches
git branch -a                           ; list all    branches [local + remote]
Create branches:
git branch MyNewBranch                  ; create local  branch
git push origin MyNewBranch             ; pushes remote branch
Delete branches:
git branch -d MyNewBranch               ; delete local branch if merged changes
git branch -D MyNewBranch               ; delete local branch unconditionally
git push origin --delete MyNewBranch    ; delete remote branch
General update commands to synch github remote and local repository:
git remote update               ; if remote stale then update to synch latest
git fetch --all --prune         ; if delete on one computer and replicate to other
Detached HEAD
HEAD points to specified branch. When you checkout a commit, it switches into "detached HEAD" state from rest of project. If you were to develop in this state then there would be no branch to get back to.
Tagging
Similar to SVN, Git tags are symbolic names for a given revision: code snapshot implemented by git tag.
| Windows | Explorer | Right click MyCoolRepo directory | TortoiseGit | Create Tag... | Enter Tag |
| Mac OS/X | Gitbox application | Click dropdown list next to "pull" button | New tag... | Enter Tag |
Here are some command prompt equivalents:
git tag ; show tag on local git push origin --tags ; push tag to remote |
Also synchronize Git tags with remote:
git tag -l | xargs git tag -d git fetch |
Merging
Merging integrates changes from one source branch into a destination branch and combines histories of both branches. Merging is non-destructive: neither branch is changed in any way, however, the merged branch may have an extraneous merge commit every time you need to incorporate upstream changes.
Fast-Forward Merge
When there is linear path from current branch tip to target branch, instead of actually merging branches, all Git has to do to integrate the histories is move ["fast forward"] current branch tip up to target branch.
git checkout -b MyNewBranch master      ; create branch and switch
                                        ; add and commit to branch
git checkout master                     ; switch to the trunk node
git merge MyNewBranch                   ; merge branch up to trunk
git branch -d MyNewBranch               ; delete local branch
3-Way MergeOccurs when it is impossible for Git to perform a fast-forward merge as there is no way to move current branch tip to target branch without backtracking. Very common when branch takes long time to develop.
git checkout -b MyNewBranch master      ; create branch and switch
                                        ; add and commit to branch
git checkout master                     ; switch to the trunk node
                                        ; add and commit to master
git merge MyNewBranch                   ; merge branch up to trunk
git branch -d MyNewBranch               ; delete local branch
Rebasing
Rebasing is an alternative to merging and moves the entire source branch to the tip of destination branch by incorporating all new commits. Rebasing re-writes project history by eliminating unnecessary commits.
git checkout -b MyNewBranch master      ; create branch and switch
                                        ; add and commit to branch
git checkout master                     ; switch to the trunk node
git rebase MyNewBranch                  ; rebase branch upto trunk
git branch -d MyNewBranch               ; delete local branch
Merging vs. Rebasing
The benefit of rebasing is a much cleaner project history. Rebasing eliminates all the unnecessary merge commits required by git merge resulting in a perfectly linear project history followed up to the feature tip.
IMPORTANT: the Golden Rule of Rebasing stipulates never to use git rebase command on public branches!
Pull Request
GitHub fosters a fast, flexible, collaborative development process where you work with or without others. Here, you can sign into GitHub and fork an existing repository and create pull request to merge changes.
Choose repository to actively collaborate e.g. MonoGame. Click "Fork" button top right. Choose location. There should now be repository forked under your username ready to git clone and commit changes to:
git clone https://<username>:<password>@github.com/SteveProXNA/MonoGame.git MonoGame
git config user.name "SteveProXNA"
git config user.email "steven_boland@hotmail.com"
Commit changes to local repo and push from local repo [master] to remote repo [origin/master] as usual. However, create pull request to integrate changes from your forked remote repository to the source repo.
Click "New pull request". This prompts "Comparing changes" dialog for the source repository + your fork.
https://github.com/MonoGame/MonoGame/compare/master...SteveProXNA:master
| User | Repo | |
| Source | MonoGame | https://github.com/MonoGame/MonoGame |
| Fork | SteveProXNA | https://github.com/SteveProXNA/MonoGame |
Click "Create Pull Request". Owner receives email notification to view proposed changes to integrate. Click "Merge pull request" to merge changes back into source repository and automatically close Pull Request.

IMPORTANT: if you would like to keep up to date with the source repository then follow these short steps:
git clone git@github.com:SteveProXNA/MonoGame.git
cd C:\Users\<username>\GitHub\SteveProXNA\MonoGame
git remote add upstream git://github.com/MonoGame/MonoGame.git
git fetch upstream
git pull upstream master
Imperatives
Here is a short list of git commands that is imperative that you should not do; especially to public history:
Don’t Reset Public History
You should never reset commits pushed to a public repository. Reset a commit poses serious problems for collaboration: when developers sync up with your repo, it'll look like project history abruptly disappeared.
Don’t Rebase Public History
Similar to git reset, you should never rebase commits that have been pushed to a public repository. The rebase would replace old commits with new ones and look like part of project history abruptly vanished.
Jenkins
Integrate all GitHub Plugins with Jenkins. Assume MSBuild setup in Manage Jenkins | Configure System:
| Name | JenkinsMSbuild |
| Path to MSBuild | C:\Windows\Microsoft.NET\Framework\v4.0.30319\MSBuild.exe |
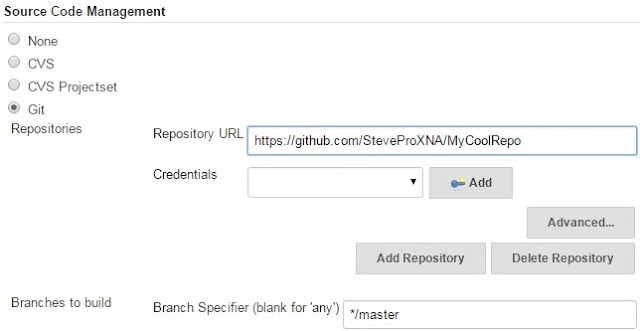
Navigate to Jenkins | New Item | Create Freestyle project. Ensure the following build configurations set:
| Source Code Management => Git Repositories | |
| Repository URL | https://github.com/SteveProXNA/MyCoolRepo |
| Credentials | <username>:<password> |
| Branches to build | Branch Specifier (blank for 'any') */master |

| Build a Visual Studio project or solution using MSBuild | |
| MSBuild Version | JenkinsMSbuild |
| MSBuild Build File | MyCoolRepo.sln |
| Command Line Arguments |
/p:Configuration=Debug
/p:Configuration=Release |
| Execute Windows batch command | |
| Command | "C:\Program Files (x86)\NUnit 2.5.7\bin\net-2.0\nunit-console-x86.exe" MyCoolRepo.UnitTests/UnitTests.nunit |
Summary
Additional topics that could explored include git stash to push unfinished changes onto a stack that can be popped off later and git submodule to keep another Git repo in subdirectory very similar to SVN Externals.

