 Let's check it out!
Windows
Install Ubuntu Linux on Windows using VirtualBox. Download VirtualBox and install. Follow all the prompts. Next, follow all instructions here to create the virtual machine to host Ubuntu. I have tweaked some inputs:
| Step | Key | Value |
| VM Name and OS Type | Version | Ubuntu (64-bit) |
| Memory | Base Memory Size | 8 GB |
| Virtual Hard Disk | Start up Disk | Create new hard disk |
| Create New Virtual Disk | File type | VDI (VirtualBox Disk Image) |
| Virtual disk storage details | Storage details | Fixed size |
| Virtual disk file location and size | Size | 100 GB |
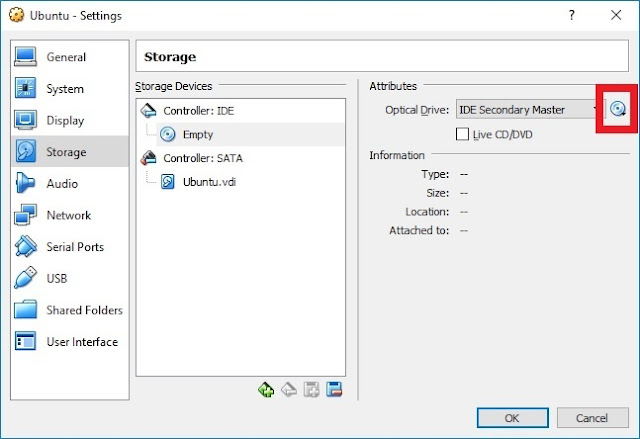
Complete virtual hard drive: click Create. Download Ubuntu 19.04. In VirtualBox, click Settings | Storage | Controller IDE | Empty | Optical Drive: IDE Secondary Master. Click icon | Choose Virtual Optical Disk File...

Navigate to downloaded Ubuntu ISO file | OK. In VirtualBox, double click Ubuntu [Powered Off] to Start the virtual machine. Next, follow all instructions here for the Ubuntu installation. I have tweaked some inputs:
| Step | Key | Value |
| Welcome | Option | Install Ubuntu |
| Keyboard layout* | English | English (US) |
| Updates and other software | What apps would you like to install | Normal installation |
| Installation type | Computer has no detected OS | Erase disk and install Ubuntu |
| Where are you? | City | Leave default selection |
The final install step "Who are you?"
| Key | Value |
| Your name | Steven Boland |
| Your computer's name | stevepro-VirtualBox |
| Pick a username | stevepro |
| Choose a password | password |
| Confirm your password | password |
Troubleshooting
VT-x is not available (VERR_VMX_NO_VMX) After Windows 10 Update
You may receive this error on Windows 10 especially after a Windows Update. If so then try the following;
- Launch the Terminal command prompt Run as Administrator
- Start | Programs | right click Command Prompt | Run as administrator
- Type the following command: dism.exe /Online /Disable-Feature:Microsoft-Hyper-V
Hyper-V Manager
If you are still experiencing issues running Ubuntu Linux on Windows using VirtualBox because of the Microsoft hypervisor then try host Ubuntu using the Hyper-V Manager. Start | run | Hyper-V Manager.
Next, follow all instructions here to create a Linux virtual machine on Windows 10 using Hyper-V. Verify Hyper-V is supported with systeminfo.exe command and that Hyper-V is enabled via Windows features.
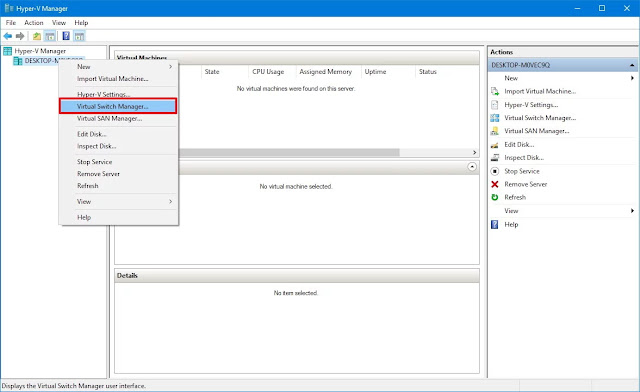
In Hyper-V Manager choose Action menu | Virtual Switch Manager | New virtual network switch | External. Create Virtual Switch e.g. "MyVirtualSwitch". Choose network adapter as External Network | Apply | OK.

Create virtual machine: Action menu | New | Virtual Machine | Ubuntu. Use default location. Use default Generation 1. Choose "MyVirtualSwitch" | Finish. Follow steps as above to complete Ubuntu installation.
Windows Subsystem for Linux
Windows Subsystem for Linux [WSL] is an optional feature in Windows that provides a kernel compatibility layer based on Ubuntu. This layer allows Linux programs to run on a Windows 10 version of the Bash shell.
Determine if your Windows 10 64-bit version supports WSL: Settings | System | About. Version >= 1607. Follow YouTube instructions: Enable Developer Mode via Settings | Update & Security then For developers.
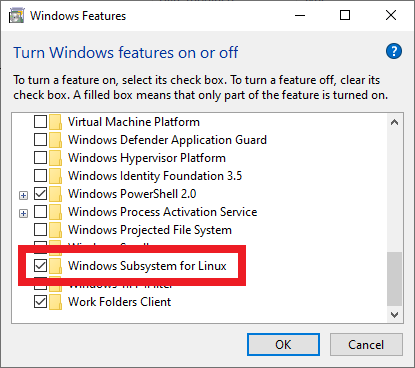
Enable Windows Subsystem for Linux: Control Panel | Programs and Features | Turn Windows features on.
 Finally, launch Microsoft store. Search for Ubuntu. Install and Launch. Set username and password to begin. From cmd prompt type bash to shell out. Windows files are mapped from /mnt directory thus C:\ => /mnt/c
Mac OS/X
Install Ubuntu Linux on Mac OS/X using VirtualBox. Download VirtualBox and install. Follow all the prompts. Next, follow all instructions here to create the virtual machine to host Ubuntu. Repeat install like Windows!
Setup
This section assumes Ubuntu Linux is installed irrespective of the platform. Now, let's do some basic setup: Login and verify an Internet connection: Settings (top right hand side) | System Settings | Network | Wired.
Resolution
Typically, the initial display will not max out monitor resolution so let's fix that: Show Applications (bottom right) | Settings | Display. Choose resolution that makes sense for monitor size. Use Landscape orientation. In VirtualBox, View menu. Choose Scaled Mode. Drag screen borders to maximize remaining monitor space.
Guest Additions
In order to copy + paste between the host and virtual machine enable Guest Editions. In VirtualBox Devices menu | Insert Guest Additions CD image. Follow all prompts and choose "Y" accordingly. Restart Ubuntu VM.
After installation, choose Ubuntu virtual machine | Settings | General | Advanced. Ensure that both "Shared Clipboard" and "Drag n' Drop" are set to Bidirectional. If this doesn't work then launch Terminal commands:
sudo apt-get update
sudo apt-get install virtualbox-guest-x11
Keyboard
Settings | Region & Language. Choose Language English (US) and Format for keyboard layout that you like. Also, you may switch the Command and Control key if you are on a Mac for consistency. Launch Terminal:
cd /usr/share/X11/xkb/symbols
sudo cp pc pc_bak
sudo gedit pc
key <LCTL> {    [ Super_L       ]   };
key <LWIN> {    [ Control_L     ]   };
key <RCTL> {    [ Super_R       ]   };
key <RWIN> {    [ Control_R     ]   };
sudo rm -rf /var/lib/xkb/*
Shortcuts
Following Keyboard, update Terminal keyboard shortcuts for copy and paste consistency. Launch Terminal menu | Preferences | Shortcuts | Edit. Choose Copy and press Ctrl+C and choose Paste and press Ctrl+V. Also, handy Files Manager shortcuts: Ctrl+D to create [bookmark] link to folder and Ctrl+L to show path.
Applications
Remove any unwanted applications from Favorites. Add any new applications to Favorites accordingly. E.g.: Show Applications | Search "Terminal". Double Terminal to launch. Right click Terminal | Add to Favorites.
Folder Share
In order to share files between the host and virtual machine enable folder share: Show Applications | Files | Other Locations. Connect to Server "smb://host-pc" | Connect. Enter Windows Username and Password and WORKGROUP for Domain. Otherwise, choose Domain as the Local Area Network [LAN] domain accordingly.
Screen Lock
Finally, you may like to disable screen lock for long periods of time. Settings | Privacy | Screen Lock | Off.
IMPORTANT
If, for any reason, changes made don't replicate then it may be necessary to simply restart virtual machine.
Summary
Now that Ubuntu Linux is installed on computer whichever configuration chosen it is time to install software! This will be the topic in the next post.


No comments:
Post a Comment