
Recently, Candy Kid was re-written in XNA using C#/.NET. However, in order to keep the super cool 80s retro arcade video game look and feel, all original programmer art in Candy Kid was used for the sprites.
Let's check it out!
 Note: in order to follow the code along first ensure you have your PC setup for Sega BASIC programming.
All code listed inspired from Sega Computer magazine Sprites tutorial, also published in September 1984.
Sprites
Think of a sprite as piece of transparent film over your television screen. Each individual sprite is made up of group of 64 dots (8 by 8 pixel block). Each dot may be turned "on" (made visible) or "off" (not visible).
To instruct the computer what 64 sprite dots look like, use binary notation to define each pixel as either turned "on" (value=1) or "off" (value=0). Hexadecimal notation is then used to group 4x pixels at a time.
Example
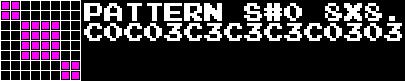
As an example, here are 64 dots (8 by 8 pixel block) that define the original candy pattern in Candy Kid:
Launch Meka emulator. Main menu | Load ROM | Sega BASIC Level 3 ROM. Type in the following code:
NEW
10 SCREEN 2,2:CLS
20 PATTERN S#0,"C0C03C3C3C3C0303"
30 SPRITE 1,(128,96),0,7
40 GOTO 40
RUN
Press the "End" key to break.
Now, let's dissect the program:
LINE 10 Switch to graphics screen and clear
LINE 20 Define 8x8 candy sprite in Pattern #0 (there can be 256 total patterns from 0-255)
LINE 30 Display sprite on-screen. Priority: 1, (X,Y)=(128,96), Pattern: 0, Color: 7 (Cyan)
LINE 40 Loop forever to keep sprite on-screen
Magnification
Now that sprite has been constructed, we are able to magnify it. There are four magnifications (0-3):
| Mag 0 | Single 8x8 pixel sprite. This is used by default when no magnification is set |
| Mag 1 | Group sprite that uses four 8x8 pixel sprites treated as one 16x16 pixel sprite |
| Mag 2 | Exactly the same as Mag 0 except the sprite is twice the size i.e. 16x16 sprite |
| Mag 3 | Exactly the same as Mag 1 except the sprite is twice the size i.e. 32x32 sprite |
Candy Kid
All sprites in Candy Kid use Mag 1. Therefore, four patterns are used to generate each 16x16 pixel sprite.

Let's break down the four 8x8 pixel sprites to determine the patterns to be typed into the Sega SC-3000:

Launch Meka emulator. Main menu | Load ROM | Sega BASIC Level 3 ROM. Type in the following code:
NEW
100 SCREEN 2,2:CLS
110 MAG3
120 REM CANDY KID FOREGROUND
130 PATTERN S#0,"030F1F3F33616173"
140 PATTERN S#1,"7F33381C8F53A050"
150 PATTERN S#2,"C0F0F8FCCC8686CE"
160 PATTERN S#3,"FECC1C38F1CA050A"
120 REM CANDY KID BACKGROUND
120 PATTERN S#4,"00000000000C0C00"
130 PATTERN S#5,"000C070300804020"
140 PATTERN S#6,"0000000000303000"
150 PATTERN S#7,"0030E0C000010204"
160 SPRITE 3,(128,96),0,2
170 SPRITE 2,(128,96),4,11
180 GOTO 180
RUN
Note: original source code used MAG1 because the screen resolution on the Sega SC-3000 was 256x192.
However, as Candy Kid is being re-written for higher screen resolution, e.g. 800x480, use MAG3 instead!
After running the code (above), take screen shot i.e. press Print Screen button and save the BMP image.
Crop image to required dimensions i.e. 32x32 pixels using MS Paint. Re-save. Make image transparent...
Paint.NET

|
Download, install and launch Paint.NET. Open the original 32x32 Candy Kid BMP image saved and processed above.
Choose Magic Wand. Click black image background. Press delete. This makes background transparent. Save new image as PNG file to include transparency. |
Repeat process for the enemy sprite Candy Mama. Different colours could be used for multiple enemies:


NEW
100 SCREEN 2,2:CLS
110 MAG3
120 REM CANDY MAMA FOREGROUND
130 PATTERN S#8,"03070F1F193070F9"
140 PATTERN S#9,"FE9C0F0F0F3F7F73"
150 PATTERN S#10,"C0E0F0F8980C0E9F"
160 PATTERN S#11,"7F39F0F0F0FCFECE"
120 REM CANDY MAMA BACKGROUND
120 PATTERN S#12,"0000000000060600"
130 PATTERN S#13,"0003101010000000"
140 PATTERN S#14,"0000000000606000"
150 PATTERN S#15,"00C0080808000000"
160 SPRITE 1,(128,96),8,5
170 SPRITE 0,(128,96),12,6
180 GOTO 180
RUN
Animation
Duplicate sprites, tweak arms and/or legs and produce sprite sheets to be used for animation:
|
|
|
Summary
That concludes how the programmer art was created for the original title on Sega SC-3000 in BASIC and how the art has been re-used for an updated version; which has been re-written in XNA using C#/.NET.
However, ultimate goal would be to re-write Candy Kid in C / Z80 assembler for the Sega Master System!
The z88dk Programming Sample demonstrates how to convert the original 16x16 pixel sprites to a format the Sega Master System (SMS) understands. This includes the Palette, Tiles, Tilemap and the Sprite table.
Create 16x16 source sprite (as above). Save source sprite as BMP (bitmap) file. Load image in MS Paint:

Note: sprite / tile data on the SMS must be max. 4bpp (bits per pixel). Save as type 16 Color Bitmap:

BMP2Tile
Download and launch BMP2Tile. Drag n' drop 16x16 pixel source sprite onto open "Source" tab.
Choose "Tiles" tab. Ensure that "Remove duplicates" and "Planar tile output" are both checked.
Set "Index of first tile" to 1. It seems best practice to leave empty background tile at index 0.

Choose "Tilemap" tab. Leave "Use sprite palette" and "In front of sprites" options unchecked.

Choose "Palette" tab. Leave the "Output hex (SMS)" option checked for Sega Master System.

Click Save button on "Tiles", "Tilemap", "Palette" tabs. All data here is used in the game code.
Sample
Finally, write small program similar to the Target Sprite program in z88dk Programming Sample to test.
First, create new directory: C:\CandyKid. Next, add the following 3x files here: test.s, linkfile and test.c.
test.s
.MEMORYMAP
SLOTSIZE $8000
DEFAULTSLOT 0
SLOT 0 $0000
SLOT 1 $8000
.ENDME

.ROMBANKMAP
BANKSTOTAL 1
BANKSIZE $8000
BANKS 1
.ENDRO

.SDSCTAG 1.0, "Candy Kid", "Candy Kid sprite test", "StevePro Studios"

.EMPTYFILL $C9                ;ret.
.COMPUTESMSCHECKSUM           ;compute sms checksum for this rom.

.BANK 0 SLOT 0
.ORG 0

.INCBIN "test.bin"
linkfile
[objects]
test.o
Launch Crimson IDE. File | New file. Save test.c. Next, type in the following source code: test.c.
test.c
#include <sms.h>

unsigned char pal1[] = {0x00, 0x02, 0x08, 0x0A, 0x20, 0x22, 0x28, 0x2A, 0x3F, 0x03, 0x0C, 0x0F, 0x30, 0x33, 0x3C, 0x3F};
unsigned char pal2[] = {0x00, 0x02, 0x08, 0x0A, 0x20, 0x22, 0x28, 0x2A, 0x3F, 0x03, 0x0C, 0x0F, 0x30, 0x33, 0x3C, 0x00};

unsigned char all_tiles[] =
{
  // blank tile.
  0x00, 0x00, 0x00, 0x00, 0x00, 0x00, 0x00, 0x00, 0x00, 0x00, 0x00, 0x00, 0x00, 0x00, 0x00, 0x00, 0x00, 0x00, 0x00, 0x00, 0x00, 0x00, 0x00, 0x00, 0x00, 0x00, 0x00, 0x00, 0x00, 0x00, 0x00, 0x00,

  // target sprite.
  0x00, 0x03, 0x00, 0x03, 0x00, 0x0F, 0x00, 0x0F, 0x00, 0x1F, 0x00, 0x1F, 0x00, 0x3F, 0x00, 0x3F, 0x00, 0x33, 0x00, 0x33, 0x00, 0x61, 0x00, 0x6D, 0x00, 0x61, 0x00, 0x6D, 0x00, 0x73, 0x00, 0x73,
  0x00, 0xC0, 0x00, 0xC0, 0x00, 0xF0, 0x00, 0xF0, 0x00, 0xF8, 0x00, 0xF8, 0x00, 0xFC, 0x00, 0xFC, 0x00, 0xCC, 0x00, 0xCC, 0x00, 0x86, 0x00, 0xB6, 0x00, 0x86, 0x00, 0xB6, 0x00, 0xCE, 0x00, 0xCE,
  0x00, 0x7F, 0x00, 0x7F, 0x00, 0x33, 0x00, 0x3F, 0x00, 0x38, 0x00, 0x3F, 0x00, 0x1C, 0x00, 0x1F, 0x00, 0x8F, 0x00, 0x8F, 0x00, 0x53, 0x00, 0xD3, 0x00, 0xA0, 0x00, 0xE0, 0x00, 0x50, 0x00, 0x70,
  0x00, 0xFE, 0x00, 0xFE, 0x00, 0xCC, 0x00, 0xFC, 0x00, 0x1C, 0x00, 0xFC, 0x00, 0x38, 0x00, 0xF8, 0x00, 0xF1, 0x00, 0xF1, 0x00, 0xCA, 0x00, 0xCB, 0x00, 0x05, 0x00, 0x07, 0x00, 0x0A, 0x00, 0x0E,
};

void setSprite(int x, int y)
{
  // priority, x, y, tile.
  set_sprite(0, x+0, y+0, 1);
  set_sprite(1, x+8, y+0, 2);
  set_sprite(2, x+0, y+8, 3);
  set_sprite(3, x+8, y+8, 4);
}

void main()
{
  int x, y;
  set_vdp_reg(VDP_REG_FLAGS1, VDP_REG_FLAGS1_SCREEN);

  // array, start, count, bpp.
  load_tiles(all_tiles, 0, 5, 4);

  // array, start, count.
  load_palette(pal1,  0, 16);
  load_palette(pal2, 16, 16);

  x=120, y=88;
  for (;;)
  {
    setSprite(x, y);
  }
}
If you have C:\PerfomBuild.bat setup as per previous post then simply hit Ctrl+1 hot key to run the test.
 Outstanding: add remaining Candy Kid sprite graphics to program in order to complete SMS game code!
