Wednesday, November 15, 2017

devkitSMS Programming Sample

In the previous post, we checked out devkitSMS Programming Setup. The devkitSMS provides tools and code to support homebrew development for the Sega Master System, SG-1000, and Sega Game Gear.

Using devkitSMS, it is possible to write game code using the C language rather than pure Z80 assembly. Therefore, we would now like to extend this knowledge and write more detailed programming sample.
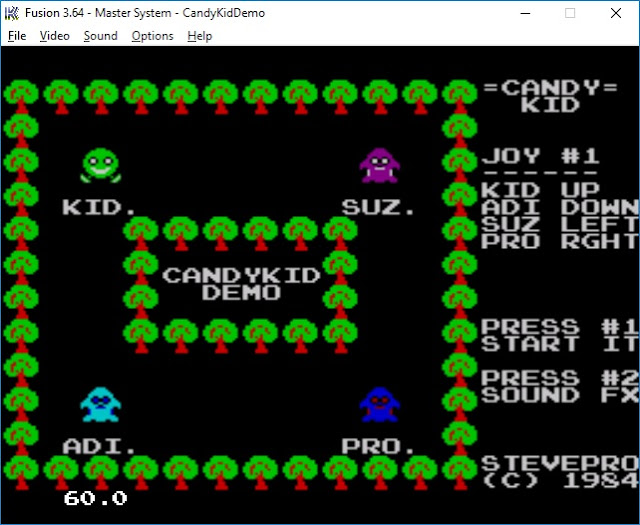
Let's check it out!

Software
Follow all instructions from the previous post: this documents how to setup the pre-requisite software.
Note: ensure you have downloaded and installed the devkitSMS and Small Device C Compiler [SDCC].

Also download vgm2psg.exe required to convert VGM files to the Programmable Sound Generator [PSG].
# Clone PSGlib
cd C:\GitHub\sverx
git clone https://github.com/sverx/PSGlib.git

Demo
The devkitSMS programming sample is based on the Candy Kid Demo coding competition entry for 2017. All graphics, sprites, music, sound fx, coding logic etc. here is based on the devkitSMS tutorial by @sverx.

Create folder C:\CandyKidDemoSMS. Create the following sub-folders: asm, crt0, dev, gfx, lib, psg, utl
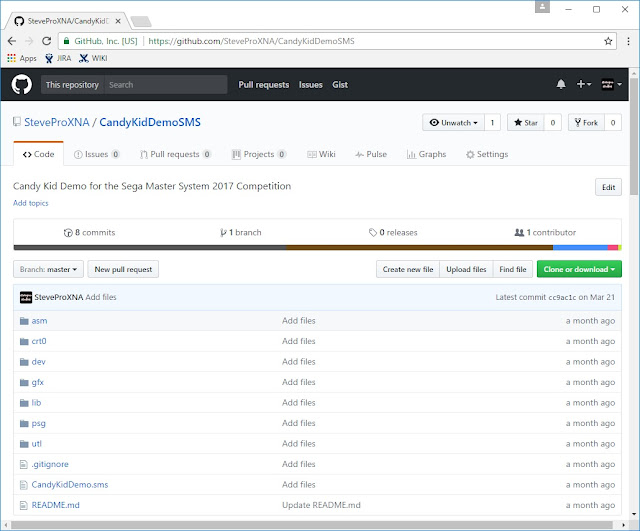
 Folder  File  Location
 asm  Opcodes.dat
 smsexamine.exe
 C:\smsexamine1_2a
 C:\smsexamine1_2a
 crt0  crt0_sms.rel  C:\Github\sverx\devkitSMS\crt0
 lib  SMSlib.h
 SMSlib.lib
 PSGlib.h
 PSGlib.rel
 C:\GitHub\sverx\devkitSMS\SMSlib\src
 C:\GitHub\sverx\devkitSMS\SMSlib
 C:\GitHub\sverx\devkitSMS\PSGlib\src
 C:\GitHub\sverx\devkitSMS\PSGlib
 utl  folder2c.exe
 ihx2sms.exe
 vgm2psg.exe
 C:\GitHub\sverx\devkitSMS\folder2c
 C:\GitHub\sverx\devkitSMS\ihx2sms
 C:\GitHub\sverx\PSGlib\tools
Note: assumes Opcodes.dat and smsexamine.exe downloaded from SMS Examine and extracted to C:\

Development
Launch Visual Studio 2008. File | New | Project... | Visual C++ | Win32 | Win32 Project
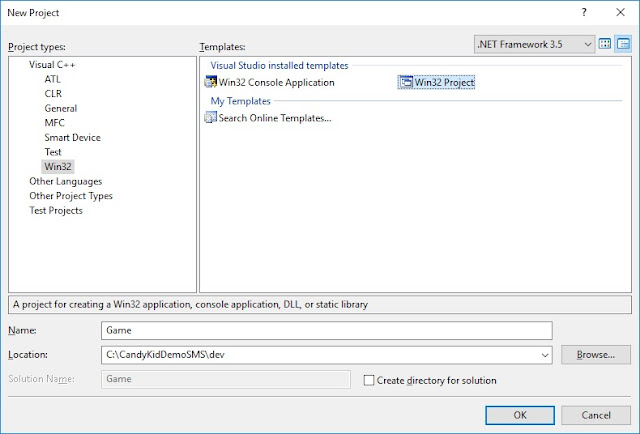
 Name:  Game
 Location:  C:\CandyKidDemoSMS\dev
 Create directory for solution  UNCHECKED
OK

 Application type:  Console application
 Additional options:  Empty project CHECKED
Finish

Graphics
Follow all instructions from the previous post to download and install BMP2Tile utility to convert graphics into Sega Master System format. Download gfxcomp_stm.dll STM compressed format to output directory.

Splash
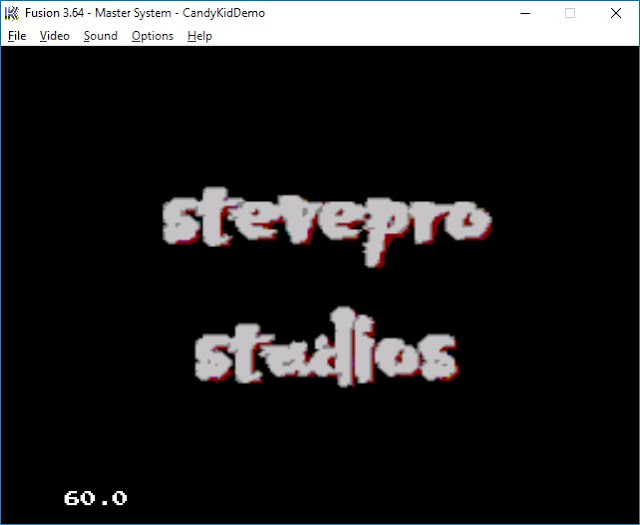
Here is an example of background tiles that exhaust the full 256 x 192 resolution e.g. the Splash screen:
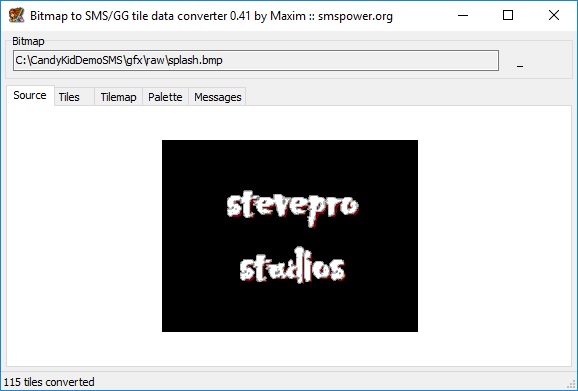
Choose "Tiles" tab. Ensure that "Remove duplicates" and "Planar tile output" are both checked.
Click Save button | File name splash (tiles).psgcompr | File type PS Gaiden (*.psgcompr)
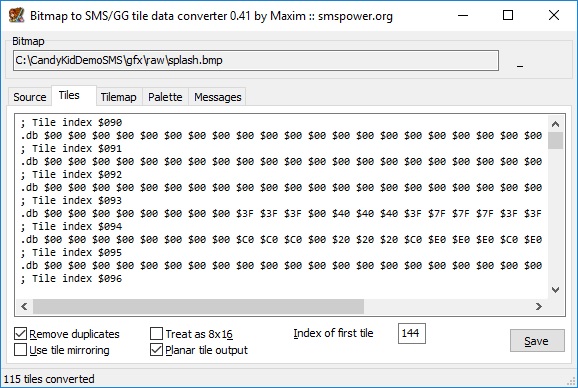
Choose "Tilemap" tab. Leave "Use sprite palette" and "In front of sprites" options both unchecked.
Click Save button | File name splash (tilemap).stmcompr | File type Sverx's TileMap (*.stmcompr)
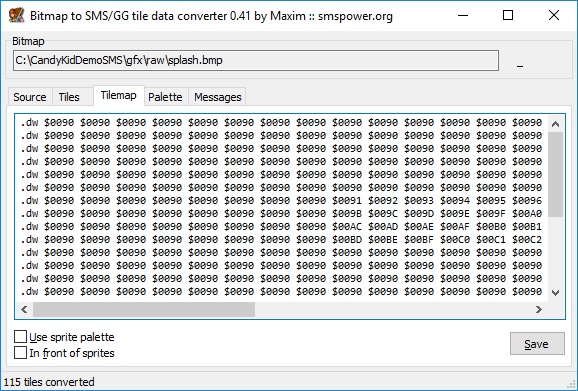
Choose "Palette" tab. Leave the "Output hex (SMS)" option checked for Sega Master System.
Click Save button | File name splash (palette).bin | File type Binary files (*.bin)
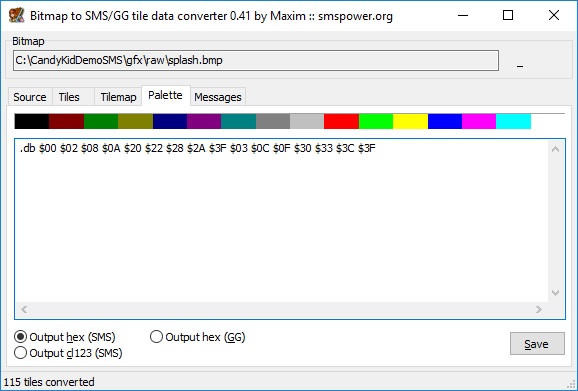
Here is basic code sample to render the splash screen in main.c with corresponding updated build.bat

main.c
#include "..\lib\SMSlib.h"
#include "gfx.h"

#define SPLASH_TILES 144

void engine_content_manager_splash()
{
  SMS_loadPSGaidencompressedTiles(splash__tiles__psgcompr, SPLASH_TILES);
  SMS_loadSTMcompressedTileMap(0, 0, splash__tilemap__stmcompr);
  SMS_loadBGPalette(splash__palette__bin);
}
void main (void)
{
  engine_content_manager_splash();
  SMS_displayOn();
  for (;;)
  {
    SMS_waitForVBlank();
  }
}

SMS_EMBED_SEGA_ROM_HEADER(9999, 0);
SMS_EMBED_SDSC_HEADER(1, 0, 2017, 3, 17, "StevePro Studios", "Candy Kid Demo", "DESC");

build.bat
@echo off
..\utl\folder2c ..\gfx gfx

sdcc -c -mz80 gfx.c
sdcc -c -mz80 main.c
sdcc -o output.ihx -mz80 --data-loc 0xC000 --no-std-crt0 ..\crt0\crt0_sms.rel main.rel ..\lib\SMSlib.lib gfx.rel

..\utl\ihx2sms output.ihx output.sms
output.sms

Background
Repeat the process for background tiles e.g. Font however save tilemap as uncompressed binary format [bin] to access data randomly. Save tiles in PS Gaiden compressed format + use same palette as above.
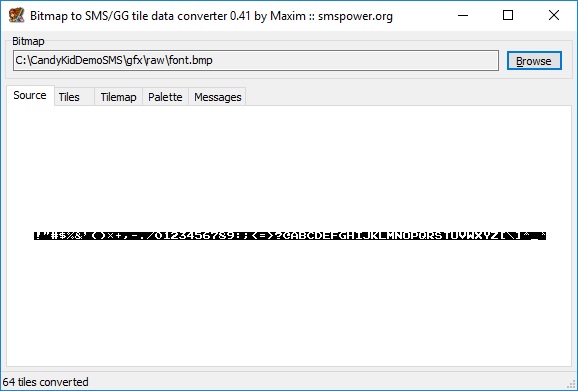
 Tiles  font (tiles).psgcompr  PS Gaiden (*.psgcompr)
 Tilemap  font (tilemap).bin  Raw (uncompressed) binary (*.bin)
 Palette  font (palette).bin  Raw (uncompressed) binary (*.bin)

main.c
#include "..\lib\SMSlib.h"
#include "gfx.h"

#define FONT_TILES  16
#define TEXT_ROOT  33  // 33 is "!" in ASCII.

void engine_content_manager_load()
{
  SMS_loadPSGaidencompressedTiles(font__tiles__psgcompr, FONT_TILES);
  SMS_loadBGPalette(font__palette__bin);
}
void engine_font_manager_draw_text(unsigned char* text, unsigned char x, unsigned char y)
{
  const unsigned int *pnt = font__tilemap__bin;
  unsigned char idx=0;
  while ('\0' != text[idx])
  {
    signed char tile = text[idx] - TEXT_ROOT;
    SMS_setNextTileatXY(x++, y);
    SMS_setTile(*pnt + tile);
    idx++;
  }
}
void main (void)
{
  char *text = "HELLO";
  engine_content_manager_load();
  engine_font_manager_draw_text(text, 0, 0);

  SMS_displayOn();
  for (;;)
  {
    SMS_waitForVBlank();
  }
}

SMS_EMBED_SEGA_ROM_HEADER(9999, 0);
SMS_EMBED_SDSC_HEADER(1, 0, 2017, 3, 17, "StevePro Studios", "Candy Kid Demo", "DESC");

Sprites
Repeat the process for sprite tiles however no need to save the tilemap file. Also, introduce sprite code:
 Tiles  sprites (tiles).psgcompr  PS Gaiden (*.psgcompr)
 Palette  sprites (palette).bin  Raw (uncompressed) binary (*.bin)

main.c
#include <stdbool.h>
#include "..\lib\SMSlib.h"
#include "gfx.h"

#define SPRITE_TILES  80
#define KID_BASE_TILE  SPRITE_TILES + 0

void engine_content_manager_load()
{
  SMS_loadPSGaidencompressedTiles(sprites__tiles__psgcompr, SPRITE_TILES);
  SMS_loadSpritePalette(sprites__palette__bin);
}
void engine_sprite_manager_draw(unsigned char x, unsigned char y, unsigned char tile)
{
  SMS_addSprite(x+0, y+0, tile+0);
  SMS_addSprite(x+8, y+0, tile+1);
  SMS_addSprite(x+0, y+8, tile+8);
  SMS_addSprite(x+8, y+8, tile+9);
}
void main (void)
{
  unsigned char kidX = 32;
  unsigned char kidY = 32;
  unsigned char kidColor = 0;
  unsigned char kidFrame = 0;
  unsigned char kidTile = KID_BASE_TILE + ((kidColor * 2) + kidFrame) * 2;

  SMS_setSpriteMode(SPRITEMODE_NORMAL);
  SMS_useFirstHalfTilesforSprites(true);
  engine_content_manager_load();

  SMS_displayOn();
  for (;;)
  {
    SMS_initSprites();
    engine_sprite_manager_draw(kidX, kidY, kidTile);
    SMS_finalizeSprites();
    SMS_waitForVBlank();
    SMS_copySpritestoSAT();
  }
}

SMS_EMBED_SEGA_ROM_HEADER(9999, 0);
SMS_EMBED_SDSC_HEADER(1, 0, 2017, 3, 17, "StevePro Studios", "Candy Kid Demo", "DESC");

Music
Download Mod2PSG2 music tracker to record music [FX] and convert output VGM files to PSG file format. File | Export module | VGM... | C:\CandyKidDemoSMS\psg\raw\music.vgm | Save
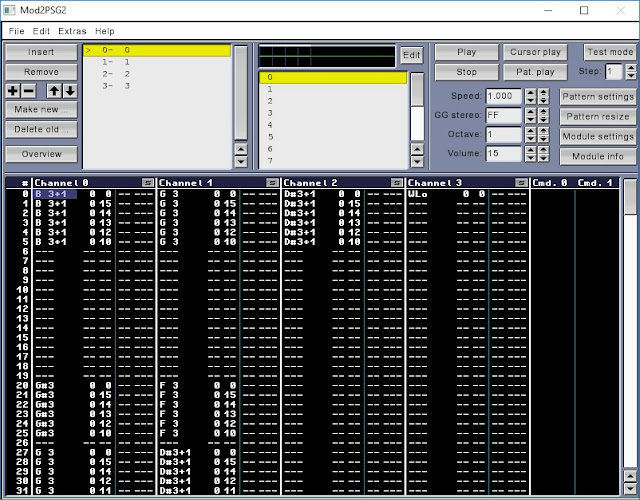
Now convert to PSG file format using vgm2psg.exe utility downloaded previously:

Start | run | cmd | cd C:\CandyKidDemoSMS
utl\vgm2psg.exe psg\raw\music.vgm psg\music.psg
Here is basic code sample to play the background music in main.c with corresponding updated build.bat
main.c
#include "..\lib\SMSlib.h"
#include "..\lib\PSGlib.h"
#include "gfx.h"
#include "psg.h"

#define MUSIC_PSG   music_psg

void main (void)
{
  PSGPlayNoRepeat(MUSIC_PSG);
  SMS_displayOn();
  for (;;)
  {
    SMS_waitForVBlank();
    PSGFrame();
  }
}

SMS_EMBED_SEGA_ROM_HEADER(9999, 0);
SMS_EMBED_SDSC_HEADER(1, 0, 2017, 3, 17, "StevePro Studios", "Candy Kid Demo", "DESC");

build.bat
@echo off
..\utl\folder2c ..\gfx gfx
..\utl\folder2c ..\psg psg

sdcc -c -mz80 gfx.c
sdcc -c -mz80 psg.c
sdcc -c -mz80 main.c
sdcc -o output.ihx -mz80 --data-loc 0xC000 --no-std-crt0 ..\crt0\crt0_sms.rel main.rel ..\lib\SMSlib.lib ..\lib\PSGlib.rel gfx.rel psg.rel

..\utl\ihx2sms output.ihx output.sms
output.sms

Sound
Repeat the process for sound effects however export VGM file to channel 2 and play on SFX_CHANNEL2:

Start | run | cmd | cd C:\CandyKidDemoSMS
utl\vgm2psg.exe psg\raw\sound.vgm psg\sound.psg 2 main.c
#include "..\lib\SMSlib.h"
#include "..\lib\PSGlib.h"
#include "gfx.h"
#include "psg.h"

#define SOUND_PSG   sound_psg

void main (void)
{
  PSGSFXPlay(SOUND_PSG, SFX_CHANNEL2);
  SMS_displayOn();
  for (;;)
  {
    SMS_waitForVBlank();
    PSGSFXFrame();
  }
}

SMS_EMBED_SEGA_ROM_HEADER(9999, 0);
SMS_EMBED_SDSC_HEADER(1, 0, 2017, 3, 17, "StevePro Studios", "Candy Kid Demo", "DESC");

Noise
Repeat the process for noise effects however export VGM file to channel 3 and play on SFX_CHANNEL3:

Start | run | cmd | cd C:\CandyKidDemoSMS
utl\vgm2psg.exe psg\raw\noise.vgm psg\noise.psg 3 main.c
#include "..\lib\SMSlib.h"
#include "..\lib\PSGlib.h"
#include "gfx.h"
#include "psg.h"

#define NOISE_PSG   noise_psg

void main (void)
{
  PSGSFXPlay(NOISE_PSG, SFX_CHANNEL3);
  SMS_displayOn();
  for (;;)
  {
    SMS_waitForVBlank();
    PSGSFXFrame();
  }
}

SMS_EMBED_SEGA_ROM_HEADER(9999, 0);
SMS_EMBED_SDSC_HEADER(1, 0, 2017, 3, 17, "StevePro Studios", "Candy Kid Demo", "DESC");

Input
Input detection is straightforward although it seems joypad variables must be static so to persist values:

main.c
#include "..\lib\SMSlib.h"
void update(const unsigned int curr_joypad1, const unsigned int prev_joypad1)
{
  if (curr_joypad1 & PORT_A_KEY_1 && !(prev_joypad1 & PORT_A_KEY_1))
  {
    SMS_setSpritePaletteColor(0, RGB(2,2,2));
  }
}
void main (void)
{
  // Must be static to persist values!
  static unsigned int curr_joypad1 = 0;
  static unsigned int prev_joypad1 = 0;

  SMS_setSpritePaletteColor(0, RGB(3,3,3));
  SMS_displayOn();
  for (;;)
  {
    curr_joypad1 = SMS_getKeysStatus();
    update(curr_joypad1, prev_joypad1);
    SMS_waitForVBlank();
    prev_joypad1 = curr_joypad1;
  }
}

SMS_EMBED_SEGA_ROM_HEADER(9999, 0);
SMS_EMBED_SDSC_HEADER(1, 0, 2017, 3, 17, "StevePro Studios", "Candy Kid Demo", "DESC");

Pause
Many homebrew games do not query pause button although I believe this is good programming practice!

main.c
#include <stdbool.h>
#include "..\lib\SMSlib.h"
#include "..\lib\PSGlib.h"

bool global_pause;
void main (void)
{
  global_pause = false;
  SMS_setSpritePaletteColor(0, RGB(3,3,3));
  SMS_displayOn();
  for (;;)
  {
    if (SMS_queryPauseRequested())
    {
      SMS_resetPauseRequest();
      global_pause = !global_pause;
      if (global_pause)
      {
        SMS_setSpritePaletteColor(0, RGB(1,1,1));
        PSGSilenceChannels();
      }
      else
      {
        SMS_setSpritePaletteColor(0, RGB(3,3,3));
        PSGRestoreVolumes();
      }
    }
    if (global_pause)
    {
      continue;
    }

    SMS_waitForVBlank();
  }
}

SMS_EMBED_SEGA_ROM_HEADER(9999, 0);
SMS_EMBED_SDSC_HEADER(1, 0, 2017, 3, 17, "StevePro Studios", "Candy Kid Demo", "DESC");

Assembler
Ultimately the goal would be to write game code in Z80 assembly! However, one useful way to slowly transition from C language to Z80 assembly would be to wrap inline assembly blocks via C functions.

Let's integrate the Z80 assembly code inline to clear VRAM from Maxim Hello World example directly:

main.c
#include "..\lib\SMSlib.h"
__sfr __at 0xBF VDPControlPort;
__sfr __at 0xBE VDPDataPort;

void engine_asm_manager_clear_VRAM()
{
  __asm
    ld a,#0x00
    out (_VDPControlPort),a
    ld a,#0x40
    out (_VDPControlPort),a
    ld bc, #0x4000
ClearVRAMLoop:
    ld a,#0x00
    out (_VDPDataPort),a
    dec bc
    ld a,b
    or c
    jp nz,ClearVRAMLoop
  __endasm;
}

void main (void)
{
  engine_asm_manager_clear_VRAM();
  SMS_displayOn();
  for (;;)
  {
    SMS_waitForVBlank();
  }
}

SMS_EMBED_SEGA_ROM_HEADER(9999, 0);
SMS_EMBED_SDSC_HEADER(1, 0, 2017, 3, 17, "StevePro Studios", "Candy Kid Demo", "DESC");

Summary
Armed with all this knowledge, we are now in an excellent position to build complete video games for the Sega Master System that will be able to run on real hardware but now without any VDP graphics glitches!

Friday, September 15, 2017

devkitSMS Programming Setup

In 2013, we checked out Sega Console Programming, specifically for the Sega Master System (SMS).
The SMS was the last ever 8-bit video game console manufactured by Sega built using the Z80 chip.

However, the process to write Z80 assembly language from scratch for the SMS can be very daunting. Instead, in 2014 we checked out z88dk Programming Setup to write code in C language using z88dk.

All code here worked on emulators but real Sega Master System hardware experienced graphics glitches! Fortunately, there is another way: write game code in C language using devkitSMS and SDCC compiler.
Let’s check it out!

devkitSMS
The devkitSMS is a collection of tools and code built specifically for the Sega Master System but also supports homebrew development using C language for SG-1000, SC-3000 and the Sega Game Gear.

Software
Follow all instructions from the previous post: this documents how to setup the pre-requisite software.

Here is a summary of all required software to be installed:
 Name Version
 Z80 Editor ConTEXT
 Assembler WLA DX
 Emulators Fusion, Meka, Emulicious
 Disassembler SMS Examine
 
 Name Version
 C IDE Editor Visual Studio 2008
 Cross compiler Small Device C Compiler
 Make files Cygwin
 Hex Editor HxD

SDCC
Download and install sdcc-3.6.0-x64-setup.exe to C:\Program Files\SDCC. Choose all features to install. UPDATE: if you build games like Astro Force then I believe you need to upgrade to version sdcc-3.6.9.

There should be no extra configuration except add C:\Program Files\SDCC\bin to the Environment PATH.

Start | Run | cmd. Type sdcc --version. The following should display to confirm SDCC version 3.6.0:

devkitSMS
Navigate to the devkitSMS repository on github. @sverx has full instructions here and advises to copy the following 3x executables into the SDCC bin folder [above]: ihx2sms.exe, assets2banks.exe, folder2c.exe.
# Clone devkitSMS
cd C:\GitHub\sverx
git clone https://github.com/sverx/devkitSMS.git

# Copy 3x files
cd devkitSMS
copy ihx2sms\ihx2sms.exe C:\Program Files\SDCC\bin
copy assets2banks\assets2banks.exe C:\Program Files\SDCC\bin
copy folder2c\folder2c.exe C:\Program Files\SDCC\bin
Note: my preference is to usually copy these 3x files up-top-date as each Master System project is built.


Example
As an example, let's write a simple program that sets the border colors of the screen using devkitSMS. Create new directory: C:\HelloWorld. Copy these files: crt0_sms.rel, SMSlib.h, SMSlib.lib, ihx2sms.exe

main.c
#include "SMSlib.h"
void main (void)
{
  SMS_setSpritePaletteColor(0, RGB(3,3,3));
  SMS_displayOn();
  for (;;)
  {
    SMS_waitForVBlank();
  }
}

SMS_EMBED_SEGA_ROM_HEADER(9999, 0);
SMS_EMBED_SDSC_HEADER(1, 0, 2017, 9, 15, "StevePro Studios", "Hello World", "Simple Sega Master System demo to run on real hardware!");

Build
Manually compile, link and execute the Hello program. Launch command prompt: Start | Run | cmd.

Change directory cd C:\HelloWorld. Next, execute the following 3x commands (in bold):
 ACTION  COMMAND  OUTPUT
 Compile   sdcc -c -mz80 main.c  main.rel
 Link  sdcc -o output.ihx -mz80 --data-loc 0xC000 --no-std-crt0 crt0_sms.rel
 main.rel SMSlib.lib
 output.ihx
 Exceute  ihx2sms output.ihx output.sms  output.sms 

Finally, type output.sms. The Hello program should launch in the Fusion emulator.
Congratulations! You have just written your first SMS program using devkitSMS.

Automate
Let's automate the build process: create C:\HelloWorld\build.bat script file that contains the commands:
@echo off
sdcc -c -mz80 main.c
sdcc -o output.ihx -mz80 --data-loc 0xC000 --no-std-crt0 crt0_sms.rel main.rel SMSlib.lib
ihx2sms output.ihx output.sms
output.sms

Visual Studio
Inspired by this suggestion to use Visual Studio as an IDE to better navigate files in larger projects and help automate the development build system. Download + install Visual Studio 2008 and setup solution.

Launch Visual Studio 2008. File | New | Project... | Visual C++ | Win32 | Win32 Project
 Name:  HelloWorld
 Location:  C:\
 Create directory for solution  UNCHECKED

 Application type:  Console application
 Additional options:  Empty project CHECKED

Navigate to C:\HelloWorld. Copy the following files as before such that they are on the same folder level like HelloWorld.sln: crt0_sms.rel, SMSlib.h, SMSlib.lib, ihx2sms.exe. Add existing: main.c and build.bat.

External Tools
Integrate the build process directly from within Visual Studio 2008 using the External Tools functionality.
Choose Tools menu | External Tools... | Add
 Title:  Run Batch File
 Command:  CMD.EXE
 Arguments:  /c "$(SolutionDir)"build.bat
 Initial directory:  $(SolutionDir)
 Use Output Window  CHECKED
 Close on exit  CHECKED
Click Apply button. Click Move Up button until "Run Batch File" is at the top of the list.

Keyboard Shortcut
Next connect "Run Batch File" command to Ctrl+1 hot key to automatically build, link and execute code!

Choose Tools menu | Options... | Environment | Keyboard. Show command containing: "Tools". Scroll list down to "Tools.ExternalCommand1". In the "Press shortcut keys:" textbox hit Ctrl+1. Click Assign button.

Disassemble
Finally, disassemble the compiled binary file output.sms generated from the Visual Studio batch script.
In directory C:\HelloWorld, copy the 2x files Opcodes.dat and smsexamine.exe from SMS Examine zip.

Launch command prompt, change directory to cd C:\HelloWorld. Type: smsexamine.exe output.sms.
This action will generate output.sms.asm and any data files. Launch ConTEXT. Open output.sms.asm: Follow instructions to setup emulator hotkeys for: F10 (Fusion) F11 (Meka) + HOTKEY F12 (Emulicious).

Press F12 to run program in Emulicious. Ensure VDP constraints are ENABLED to emulate real hardware.

Note: in Emulicious we are able to debug through the HelloWorld source assembly code:

Compare machine code in the debugger with the raw binary output file from output.sms.

Update the build.bat script to include the disassemble step. Clean up and delete any unnecessary files:
@echo off
sdcc -c -mz80 main.c
sdcc -o output.ihx -mz80 --data-loc 0xC000 --no-std-crt0 crt0_sms.rel main.rel SMSlib.lib
ihx2sms output.ihx output.sms
smsexamine.exe output.sms
del *.ihx > nul
del *.lk > nul
del *.lst > nul
del *.map > nul
del *.noi > nul
del *.sym > nul
output.sms

Summary
Now the devkitSMS has been downloaded, installed and setup, it is possible to write full homebrew demos and / or video games to target real Sega Master System hardware! This will be the topic of the next post.

Tuesday, July 4, 2017

Sega Master Everdrive

In 2013, we checked out Sega Retro Gaming to mark the 30 year anniversary [July 1983] launch of the Sega SG-1000 and SC-3000. We also checked out the Sega Master System as these were the last ever 8-bit video game consoles manufactured by Sega built using the Z80 chip.

Here, we installed an emulator on a modern-day computer and downloaded ROMs in order to play some classic Sega retro games. Now we would like to play these game on real hardware via Master Everdrive.
Let’s check it out!

Description
The Master Everdrive is a multi-cart for the Sega Master System which loads ROMs in the console itself: Store ROM files on SD card. Plug SD card into Everdrive and load Everdrive into Master System cart slot.

Features
The Master Everdrive Printed Circuit Board (PCB) is built by @krikzz and contains the following features:
  • FRAM for game saves (no battery required)
  • Max supported ROM size is 8Mbit (1Mbyte)
  • SMS and SG-1000 games are supported
  • Save RAM data can be stored or loaded from the SD card
  • Cartridge used on Game Gear via Master Gear Converter
  • Codemasters and Sega mappers are supported
  • SD/SDHC cards supported up to 32GB
  • FAT16 and FAT32 support
Therefore, the Everdrive allows entire library of SG-1000 + Master System games on a single cartridge! Note: valid binary files should have extension *.sg [SG-1000] *.sc [SC-3000] *.sms [Master System]

Requirements
Purchase the following equipment in order to play classic 8-bit Sega retro video games on real hardware:
  1. Sega Master System
  2. Master Everdrive
  3. SD card [storage]
  4. USB SD card reader
  5. CRT TV [optional]

1. Sega Master System
 Amazon  Sega Master System 1
 The Rage  Shop Sega [incl. SMS]
 eBay  SEGA Master System Original

2. Master Everdrive
 Stone Age Gamer  Master Everdrive (Deluxe Edition)
 Retro Towers  Master Everdrive (Cartridge Form) With Shell
 eBay  Everdrive Sega Master System + Carcasa

3. SD card
If / when you buy a Master Everdrive from Stone Age Gamer there is an option to include 2GB SD card.

4. SD card reader
Some computers do not have an SD drive therefore is may be necessary to buy a USB SD card reader.

5. CRT Television
Optional extra however a CRT Television would be necessary to play Light Phaser games like Rambo III.

Instructions
Here are some You Tube videos on the Master Everdrive beginning with this cool Cart Review "tutorial":
 You Tube  Fantastic Flashcarts
 You Tube  SMS Flashcart Demo
 You Tube  Master Everdrive Opening

Homebrew
Finally, we would like to play many of the SG-1000 + Master System Homebrew games available on real hardware via the Master Everdrive! Checkout SMS Power web site especially Homebrew + Competitions.

Choices to build your own 8-bit Sega Homebrew games generally result in 2x options: writing game code in pure Z80 assembly or writing game code in C and using cross compiler to generate the binary output. References: Sega Console Programming or z88dk Programming Setup or z88dk Programming Sample

Either way, it is imperative there are enough clock cycles, i.e. at least 26 clock cycles, between two Video RAM (VRAM) writes when in the active phase. Otherwise VRAM corruption will occur as graphics glitches!

Emulation
Emulate graphics on real hardware to check for potential glitches in the Visual Display Processor (VDP). Download Emulicious emulator. Setup Options | Emulation | Master System | Emulate VDP constraints.

Example
Download and extract "Hello World". Launch ConTEXT editor, choose File menu, Open, "Hello World.asm" Follow Sega Console Programming to setup ConTEXT F9, F10, and F11, keys. Now setup the F12 key:

F12 - Emulicious Execute: Emulicious.bat
Parameters: "%poutput.sms"
Start in: C:\PathTo\Emulicious-with-Java

Press F9 to compile and link "Hello World.asm". This generates the "output.sms" binary file.
Press F12 to run Hello World in Emulicious emulator [Emulate VDP constraints real hardware]

Summary
To summarize, the Master Everdrive is a great way to play classic Sega retro games on real hardware.
It also makes it possible to play many of the Homebrew games available on the Sega Master System.

In 2014, we checked out z88dk as a way to write our own Homebrew game code in C language as an alternative to pure Z80 assembly. This is how 3D City and other SMS homebrew games were built.

Unfortunately, it seems that the z88dk does not allow for enough clock cycles between multiple VRAM writes, which results in graphics glitches! The devkitSMS, however, does not seem to have this issue J

This will be the topic in the next post.

Friday, March 17, 2017

Large Scale C++ Projects II

In the previous post, we discussed Levelization to help reduce link-time dependencies in Large Scale C++ Projects. Now let's build here to discuss Insulation techniques to help reduce compile-time dependencies.

Insulation
Insulation is the process of avoiding or removing unnecessary compile-time coupling.
Insulation is a physical design issue whereas encapsulation refers to logical design.

If a component can be modified without forcing clients to recompile is said to be insulated.
The following sections list techniques to minimize excessive compile-time dependencies:

Remove Private Inheritance
Private Inheritance exposes some but not all functions in private base class to clients of derived class.
 // base.h
 #ifndef _INCLUDED_BASE
 #define _INCLUDED_BASE


 class Base
 {
 public:
     Base()  {}
     ~Base() {}

     void f1(int);
     int f1() const;
 };
 #endif//_INCLUDED_BASE
 // myclass.h
 #ifndef _INCLUDED_MYCLASS
 #define _INCLUDED_MYCLASS

 #ifndef _INCLUDED_BASE
 #include "base.h"
 #endif//_INCLUDED_BASE

 class MyClass : private Base
 {
 public:
     MyClass() {}
     Base::f1; // access declaration


 };
 #endif//_INCLUDED_MYCLASS

However, the same logical interface can be achieved without exposing clients to details of the class.
 // myclass.h
 #ifndef _INCLUDED_MYCLASS
 #define _INCLUDED_MYCLASS

 class Base;

 class MyClass
 {
 public:
     MyClass();
     MyClass(const MyClass& c);
     ~MyClass();

     MyClass& operator=(const MyClass& c);
     void f1(int i);
     int f1() const;

 private:
     Base* p_base;
 };
 #endif//_INCLUDED_MYCLASS

Instead of privately deriving from Base, an implementation now holds an opaque pointer to Base;
New member functions of MyClass are defined (out-of-line) to forward calls to functions in Base.
 // my_class.c
 #include "myclass.h"
 #include "base.h"

 MyClass::MyClass()                 : p_base(new Base) {}
 MyClass::MyClass(const MyClass& c) : p_base(new Base(*c.p_base))  {}

 MyClass::~MyClass()
 {
     delete p_base;
 }

 MyClass& MyClass::operator=(const MyClass& c)
 {
     if (this != &c)
     {
         delete p_base;
         p_base = new Base(*c.p_base);
     }

     return *this;
 }
 void MyClass::f1(int i)
 {
     p_base->f1(i);
 }
 int MyClass::f1() const
 {
     return p_base->f1();
 }

Remove Embedded Data Members
Insulate clients from an individual implementation class:
  • Convert all embedded instances of that implementation class to pointers (or references)
  • Manage those pointers explicitly in constructors, destructors and assignment operators

That is, convert HasA relationship to HoldsA to improve insulation.
Here, compare before insulating clients of class to after insulation.
 // myclass_before.h
 #ifndef _INCLUDED_MYCLASS_BEFORE
 #define _INCLUDED_MYCLASS_BEFORE

 #ifndef _INCLUDED_YOURCLASS
 #include "yourclass.h"
 #endif//_INCLUDED_YOURCLASS

 class MyClass
 {
 public:
     MyClass();
     ~MyClass();
     int getValue() const;
     int getCount() const
     {
         return count;
     }

 private:
     YourClass yours;
     int count;
 };
 #endif//_INCLUDED_MYCLASS_BEFORE

 // my_class_before.c
 #include "myclass_before.h"


 MyClass::MyClass()
 {

 }
 MyClass::~MyClass()
 {

 }
 int MyClass::getValue() const
 {
     return yours.getValue();
 }
 // myclass_after.h
 #ifndef _INCLUDED_MYCLASS_AFTER
 #define _INCLUDED_MYCLASS_AFTER


 class YourClass;


 class MyClass
 {
 public:
     MyClass();
     ~MyClass();
     int getValue() const;
     int getCount() const
     {
         return count;
     }

 private:
     YourClass* p_yours;
     int count;
 };
 #endif//_INCLUDED_MYCLASS_AFTER

 // my_class_after.c
 #include "myclass_after.h"
 #include "yourclass.h"

 MyClass::MyClass()
 {
     p_yours = new YourClass;
 }
 MyClass::~MyClass()
 {
     delete p_yours;
 }
 int MyClass::getValue() const
 {
     return p_yours->getValue();
 }

Remove Private Member Functions
Private member functions, although encapsulated, are part of the component's physical interface.
Instead of making functions private, make them static free (non-member) declared at file scope.

Compare an original class, modified with only private static functions then with static free functions:
 // myclass_before.h
 #ifndef _INCLUDED_MYCLASS_BEFORE
 #define _INCLUDED_MYCLASS_BEFORE

 class MyClass
 {
 public:
     int getValue() const;
 
 private:
     int value() const;
 };
 #endif//_INCLUDED_MYCLASS_BEFORE

Step One: convert each private member function to a private static member:
 // myclass_after1.h
 #ifndef _INCLUDED_MYCLASS_AFTER1
 #define _INCLUDED_MYCLASS_AFTER1

 class MyClass
 {
 public:
     int getValue() const;

 private:
     static int value(const MyClass&);
 };
 #endif//_INCLUDED_MYCLASS_AFTER1

 // myclass_after1.c
 #include "myclass_after1.h"
 int MyClass::getValue() const
 {
     return value(*this);
 }
 int MyClass::value(const MyClass& myclass)
 {
     return 0;
 }

Step Two: remove function declaration from header file and member notation from definition file:
 // myclass_after2.h
 #ifndef _INCLUDED_MYCLASS_AFTER2
 #define _INCLUDED_MYCLASS_AFTER2

 class MyClass
 {
 public:
     int getValue() const;
 };
 #endif//_INCLUDED_MYCLASS_AFTER2

 // myclass_after2.c
 #include "myclass_after2.h"
 int MyClass::getValue() const
 {
     return value(*this);
 }
 static int value(const MyClass& myClass)
 {
     return 0;
 }

Remove Private Member Data
Removing private static data is easy for inline member functions that do not require direct access:
Move static member data into a static variable defined at file scope in the component's .c file.

Compare original class with private static member data and modified class with static file-scope data:
 // myclass_before.h
 #ifndef _INCLUDED_MYCLASS_BEFORE
 #define _INCLUDED_MYCLASS_BEFORE

 class MyClass
 {
 public:

 private:
     static int s_count;
 };
 #endif//_INCLUDED_MYCLASS_BEFORE

 // my_class_before.c
 #include "myclass_before.h"
 int MyClass::s_count;
 // myclass_after.h
 #ifndef _INCLUDED_MYCLASS_AFTER
 #define _INCLUDED_MYCLASS_AFTER

 class MyClass
 {
 public:

 private:

 };
 #endif//_INCLUDED_MYCLASS_AFTER

 // my_class_after.c
 #include "myclass_after.h"
 static int s_count;

Remove Compiler-Generated Functions
The compiler will auto-generate the following functions if not found: constructor, copy constructor, assignment operator and/or destructor. However, truly insulating class must define these explicitly.

Remove Include Directives
Unnecessary #include directives can cause compile-time coupling where none would otherwise exist: Move all unnecessary #include directives from a header file to .c file with forward class declarations.
 // bank.h
 class USD;    // class declaration instead of #include
 class CAD;    // class declaration instead of #include
 class NZD;    // class declaration instead of #include
 
 class Bank
 {
 public:
     USD getUSD() const;
     CAD getCAD() const;
     NZD getNZD() const;
 };

An alternative is to place redundant guards around each #include directive in every header file.
Although unpleasant, this may significantly reduce compile times in much larger C++ projects.
 // bank.h
 #ifndef _INCLUDED_BANK
 #define _INCLUDED_BANK
 
 #ifndef _INCLUDED_USD
 #include "usd.h"
 #endif//_INCLUDED_USD
 
 #ifndef _INCLUDED_CAD
 #include "cad.h"
 #endif//_INCLUDED_CAD
 
 #ifndef _INCLUDED_NZD
 #include "nzd.h"
 #endif//_INCLUDED_NZD
 
 class Bank {};
 #endif//_INCLUDED_BANK

Remove Enumerations
Judicious use of enumerations, typedefs, + other constructs with internal linkage achieve good insulation: Move enumerations and typedefs to .c file and replace them as private static const member of the class.

Summary
Generally if a component is used widely throughout the system, its interface should be insulated.
However, insulated interfaces are not always practical, e.g. lightweight, reusuable components.

Techniques
 Remove Private Inheritance  Convert WasA relationship to HoldsA
 Remove Embedded Data Members  Convert HasA relationship to HoldsA
 Remove Private Member Functions  Make them static at file scope and move into .c file
 Remove Private Member Data  Extract a protocol and/or move static data to .c file
 Remove Compiler Functions  Explicitly define these functions
 Remove Include Directives  Remove include directives or replace with class declarations
 Remove Enumerations  Relocate to .c file and replace as const static class member data

Conclusion
In conclusion, two important techniques can be used to mitigate cyclic dependencies in C++: Levelization can reduce link-time dependencies and Insulation can minimize compile-time dependencies. Awesome J

Tuesday, February 14, 2017

Large Scale C++ Projects

C++ continues to be one of the preferred programming languages to develop professional applications and there is much information that documents C++ coding standards and how to write Effective C++.

However, it seems rare to find information that documents how to use the C++ language effectively;
That is: write C++ in such a way that minimizes cyclic, link and compile-time dependencies in C++.

Objective
The objective of this post is to gain insight into the design of large, high-quality C++ software systems:
Create highly maintainable + testable software that uses increasing number of classes and lines of code.

Reference
The majority of information here can be found in Large-Scale C++ Software Design book by John Lakos.

Definitions
 Declaration  Introduces a name into a program
 Definition  Provides a unique description of an entity within a program
 Translation Unit  Single implementation file that includes all header files
 Internal Linkage  Name local to translation unit and cannot collide with identical name at link time
 External Linkage  In a multi-file program a name can interact with other translation units at link time

Issues
Poorly written C++ is difficult to understand + maintain. As programs get large the following issues occur:

Cyclic Dependencies
C++ components have tendency to get tangled up in each other which results in tightly physical coupling;
e.g. 2x components Rectangle and Window: Rectangle uses the Window and Window uses the Rectangle.
 // rectangle.h
 #ifndef _INCLUDED_RECTANGLE
 #define _INCLUDED_RECTANGLE

 class Window;

 class Rectangle
 {
 public:
     Rectangle(const Window& w);
 };
 #endif//_INCLUDED_RECTANGLE
 // window.h
 #ifndef _INCLUDED_WINDOW
 #define _INCLUDED_WINDOW

 class Rectangle;

 class Window
 {
 public:
     Window(const Rectangle& r);
 };
 #endif//_INCLUDED_WINDOW
Now, both objects in the system must know about each other and #include the other object's header file.
Therefore, it is now not possible to compile, link, test and use one component without the using other!

Excessive Link-Time
Cyclic dependencies make it necessary to link most dependent objects in order to test any of them at all.
Not only does this increase the executable size but can make the linking process unduly slow and painful!

Excessive Compile-Time
When developing C++ programs, changes to a single header file can sometimes cause many translation units to recompile. Why? Because the unnecessary inclusion of one header file by another is a common source of excessive coupling in C++.

Ignoring compile-time dependencies can cause translation units to unnecessarily include header files.
This results in excessive compile-time dependencies which can reduce compilation speeds to a crawl!

Poor Physical Design
This addresses design issues surrounding the physical entities of a system e.g. files, directories, libraries as well as organizational issues e.g. compile-time and link-time dependencies between physical entities.

Good physical design implications often dictate the outcome of logical design decisions;
Therefore avoid logical design choices that would imply cyclic physical dependencies.

Testing Challenges
Complex, well-designed software systems are built from layered parts that should have been tested thoroughly in isolation, then within a sequence partial subsystems, and as a fully integrated product.

Therefore, it must be possible to decompose the entire system into its single units of functionality.

Summary
Cyclic link-time dependencies among translation units can undermine understanding, testing, reusability. Unnecessary or excessive compile-time dependencies increase compilation cost + destroy maintainability.

Most C++ design books address only the logical design issues of project (classes, functions, inheritance).
However, quality of physical design often dictates improved outcome of many logical design decisions!

Techniques
Two important techniques are discussed to mitigate cyclic dependencies in C++:
 Levelization  Techniques used to help reduce link-time dependencies
 Insulation  Techniques used to minimize compile-time dependencies


Levelization
Levelization refers to the technique for reducing the link-time dependencies within a system.
Therefore, a system is levelizable when there are no cyclic dependencies, that is, acyclic.

Link-time dependencies within a system establish the overall physical quality of a system;
e.g. understandability, maintainability, testability and reusability tied to a physical design.

The following sections list techniques to help reduce link-time dependencies:

Escalation
Refer back to the original example of 2x mutually dependent objects: Rectangle and Window.
Move the cyclic functionality into a higher level component; a technique called escalation.

If peer components are dependent then it may be possible to escalate interdependent functionality;
Each component becomes static members in a higher-level component that depends on the original.
 // boxutil.h
 class Rectangle;
 class Window;
 
 class BoxUtil
 {
 public:
     static Rectangle toRectangle(const Window& w);
     static Window toWindow(const Rectangle& r);
 };

Demotion
Move the common functionality to lower levels of the physical hierarchy; a technique called demotion.
The new lower-level component is shared upon each of which the original component(s) depends.

Opaque Pointers
In order to compile a function, the compiler needs to know the size and layout of the object it uses.
The compiler does this by #include the header file of the component containing the class definition.

A function f uses a type T in size if compiling the body of f requires having first seen definition of T.
A function f uses a type T in name only if compiling f does not require having seen definition of T.

A pointer is opaque if the type definition to which it points is not included in current translation unit.
This technique is sometimes referred to as the Pointer to Implementation idiom or the Pimpl idiom.
 // handle.h
 class Foo;
 
 class Handle
 {
 public:
     Handle(Foo* foo) : p_opaque(foo) {}
 
     Foo* get() const { return p_opaque; }
     void set(Foo* foo) { p_opaque = foo; }
 
 private:
     Foo* p_opaque;
 };

Dumb Data
Any kind of information that an object holds but does not know how to interpret.
Such data must be used in the context of another object, at a higher level.

E.g. rather than identifying objects by opaque pointer, we may use a short integer index instead. However, an indexed approach does sacrifice type safety when compared to opaque pointers.

Redundancy
This technique deliberately repeats code or data to avoid or remove unwanted physical dependencies.
The additional coupling associated with some forms may outweigh the advantage gained from reuse.

Callbacks
A function supplied by a client to allow lower-level component to take advantage of higher-level context. Callbacks are useful in event-based programming to break dependencies between co-operating classes.

However, when used inappropriately, callbacks can blur the responsibility of the lower-level objects.
This can result in unnecessary conceptual coupling that is difficult to understand, maintain + debug.

Factoring
Extracting pockets of cohesive functionality: move them where they can be independently tested and reused; General technique for reducing the burden imposed by cyclicly dependent classes. Factoring:
  • A system into smaller components: more flexible yet more complex pieces to work
  • A concrete class into two classes containing higher and lower levels of functionality
  • An abstract base class into 2x classes: pure interface and partial implementation

Escalating Encapsulation
A common misconception is that each component must encapsulate all implementation details.
Instead we can hide a number of useful low-level classes behind single component: Wrapper.
Note: Wrapper is a component-based implementation of the Façade design pattern.

Summary
By proactively engineering the system as a levelizable collection of components creates a hierarchy of modular abstractions that can be understood, tested, reused independently from the rest of the design.

Techniques
 Escalation  Move mutually dependent functionality higher in physical hierarchy
 Demotion  Move mutually dependent functionality lower in physical hierarchy
 Opaque Pointers  Having an object use another in name only [Pimpl idiom]
 Dumb Data  Use data that indicates dependency on peer object in higher object context
 Redundancy  Deliberately avoid reuse: repeat small amounts of code to avoid coupling
 Callbacks  Client-supplied functions enable lower-level subsystems to perform tasks
 Factoring  Move independent testable behaviour from implementation avoids coupling
 Escalating Encapsulation  Implementation hidden from clients to higher level in physical hierarchy

Conclusion
In conclusion, this post discussed Levelization techniques to help reduce link-time dependencies in Large Scale C++ Projects. Next we will discuss Insulation techniques to help reduce compile-time dependencies.

This will be the topic in the next post.

Friday, January 20, 2017

Candy Kid WiX Installer

Candy Kid is a simple maze chase video game written in XNA using C#/.NET. All development was done on Windows therefore it made sense to build a PC version of the game to be published available for sale.

In order to build all binary files plus game content into a single deployable package, the Windows Installer XML [WiX] toolset was used. WiX is free software that builds Windows Installer packages from XML code.

Let's check it out!

Pre Requisites
First, obtain Candy Kid release build complete with game executable, managed assemblies and content:
 Folder  Content  All game content
 File  log4net.dll  log4net logging
 File  Ninject.dll  IoC Container
 File  WindowsGame.exe.config  Game configuration
 File  WindowsGame.exe  Game executable
Next, download WiX Installer here. Note: post is based heavily on the XNA Installer published by Cygon!

Implementation
Launch Visual Studio. File | New Project... | Windows Installer XML | Setup Project | CandyKidInstaller. Uncheck Create directory for solution. Delete Product.wxs and copy the following folders as per Cygon:
 Folder  Description
 Content  Candy Kid release build (as above)
 Documents  Includes license.rtf document only
 References  Includes the 2x Nuclex.Setup DLLs
 Resources  Includes all bmp, ico, and png files
 Source  Installer (wxs) + Include (wxi) files
Note: C:\Program Files (x86)\SharpDevelop\5.1\data\resources\InstallerBitmaps required in Resources.

Actions
Right click project name | Properties | Output name: RetroCandyKid. Next, action these following tasks: Note: anytime you need a GUID choose Tools menu | Create GUID | 2. DEFINE_GUID | New GUID | Copy
  • Add the Program Menu
  • Add Desktop Shortcut
  • Add the Program Files
  • Harvest content folder

Program Menu
Add this change to Files.wxs. This blob of XML is responsible to set Program Menu entry once installed. Important: make note of the Component Id as this will be used in Setup.wxs for Feature ComponentRef.
<Directory Id='ProgramMenuFolder' Name='Programs'>
<Directory Id='MyGameProgramMenuFolder' Name='Retro Candy Kid'>
        <Component Id="StartMenuEntriesComponent" Guid="{GUID}" DiskId="1">
                <RemoveFolder Id='MyGameProgramMenuFolder' On='uninstall' />
                <RegistryValue
                        Root='HKCU'
                        Key='SOFTWARE\SteveProStudios\RetroCandyKid'
                        Name="ProgramMenuFolder"
                        Type='string'
                        Value='Installed'
                        KeyPath='yes' />
        </Component>
</Directory>
</Directory>

Desktop Shortcut
Add this change to Files.wxs. This blob of XML is responsible to set the Desktop shortcut once installed. Important: make note of the Component Id as this will be used in Setup.wxs for Feature ComponentRef.
<Directory Id="DesktopFolder" Name="Desktop">
        <Component Id="ApplicationShortcutDesktop" Guid="{GUID}">
                <Shortcut
                        Id="ApplicationDesktopShortcut"
                        Name="Retro Candy Kid"
                        WorkingDirectory="INSTALLDIR"
                        Icon="ProductIcon.ico"
                        Target="[INSTALLDIR]WindowsGame.exe" />
                <RemoveFolder Id="DesktopFolder" On="uninstall" />
                <RegistryValue
                        Root="HKCU"
                        Key='SOFTWARE\SteveProStudios\RetroCandyKid'
                        Name="DesktopFolder"
                        Type="integer"
                        Value="1"
                        KeyPath="yes" />
        </Component>
</Directory>

Program Files
Add this change to Files.wxs. This blob of XML is responsible to install the executable and all assemblies. Important: make note of the Component Id as this will be used in Setup.wxs for Feature ComponentRef.
<Directory Id="ProgramFilesFolder" Name="PFiles">
<Directory Id="INSTALLDIR" Name="RetroCandyKid">
<Component Id="MyComponent" Guid="{GUID}" DiskId="1">

<File Id="WindowsGameExe" Name="WindowsGame.exe.config"
          Source="$(sys.SOURCEFILEDIR)/../Content/WindowsGame.exe.config" />
<File Id="log4netdll" Name="log4net.dll"
          Source="$(sys.SOURCEFILEDIR)/../Content/log4net.dll" />
<File Id="NinjectDll" Name="Ninject.dll"
          Source="$(sys.SOURCEFILEDIR)/../Content/Ninject.dll" />

<File Id="GameExecutable" Name="WindowsGame.exe" KeyPath="yes"
          Source="$(sys.SOURCEFILEDIR)/../Content/WindowsGame.exe">
         <Shortcut
                Id="MyGameShortcut"
                Name="Retro Candy Kid shortcut"
                Directory="MyGameProgramMenuFolder"
                Advertise="yes"
                WorkingDirectory="INSTALLDIR"
                Icon="ProductIcon.ico" />   
</File>
</Component>
</Directory>
</Directory>

Harvest Content
In order to copy the Content directory to the install folder, use the Wix "Heat" application to harvest the directory. The Wix Harvest Tool (Heat) generates the required fragment into its own Installer (wxs) file.

First, ensure that Wix Toolset is included in Environment PATH. Control Panel | Advanced system settings. Environment Variables | Path | Edit | Add install directory: C:\Program Files (x86)\WiX Toolset v3.10\bin

Next, launch Command Prompt and harvest content from Game executable level beneath Content folder: heat dir . -o MyHarvestedStuff.wxs -scom -frag -srd -sreg -gg -cg MyComponentGroupId -dr INSTALLDIR

Find and replace in wxs file Source="SourceDir\ to Source="$(sys.SOURCEFILEDIR)\..\Content\
Finally, remove all top entries with Directory="INSTALLDIR". Make note of the ComponentGroupRef Id.


Setup.wxs
Main entry point: update Product XML blob and complete the Feature list as per the components (above). Ensure you have ProductIcon value set as Icon for shortcut and Icon displayed in Add/Remove programs!
<Product Id="{GUID}"
         Name="Retro Candy Kid"
         Language="1033"
         Version="1.0.0"
         Manufacturer="StevePro Studios"
         UpgradeCode="{GUID}">

<Property Id="ALLUSERS" Value="1" />
<Property Id='ARPPRODUCTICON' Value='ProductIcon' />

<Feature Id="MyFeature" Title="Required Files" Level="1">
        <ComponentRef Id="StartMenuEntriesComponent" />
        <ComponentRef Id="ApplicationShortcutDesktop" />
        <ComponentRef Id="MyComponent" />
        <ComponentGroupRef Id="MyComponentGroupId" />
</Feature>

<!-- Includes the user interface definition defined in another file -->
<UIRef Id="UserInterface"/>
<Icon Id="ProductIcon" SourceFile="$(sys.SOURCEFILEDIR)/../Resources/Game.ico" />
<Icon Id="ProductIcon.ico" SourceFile="$(sys.SOURCEFILEDIR)/../Resources/Game.ico" />
</Product>

UserInterface.wxs
Update the relative location for "Default dialog resources for the setup" bitmap files e.g. banner and info:
 Binary  Source
 dialog.bmp  $(sys.SOURCEFILEDIR)/../Resources/InstallerBitmaps/default-dialog.bmp
 banner.bmp  $(sys.SOURCEFILEDIR)/../Resources/InstallerBitmaps/default-banner.bmp
 info.bmp  $(sys.SOURCEFILEDIR)/../Resources/InstallerBitmaps/info.bmp
 up.bmp  $(sys.SOURCEFILEDIR)/../Resources/InstallerBitmaps/up.bmp
 new.bmp  $(sys.SOURCEFILEDIR)/../Resources/InstallerBitmaps/new.bmp

Build
Finally, build WiX Installer from within Visual Studio to generate the MSI package RetroCandyKid.MSI.
Download source code here.

Summary
Double click to RetroCandyKid.MSI to install. Ensure there is a Program Menu entry + Desktop shortcut!
Retro Candy Kid is also in Programs and Features and could be uninstalled; not that you would want to J

Sunday, January 1, 2017

Retrospective VIII

Last year, I conducted a simple retrospective for 2015. Therefore, here is a retrospective for 2016.

2016 Achievements
  • Complete first Sega Master System video game 3D City using C/Z80 assembler
  • Enter 3D City into Sega Master System annual coding competition for this year
  • Complete Retro Candy Kid blog topics such as Press Release and WiX Installer
  • Integrate IPv6-only Networking into Unity3D code base using the Lidgren API
  • Document SVN Externals to scale out single game code library across clients
  • Create repositories on GitHub and publish source code from various projects
  • Scale Push Notifications application across iOS / Android improved efficiency
  • Transition existing C++ OpenGL tutorial studies to new Vulkan graphics API
Note: reviewed game project in C / Z80 assembler for Sega Master System is an achievement!

2017 Objectives
  • Complete another Sega Master System video game that can run on real hardware
  • Integrate Git Submodules similar to SVN Externals to scale out code across clients
  • Evaluate monetization plugins for MonoGame / XNA game projects e.g. Purchases
  • Check out opportunity to incorporate Virtual Reality in Unity3D game engine code

2016, as every Virtual Reality evangelist will tell you, was the year of VR. Game Engines such as Unity5 attempt to ease development transition to VR by adding Virtual Reality Supported checkbox to Settings. However, repairing breakages from Unity4 to Unity5 game project upgrade is often challenging enough.

Homebrew
Outside commercial game development, homebrew projects continue to be very popular: SMS Power hosted its annual Sega Master System coding competition and attracted more than two dozen entries.

This provided great opportunity to complete first Sega Master System video game 3D City using z88dk. Unfortunately, the game runs only in emulator. R+D has begun to ensure games run on real hardware.

Summary
Another busy year coding from Z80 assembler to C/C++ to C#/.NET certainly does keep life interesting!