The issue now for Windows users is to seamlessly transfer all keyboard shortcuts + muscle memory to Mac!

Let's check it out!
Documentation
If you are new to the Mac then the first thing to do is acquaint yourself with keyboard shortcuts as outlined in various online documentation pages and especially with what are those symbols shown in menus on Mac:

Keyboards
The major differences between Windows and Mac keyboards are the special keys found on either side of the spacebar known as modifier keys and are typically used for System Keybindings. Here is quick comparison:
| Location | Windows | Mac OS | Keycode Modifier | Menu Symbol |
| Left | Ctrl | Ctrl | @ | ⌃ |
| Middle | WinKey | Option | ~ | ⌥ |
| Right | Alt | Command | ^ | ⌘ |
| Left | Shift | Shift | $ | ⇧ |
Out-of-the-box, there are some common keyboard shortcuts shared across Windows and Mac, for example:
| Alt + Tab | Toggle between all open applications |
| Ctrl + Tab | Toggle between all open tabs within an application |
However, for all common Ctrl + type Windows keyboard shortcuts the Mac prefers to use the Command key:
| Ctrl + A | Select all | Ctrl + Q | Quit application |
| Ctrl + C | Copy item | Ctrl + S | Save item |
| Ctrl + F | Find item | Ctrl + V | Paste item |
| Ctrl + N | New item | Ctrl + W | Close window |
| Ctrl + O | Open item | Ctrl + X | Cut item |
| Ctrl + P | Print item | Ctrl + Z | Undo action |
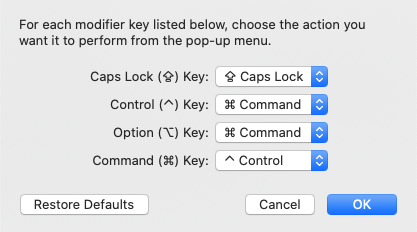
Therefore, remap the modifier keys in System Settings | Keyboard | Keyboard Shortcuts... | Modifier Keys:

IMPORTANT: in order to retain Alt + Tab functionality we have now had to re-map Option to Command also! There is an AltTab utility but companies may disallow the installation of third party software, unfortunately.
System Settings
Customize your Mac with System Settings. Launch System Settings from Dock and make following changes:
| General | Language & Region | Region = New Zealand |
| Accessibility | Keyboard | Full Keyboard Access |
| Accessibility | Pointer Control | Trackpad Options | Use trackpad for scrolling = DISABLED |
| Appearance | Show scroll bars | Automatically based on mouse or trackpad |
| Desktop & Dock | Dock | Size = Small |
| Desktop & Dock | Dock | Position on screen = Left |
| Desktop & Dock | Desktop & Stage Manager | Click wallpaper to reveal desktop = Only in Stage Manager |
| Desktop & Dock | Group windows by application | DISABLED |
| Desktop & Dock | Displays have separate Spaces | DISABLED |
| Displays | Dual Monitors | 1920 x 1080 (Default) |
| Users & Groups | Administrator | Update login photo |
| Keyboard | Key repeat rate | Fast |
| Keyboard | Delay until repeat | Short |
| Keyboard | Turn keyboard backlight off after inactivity | Never |
| Keyboard | Press fn key to | Do Nothing |
| Keyboard | Keyboard navigation | Enabled |
| Trackpad | Scroll & Zoom | Natural scrolling = DISABLED |
Here is some more information explaining the rationale behind some of these System Settings options set:
|
Keyboard Shortcuts
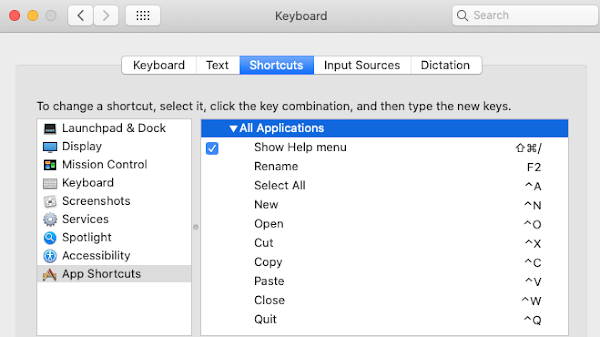
Customize your general Mac keyboard shortcuts. Launch System Settings | Keyboard | Keyboard Shortcuts:

|

|

|

|

|

|

|

|
Here is my quick summary of Keyboard Shortcuts setup that will be compatible with Application navigation:
| Launchpad & Dock | Turn Dock hiding on/off | DISABLED |
| Launchpad & Dock | Show Lauchpad | DISABLED |
| Mission Control | Show Desktop [F11] | DISABLED |
| Mission Control | Move left a space [Cmd + left] | DISABLED |
| Mission Control | Move right a space [Cmd + right] | DISABLED |
| Keyboard | Move focus to the window toolbar [Cmd + F5] | DISABLED |
| Keyboard | Move focust to next window [Ctrl + `] | ENABLED |
| Input Sources | Select previous input source [Cmd + Space] | DISABLED |
| Screenshots | Save picture of screen as a file [Ctrl + 3] | ENABLED |
| Screenshots | Save picture of selected area as a file [Ctrl + Shift + 4] | ENABLED |
| Spotlight | Show Spotlight search [Ctrl + Space] | DISABLED |
| Accessibility | Turn VoiceOver on or off [Ctrl + F5] | DISABLED |
| App Shortcuts | All Applications | Rename | F2 |
Here is more information explaining the rationale behind some of these Keyboard Shortcuts... options set:
|
Finder
The Finder is the home base for your Mac: you use the Finder to organize your folders and files on the Mac. Launch Finder | Settings... Leave all options in Finder Settings but check all checkboxes on Advanced tab:

In View menu check "as Columns" + "Sort By Name". Show all relevant Sidebar, Toolbar, Status options etc:
Here are some Windows keyboard shortcut equivalents. *Customization via App Shortcuts as shown below:
| Ctrl + N | New Finder Window |
| Ctrl + Shift + N | New Folder |
| Ctrl + O | Open File |
| Ctrl + Shift + G | Go to Folder... |
| F2* | Enter | Rename File / Folder |
| Alt + Backspace | Delete File / Folder |
Shortcuts: Right click folder | Show in Enclosing folder. Right click folder the Status Bar | Copy
 |
 |
Finally, here are two handy aliases to hide and show private files and folders on Mac via ~/.bash_profile:
|
Python
As per this post, Python is installed on most Mac OS/X systems by default. Also, one can install Python when you install Xcode Command Line Tools. Another option is update Python from the official website e.g. v3.12. IMPORTANT: when coding in Python activate the created virtual environment: source .venv/bin/activate.
As per this post, we installed open source Python distribution Anaconda used for data science. However, on the Mac after launch Terminal and enter jupyter notebook you may encounter the following couple errors:
Error #1: Jupyter Notebook 500 : Internal Server Error - follow instructions here to resolve the issue:
|
pip install --upgrade jupyterhub pip install --upgrade --user nbconvert |
Error #2: ModuleNotFoundError: No module named 'jupyter_server.contents' - follow instructions here:
|
pip uninstall traitlets pip install traitlets==5.9.0 jupyter notebook http://localhost:8889/notebooks |
Terminal
The Mac terminal may be zsh by default. However, change your default shell via Settings... | General | Shell open with: Command path /bin/bash or enter chsh -s /bin/bash. Confirm BASH is now in Terminal title!
IMPORTANT: remove silence deprecation warning | Enter the following into Terminal for ~/.bash_profile:
| echo "export BASH_SILENCE_DEPRECATION_WARNING=1" >> ~/.bash_profile |
Customize the Mac terminal to always show full directory path as the cursor similar to the Linux terminal:
| echo "export PS1='\u@\h:\w$ '" >> ~/.bash_profile |
Homebrew
Homebrew is a package manager for macOS which lets you install free and open-source software using your terminal. Launch terminal and issue the following commands to install Homebrew and update bash_profile:
|
/bin/bash -c "$(curl -fsSL https://raw.githubusercontent.com/Homebrew/install/HEAD/install.sh)"
echo 'eval "$(/opt/homebrew/bin/brew shellenv)"' >> ~/.bash_profile |
Install free and open-source software for Cloud Computing for example: minikube, KinD, Helm, Terraform:
| minikube | brew install minikube |
| KinD | brew install kind |
| Helm | brew install helm |
| Terraform | brew tap hashicorp/tap | brew install hashicorp/tap/terraform |
Cloud CLIs
Download and install Command Line Interfaces for all managed cloud providers e.g.: AWS, Azure, Google: Install the latest version of the AWS CLI. Download the macOS pkg file. Confirm installation aws version. Install Azure CLI on macOS using brew brew update && brew install azure-cli. Confirm install az version. Install the Google Cloud CLI. Download the Apple M1 package. Extract and execute install.sh | gcloud init.
Kubernetes
As per this post, install Kubernetes with Docker Desktop on Mac OS/X. Next, install and setup kubectl on the Mac OS/X. However, the default kubectl autocomplete setup quick reference may produce the following error
| bash: completion: function `__start_kubectl` not found |
If you experience this error then here is an alternative approach: first brew install bash bash-completion Set Terminal to use bash: Settings... | General | Shell open with: Command path /opt/homebrew/bin/bash
Finally, update ~/.bash_profile
|
BASH Profile
Dump out the contents of the ~/.bash_profile file and verify all the following aliases and commands exist:
| ||||||||||||||||||||||
Summary
To summarize, by remapping the modifier keys in System Settings has helped tremendously, however this method does not provide a complete one-to-one mapping for all keyboard shortcuts from Windows to Mac.
Another option is investigate global hotkeys in App Shortcuts for All Applications and specific Applications.

However, this could be extremely time-consuming and unsuccessful thus will keep the setup as is for now. Therefore, he is short list of mismatched keyboard shortcuts going forward and new key combos to learn:
| General | Ctrl + H | Hide current window of this front app |
| General | Ctrl + M | Minimize all open windows to the Dock |
| General | Ctrl + 1 | Restoring minimized window from Dock |
| General | Ctrl + ` | Move focus to next window of same app |
| General | Win + Tab | Use instead of default Ctrl + Tab option |
| Applications | Ctrl + Enter | Save current open document then exit |
After aligning keyboard shortcuts from Windows to Mac the next step is to transfer Application navigation! This will be the topic of the next post.


No comments:
Post a Comment