Tuesday, November 15, 2016

Unity3D and IPv6 Networking

At WWDC 2015, Apple announced the transition to IPv6-only network services in iOS 9. Starting June 1st 2016 all apps submitted to the App Store must support IPv6-only networking. Therefore, Unity3D posted Unity and IPv6 Support in response to this since many developers publish Unity games to the App Store.
Let's check it out!

IPv6
IPv6 (Internet Protocol version 6) is the most recent version of the Internet Protocol communications protocol that provides identification for computers on networks and routes traffic across the Internet.

Therefore, Apple's new requirement means that apps must be able to operate on an IPv6-only network!

Example
As an example, suppose that you have a typical client / server networked game that uses the Lidgren library as the networking layer to communicate messages from the client to the server and vice versa.

Lidgren
Initially, the Lidgren library uses IPv4-only specific APIs to communicate messages from the client to the server. Therefore, here is a short list of tasks to transition the code to support IPv6-only networking now:
  • Look for IPv4 addresses (e.g. 127.0.0.1, 8.8.4.4). Any hardcoded addresses should be removed. Prefer host names: use to look up IPv4 or IPv6 address of device for the proper type of network.

  • Look for the use of the IPAddress.AddressFamily property. Any code that branches based on the value of the AddressFamily must ensure the code handles IPv6-only networking option properly.

  • Look for the use of IPAddress.Any and IPAddress.Loopback fields. These fields work with IPv4 addresses not IPv6. Use IPAddress.IPv6Any and IPAddress.IPv6Loopback for IPv6 compatibility.

Fortunately, a Lidgren pull request has been submitted by jens-nolte to implement IPv6 Dual Mode, that is, upgrade Lidgren library to support both IPv4 and IPv6 network connections in client and server code.

However, all C#/.NET code in pull request is based on .NET Framework 4.5 whereas Unity uses Mono 3.5! Therefore, implement the server as Dual Mode but the client must detect at runtime either IPv4 or IPv6.

Server
Let's implement the server first [Dual Mode] as is easier + simply requires .NET Framework 4.5 (above). Channel all network connectivity through IPv6. If IPv6 then leave otherwise map IPv4 address to IPv6.

NetPeer.cs
public NetPeer(NetPeerConfiguration config)
{
  m_senderRemote = (EndPoint)new IPEndPoint(IPAddress.IPv6Any, 0);
}
public virtual NetConnection Connect(IPEndPoint remoteEndPoint, NetOutgoingMessage hailMessage)
{
  remoteEndPoint = NetUtility.MapToIPv6(remoteEndPoint);
}
NetPeer.Internal.cs
private void BindSocket(bool reBind)
{
  m_socket = new Socket(AddressFamily.InterNetworkV6, SocketType.Dgram, ProtocolType.Udp);
  m_socket.DualMode = true;

  var addr = m_configuration.LocalAddress.MapToIPv6();
  var port = reBind ? m_listenPort : m_configuration.Port;

  var ep = (EndPoint)new IPEndPoint(addr, port);
  m_socket.Bind(ep);
}
NetPeer.LatencySimulation.cs
internal bool ActuallySendPacket(byte[] data, int numBytes, IPEndPoint target, out bool connectionReset)
{
  target = NetUtility.MapToIPv6(target);
}
NetPeerConfiguration.cs
public NetPeerConfiguration(string appIdentifier)
{
  m_localAddress = IPAddress.IPv6Any;
}
NetUtility.cs
public static void ResolveAsync(string ipOrHost, ResolveAddressCallback callback)
{
  if (ipAddress.AddressFamily == AddressFamily.InterNetwork || 
      ipAddress.AddressFamily == AddressFamily.InterNetworkV6) {}
}
internal static IPEndPoint MapToIPv6(IPEndPoint endPoint)
{
  if (endPoint.AddressFamily == AddressFamily.InterNetwork)
  {
    return new IPEndPoint(endPoint.Address.MapToIPv6(), endPoint.Port);
  }
  return endPoint;
}

Client
Let's implement the client: detect network connectivity from IPv4 or IPv6 at runtime and inject either AddressFamily.InterNetwork | IPAddress.Any into Lidgren for IPv4 or AddressFamily.InterNetworkV6 | IPAddress.IPv6Any for IPv6.

Create custom class to store the IPAddress and AddressFamily from IPv4 or IPv6 and inject at runtime.
public struct NetGameConfig
{
  public NetGameConfig(IPAddress netIPAddress, AddressFamily netAddressFamily)
    : this()
  {
    NetIPAddress = netIPAddress;
    NetAddressFamily = netAddressFamily;
  }

  public IPAddress NetIPAddress { get; private set; }
  public AddressFamily NetAddressFamily { get; private set; }
}

public enum IPProtocol { IPv4, IPv6 }

Unity4
Note: if you are on an older version of Unity e.g. Unity4 then you must upgrade to Unity 4.7.2f1. If you use .NET / IL2CPP libraries, e.g. to support 64-bit architecture on iOS, then upgrade to Unity 4.7.2p1; Especially if ReceiveFrom() method is used on the Socket otherwise sender remote becomes corrupt!

Finally, remove any code referencing the LocalEndPoint property on the Socket otherwise an exception will be thrown. Again this is if you use IL2CPP scripting backend to support 64-bit architecture on iOS.

IMPORTANT
The corresponding code will not work on Android platform with Unity4: a SocketException will occur as Unity Technologies explicitly decided not to back port these changes. More information is available here.

NetClient.cs
public NetClient(NetPeerConfiguration config, NetGameConfig netGameConfig)
  : base(config, netGameConfig) {}
NetPeer.cs
public NetGameConfig NetGameConfig { get; protected set; }

public NetPeer(NetPeerConfiguration config, NetGameConfig netGameConfig)
{
  NetGameConfig = netGameConfig;
  m_senderRemote = (EndPoint)new IPEndPoint(netGameConfig.NetIPAddress, 0);
}
public NetConnection Connect(string host, int port)
{
  var addr = NetUtility.Resolve(host, NetGameConfiguration.NetAddressFamily);
  return Connect(new IPEndPoint(addr, port), null);
}
NetPeer.Discovery.cs
public bool DiscoverKnownPeer(string host, int serverPort)
{
  IPAddress address = NetUtility.Resolve(host, NetGameConfig.NetAddressFamily);
}
NetPeer.Internal.cs
private void BindSocket(bool reBind)
{
  m_socket = new Socket(NetGameConfig.NetAddressFamily, SocketType.Dgram, ProtocolType.Udp);
}
NetPeer.Send.cs
public void SendUnconnectedMessage(NetOutgoingMessage msg, string host, int port)
{
  IPAddress adr = NetUtility.Resolve(host, NetGameConfig.NetAddressFamily);
}
NetPeerConfiguration.cs
private NetGameConfig m_NetGameConfig;

public NetPeerConfiguration(string appIdentifier, NetGameConfig netGameConfig)
{
  m_NetGameConfig = netGameConfig;
  m_localAddress = m_NetGameConfig.NetIPAddress;
}
NetServer.cs
public NetServer(NetPeerConfiguration config, NetGameConfig netGameConfig)
  : base(config, netGameConfig) {}
NetUtility.cs
public static void ResolveAsync(string ipOrHost, AddressFamily addressFamily, ResolveAddressCallback callback)
{
  if (ipAddress.AddressFamily == addressFamily) {}
}
Finally, create an IPNetworkManager to get the host address for the IPProtocol type and resolve the DNS.


Testing
Apple recommend the easiest way to test for IPv6 DNS64 / NAT64 compatibility, which is the type of network most cellular carriers deploy, is to set up a local IPv6 DNS64 / NAT64 network with your Mac.

Hosts
If you would like to setup hosts files then assume example has 1x Game Server and 2x Game Clients:
 Environment  Platform  Mode  Address  Host
 Game Server  Windows PC  Dual  fc00:992b:a::1  GameServer.v6net
 Game Client  Windows PC  IPv4  fc00:992b:a::4  StevePro-PC.v6net
 Game Client  Mac OS/X  IPv6  fc00:992b:a::6  SteveProIMac.v6net

Game Server
Edit the hosts file located at C:\Windows\System32\drivers\etc
# localhost name resolution is handled within DNS itself.
127.0.0.1        localhost 
::1              localhost
fc00:992b:a::1   GameServer.v6net
fc00:992b:a::4   StevePro-PC.v6net
fc00:992b:a::6   SteveProIMac.v6net

Game Client [PC]
Edit the hosts file located at C:\Windows\System32\drivers\etc
# localhost name resolution is handled within DNS itself.
127.0.0.1        localhost 
::1              localhost
fc00:992b:a::1   GameServer.v6net
fc00:992b:a::4   StevePro-PC.v6net
Disable IPv4 networking to ensure IPv6-only connection. Local Area Connection | Double click (TCP/IPv6)

Game Client [Mac]
Launch terminal as root. Edit the hosts file located at /etc/hosts
# localhost is used to configure the loopback interface
# when the system is booting.  Do not change this entry.
127.0.0.1        localhost
255.255.255.255  broadcasthost
::1              localhost 
fc00:992b:a::1   GameServer.v6net
fc00:992b:a::6   SteveProIMac.v6net
Disable IPv4 networking to ensure IPv6-only connection. System Preferences | Network. Click Advanced
Download code sample here.

Summary
At the time of this writing, Lidgren uses IPv4-only specific APIs to communicate all networked messages. These APIs are built into .NET Framework 3.5 and therefore can currently be accessed from within Unity.

However, to access IPv6-only specific APIs from within Unity [Dual Mode] requires .NET Framework 4.5. The .NET Profile Upgrade is currently on the Unity roadmap for this functionality although there's no ETA!

Thursday, September 15, 2016

Candy Kid Press Release

A Press Release is an official statement issued to give information on particular matters e.g. Video Games! Here is the official Press Release for Retro Candy Kid and its full implementation with the assistance from @PhilipGHarris [writer, developer, designer] using MailChimp to distribute the Press Release accordingly.

Let's check it out!

MailChimp
MailChimp is an email marketing service used to directly send commercial messages, typically to a group of people, using email. MailChimp offers these main features: Campaigns | Templates | Lists | Reports:
 Campaigns   Campaigns are how you send template emails to the contacts in your MailChimp list.
 Templates   A template is an HTML file used to create the layout and basic design for a campaign.
 Lists   A MailChimp list is a powerful and flexible tool that helps you manage your contacts.
 Reports   MailChimp reports analyze clicks, opens, subscribers’ social activity, e-commerce data.

Therefore, let's use MailChimp to complete Press Release for Retro Candy Kid. Action the following tasks:
  • Get Promo Codes
  • Build Email List
  • Build Template
  • Send Campaign
Promo Codes
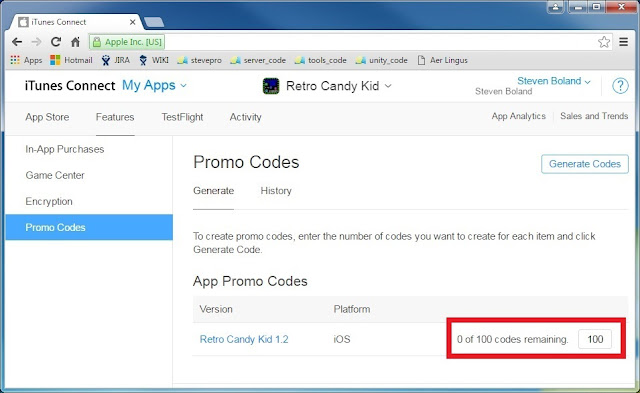
Generate iOS promo codes: Log in iTunes Connect. Select My Apps | Candy Kid | Features | Promo Codes.
Enter a number of Promo Codes required for Press Release (e.g. max 100) | Click Generate Codes button. Check "I have read and agree to the terms presented above". Generate Codes and download as a txt file.

Lists
MailChimp | Lists | Create List | Create List | Enter the following details to complete the list information:
 List name  CandyKidList
 Default From email address  steven_boland@hotmail.com
 Default From name  StevePro Studios
 Remind people how they signed up to your list  Enter reminder information
 Contact information for this list  Enter contact information

Next page: View subscribers | Import subscribers | CSV or tab-delimited text file | Next | Upload CSV file. Browse to CSV file and Check "I understand that my billing plan may be automatically upgraded" | Next. Match any unmatched columns: "Make a Selection" | New column name | e.g. COUPON | Save | Import.

Finally, ensure columns can be used as placeholders in Template: Settings | List fields and *|MERGE|* tags. Ensure the "Field label and type" values are aligned to the "Put this tag in your content" values!
 FULLNAME  FNAME  LNAME  COMPANY  EMAIL  COUPON
 Steven Boland  Steven  Boland  StevePro Studios  steve@stevepro.com  YY3FR7L7NNY3
 Suzanne Boland  Suzanne  Boland  FN Days Ltd  suzanne@stevepro.com  7YHALRJ39FJX
 Adriana Boland  Adriana  Boland  Stinky Inky Co.  adriana@stevepro.com  N6X4L79KKLNK
IMPORTANT: tags have maximum 10x characters thus better use "COMPANY" instead of ORGANIZATION.

Templates
MailChimp | Templates | Create Template | Code your own | Paste in code | Select | Edit code | ENTER:

Retro Candy Kid is a top-down maze chase video game inspired by the 8-bit title "Candy Kid".

Candy Mama enemies are always out to get you as you try and eat all the candy to complete the level. Simple!

Try it for yourself with this free iOS Promo Code: *|COUPON|*

Retro Candy Kid is available on mobile platforms (iOS / Android / Kindle) and PC.

You Tube http://www.youtube.com/watch?v=rEWGOwq4yAI
Facebook http://www.facebook.com/CandyKidVideoGame


Retro Candy Kid includes the following key features that were not available in the original 8-bit title:
 - All 100x levels are unlocked.
 - Double bonus pts available.
 - Giant candy for extra lives.
 - Free man every 20,000 pts.
 - Open tunnels or closed exits.
 - Avoid trees or Death trees.
 - God mode for invincibility.
 - Unlimited game continues.

Company Bio
StevePro Studios is an independent game developer that builds and publishes 80s retro arcade video games! The studio was founded by Steven Boland "SteveProXNA" in January 2007 as a "one man team of one" and is currently based in Dublin, Ireland.

Fact Sheet
The original 8-bit title Candy Kid was a "type-in" video game published by New Zealand's Sega Computer Magazine in the September 1984 issue, pages 17-18. Inspired by the Sega Retro Gaming scene, "Candy Kid" was re-written as "Retro Candy Kid" by StevePro Studios in September 2015.

Price point
 USD   0.99
 GBP   0.79
 EUR   0.99
 JPY     120
 AUD   1.49
 CAD   1.19
 NZD   1.29
 CNY   6.00

Contact
 Blog
 Email
 Phone
 StevePro Studios
 steven_boland@hotmail.com
 +353 877 541 327
 Linked In
 Twitter
 Skype
 StevePro Studios
 @SteveProXNA
 SteveProXNA

Best,
Steven Boland.
Note: *|COUPON|* placeholder in the Press Release text will be substituted with promo code from list.

Campaigns
Although you can create campaigns directly from Campaigns tab, a simpler method is through Templates:

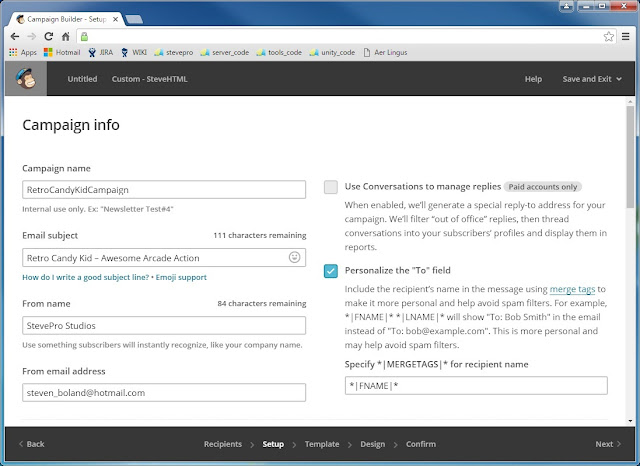
MailChimp | Templates | Click "Edit" dropdown to right of Template saved | Create Campaign. Choose a list to get started e.g. CandyKidList. Send to entire list | Next [bottom]. Enter following Campaign Info:
 Campaign name  RetroCandyKidCampaign
 Email subject  Retro Candy Kid – Awesome Arcade Action
 From name  StevePro Studios
 From email address  steven_boland@hotmail.com

Note: leave all checkboxes unchecked except the Personalize the "To" field. Set *|FNAME|* for recipient. Next Template | Next Confirm | Review summary all correct. Finally, Prepare for launch and Send Now!
Note re-send: MailChimp | Campaigns | Click "View Report" dropdown to right of Campaign | Replicate.

Summary
After campaign is successfully sent, the main Dashboard will report all activity; which includes: 24-hour performance, Top links clicked, Subscribers with most opens, Top locations by opens and much more...!

Wednesday, August 31, 2016

GitHub Cheat Sheet

Subversion (SVN) client–server model makes it easy to checkout source code from server-side centralized repository [repo], make local changes to working copy on client, and commit changes back to the server.

Whereas Git: a distributed version control system, unlike most client-server systems, every Git directory is full-fledged repository [repo] complete with history + independent of network access or central server.

Differences like these may be challenging at first. Therefore, let's smooth the transition from SVN to Git:

Let's check it out!

Pre Requisites
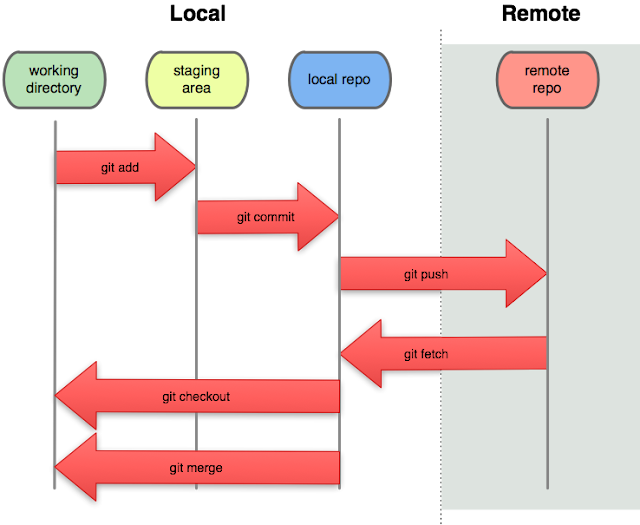
Here are the Atlassian Git tutorials this post makes reference to. Attached is basic diagram for Newbies: Note: in the simplest terms, git pull [not pictured] does a git fetch followed by a git merge.

Download Git distributed version control system for Windows or Mac. Setup Git global configuration here:
 Windows  C:\Users\<username>\.gitconfig
 Mac OS/X  /Users/<username>/.gitconfig

Here are basic commands to get and set Git global user name and user email throughout all repositories:
 User name  git config --global --get user.name
 git config --global user.name "SteveProXNA"
 User email  git config --global --get user.email
 git config --global user.email "steven_boland@hotmail.com"

Git Clients
There are free Git clients available for Windows and Mac such as GitHub Desktop and SourceTree however these show complex branched code which can be overwhelming for Newbies. Let's focus on simpler tools:
   SVN  GIT
 Windows  TortoiseSVN  TortoiseGit
 Mac OS/X  svnx  Gitbox
Note: Gitbox non-commercial version only allows one repository at a time but often that can be sufficient.

IMPORTANT:
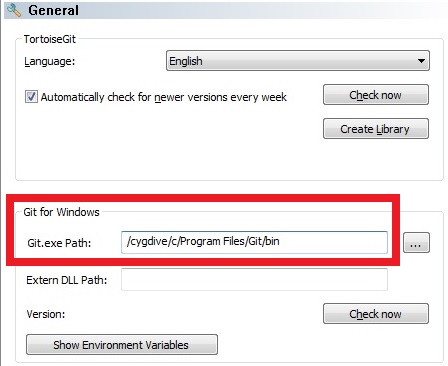
If you have Cygwin installed on Windows then ensure TortoiseGit settings do NOT use Unix Git.exe Path:

GitHub
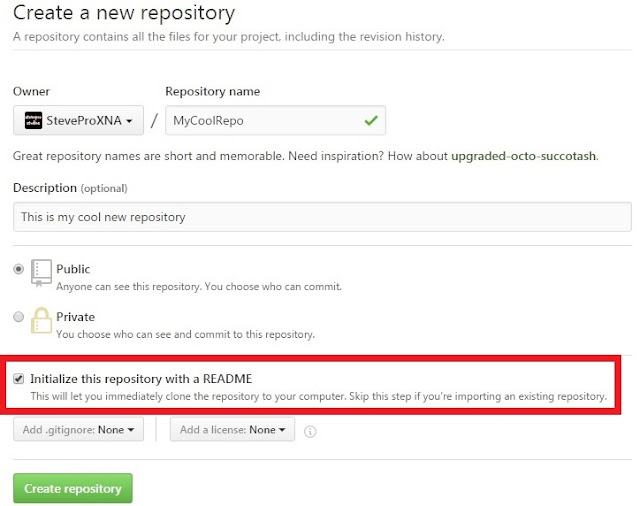
Create an account on github.com if you have not already done so. Read the guide is another good start. Choose Start a Project | Enter the name of your new repo e.g. "MyCoolRepo" and initialize with README: Launch command prompt. Type 3x variants of following git clone command to checkout local repository:
git clone https://github.com/SteveProXNA/MyCoolRepo.git MyCoolRepo
git clone https://<username>@github.com/SteveProXNA/MyCoolRepo.git MyCoolRepo
git clone https://<username>:<password>@github.com/SteveProXNA/MyCoolRepo.git MyCoolRepo
As a convenience, cloning automatically creates a remote connection called origin pointing back to the original repository. This makes it easier to interact with the repository. Also, default branch is master.
repo   local    master
repo   remote   origin/master
When you push to origin/master [remote] you will be prompted with whatever credentials are required. Note: here all git clone repos are done via https protocol. Checkout here for SSH git clone repo setup.

Configure current user name and email for repo activity, especially if you have multiple Github accounts:
 User name  git config --get user.name  git config user.name "SteveProXNA"
 User email  git config --get user.email  git config user.email "steven_boland@hotmail.com"

Note: local Git repo information can be found in hidden .git folder at root level where repository is cloned:
 Windows  C:\Users\<username>\GitHub\SteveProXNA\MyCoolRepo\.git\config
 Mac OS/X  /Users/<username>/GitHub/SteveProXNA/MyCoolRepo/.git/config

IMPORTANT:
If you push code changes using TortoiseGit then you may need to change Global User Info name + email; especially if you git clone repository using credentials that are different from the global GitHub account.

Windows Explorer | Right click MyCoolRepo directory | TortoiseGit | Settings | Git [OK] Configure source:

Before making any changes to the repo, prepare working environment to detect changes via Git tools:
 Windows  Explorer | Right click MyCoolRepo directory | TortoiseGit | Check for modifications
 Mac OS/X  Finder | Navigate to MyCoolRepo directory | Drag MyCoolRepo into Gitbox application

Command Prompt
Developers will add changes from the working directory to staging area and commit changes to local repo. When they push from local repo [master] to remote repo [origin/master] changes are available on server.

TortoiseGit + Gitbox can co-ordinate this activity, however, here are some command prompt equivalents:
 git status  List which files are staged, unstaged, and untracked.
 git add file  Stages file from working directory to staging area.
 git reset file  Unstages file from staging area to working directory.
 git commit file  Commits file from staging area to the local repo.
 git push  Push files from local repo to remote [origin] repo. [SVN Commit]
 git clean -df  Remove untracked directories and untracked files from current directory.
 git reset --hard  Reset staging area and working directory to match most recent commit.
 Obliterates all uncommitted changes so be careful using this command!
IMPORTANT: you cannot seem to commit an empty directory; add dummy README file here as needed.

Commit Comparison
One of the more challenging aspects found during the SVN to Git transition is difference between commit.

SVN commits working copy changes from client to server whereas Git commits from staging area to local repo only; git status shows staged + unstaged files thus how do you list all local commits for next push?

Windows right click MyCoolRepo directory | Git Sync... | Click "Out ChangeList" tab | lists local commits.
Mac OS/X in Gitbox each commit listed but not yet pushed is displayed with a dot on the left hand side.

Logging
Whereas git status lets you inspect the working directory and staging area the git log command lets you list the project history, filter and search for specific changes and only operates on the committed history.
 git status
 git log
 git log --grep="SteveProXNA"
 git log --author="SteveProXNA"
 git log --grep="commit"
 git log --merges
 git log -S"today"
 git log --oneline
 git log --graph --decorate --oneline
 git log --oneline master..MyNewBranch
 git log --pretty=format:"%cn committed %h on %cd"
 git log --after="2016-4-1"

Command Prompt II
After developers (eventually) push changes from local repo to remote, here are some more commands:
 git branch  Lets you create, list, rename, and delete branches.
 git checkout  Lets you navigate between branches created by git branch.
 git merge  Lets you integrate independent lines of development into a single branch.
 git rebase  Process of moving branch to new base commit to maintain linear history.
 git fetch  Imports remote changes but does not integrate changes into local repo.
 git pull  Equivalent to a git fetch followed by a git merge. [SVN Update]

Branching
Unlike SVN, Git differentiates between local and remote branches: local branches exist only on the local machine for local user whereas remote branches are branches pushed to origin and are accessible to all.
git branch                              ; list local  branches
git branch -r                           ; list remote branches
git branch -a                           ; list all    branches [local + remote]
Create branches:
git branch MyNewBranch                  ; create local  branch
git push origin MyNewBranch             ; pushes remote branch
Delete branches:
git branch -d MyNewBranch               ; delete local branch if merged changes
git branch -D MyNewBranch               ; delete local branch unconditionally
git push origin --delete MyNewBranch    ; delete remote branch
General update commands to synch github remote and local repository:
git remote update               ; if remote stale then update to synch latest
git fetch --all --prune         ; if delete on one computer and replicate to other
Detached HEAD
HEAD points to specified branch. When you checkout a commit, it switches into "detached HEAD" state from rest of project. If you were to develop in this state then there would be no branch to get back to.

Tagging
Similar to SVN, Git tags are symbolic names for a given revision: code snapshot implemented by git tag.
 Windows  Explorer | Right click MyCoolRepo directory | TortoiseGit | Create Tag... | Enter Tag
 Mac OS/X  Gitbox application | Click dropdown list next to "pull" button | New tag... | Enter Tag

  Here are some command prompt equivalents:
 git tag  ; show tag on local
 git push origin --tags ; push tag to remote
  Also synchronize Git tags with remote:
 git tag -l | xargs git tag -d
 git fetch
Finally, if remote stale then git remote update and replicate to another computer git fetch --prune --tags.

Merging
Merging integrates changes from one source branch into a destination branch and combines histories of both branches. Merging is non-destructive: neither branch is changed in any way, however, the merged branch may have an extraneous merge commit every time you need to incorporate upstream changes.

Fast-Forward Merge
When there is linear path from current branch tip to target branch, instead of actually merging branches, all Git has to do to integrate the histories is move ["fast forward"] current branch tip up to target branch.
git checkout -b MyNewBranch master      ; create branch and switch
                                        ; add and commit to branch
git checkout master                     ; switch to the trunk node
git merge MyNewBranch                   ; merge branch up to trunk
git branch -d MyNewBranch               ; delete local branch
3-Way Merge
Occurs when it is impossible for Git to perform a fast-forward merge as there is no way to move current branch tip to target branch without backtracking. Very common when branch takes long time to develop.
git checkout -b MyNewBranch master      ; create branch and switch
                                        ; add and commit to branch
git checkout master                     ; switch to the trunk node
                                        ; add and commit to master
git merge MyNewBranch                   ; merge branch up to trunk
git branch -d MyNewBranch               ; delete local branch

Rebasing
Rebasing is an alternative to merging and moves the entire source branch to the tip of destination branch by incorporating all new commits. Rebasing re-writes project history by eliminating unnecessary commits.
git checkout -b MyNewBranch master      ; create branch and switch
                                        ; add and commit to branch
git checkout master                     ; switch to the trunk node
git rebase MyNewBranch                  ; rebase branch upto trunk
git branch -d MyNewBranch               ; delete local branch

Merging vs. Rebasing
The benefit of rebasing is a much cleaner project history. Rebasing eliminates all the unnecessary merge commits required by git merge resulting in a perfectly linear project history followed up to the feature tip.
IMPORTANT: the Golden Rule of Rebasing stipulates never to use git rebase command on public branches!

Pull Request
GitHub fosters a fast, flexible, collaborative development process where you work with or without others. Here, you can sign into GitHub and fork an existing repository and create pull request to merge changes.
Choose repository to actively collaborate e.g. MonoGame. Click "Fork" button top right. Choose location. There should now be repository forked under your username ready to git clone and commit changes to:
git clone https://<username>:<password>@github.com/SteveProXNA/MonoGame.git MonoGame
git config user.name "SteveProXNA"
git config user.email "steven_boland@hotmail.com"
Commit changes to local repo and push from local repo [master] to remote repo [origin/master] as usual. However, create pull request to integrate changes from your forked remote repository to the source repo.

Click "New pull request". This prompts "Comparing changes" dialog for the source repository + your fork.
https://github.com/MonoGame/MonoGame/compare/master...SteveProXNA:master
   User  Repo
 Source  MonoGame  https://github.com/MonoGame/MonoGame
 Fork  SteveProXNA  https://github.com/SteveProXNA/MonoGame

Click "Create Pull Request". Owner receives email notification to view proposed changes to integrate. Click "Merge pull request" to merge changes back into source repository and automatically close Pull Request.
IMPORTANT: if you would like to keep up to date with the source repository then follow these short steps:
git clone git@github.com:SteveProXNA/MonoGame.git
cd C:\Users\<username>\GitHub\SteveProXNA\MonoGame
git remote add upstream git://github.com/MonoGame/MonoGame.git
git fetch upstream
git pull upstream master

Imperatives
Here is a short list of git commands that is imperative that you should not do; especially to public history:

Don’t Reset Public History
You should never reset commits pushed to a public repository. Reset a commit poses serious problems for collaboration: when developers sync up with your repo, it'll look like project history abruptly disappeared.

Don’t Rebase Public History
Similar to git reset, you should never rebase commits that have been pushed to a public repository. The rebase would replace old commits with new ones and look like part of project history abruptly vanished.

Jenkins
Integrate all GitHub Plugins with Jenkins. Assume MSBuild setup in Manage Jenkins | Configure System:
 Name  JenkinsMSbuild
 Path to MSBuild  C:\Windows\Microsoft.NET\Framework\v4.0.30319\MSBuild.exe
Next, install plugins: Manage Jenkins | Manage Plugins | GitHub Plugin. You may need to install Git plugin.

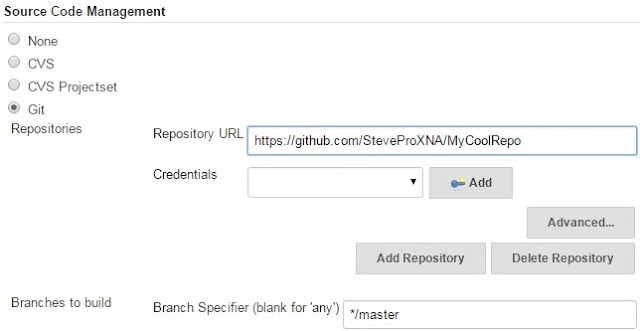
Navigate to Jenkins | New Item | Create Freestyle project. Ensure the following build configurations set:
 Source Code Management => Git Repositories
 Repository URL  https://github.com/SteveProXNA/MyCoolRepo
 Credentials  <username>:<password>
 Branches to build  Branch Specifier (blank for 'any') */master


 Build a Visual Studio project or solution using MSBuild
 MSBuild Version  JenkinsMSbuild
 MSBuild Build File  MyCoolRepo.sln
 Command Line Arguments  /p:Configuration=Debug
 /p:Configuration=Release

 Execute Windows batch command
 Command  "C:\Program Files (x86)\NUnit 2.5.7\bin\net-2.0\nunit-console-x86.exe"  MyCoolRepo.UnitTests/UnitTests.nunit

Summary
Additional topics that could explored include git stash to push unfinished changes onto a stack that can be popped off later and git submodule to keep another Git repo in subdirectory very similar to SVN Externals.

Monday, July 4, 2016

SVN Externals Application II

In the previous post, we checked out SVN Externals to build an XNA solution with the majority of game code written in an external library and scaled out across multiple game clients including Android + iOS.

As an example, the XNA and System Testing snake simulation was scaled to demonstrate SVN Externals.
However, all code here is in trunk; larger scale development requires release tags and feature branches. Let's check it out!

Pre Requisites
This post assumes you already have Tortoise SVN installed on Windows and svnx installed on Mac OS/X.
Also, consider configuring the $SVN_EDITOR on Windows and Mac OS/X in order to edit SVN properties:
set SVN_EDITOR=notepad.exe     ; Windows PC
export SVN_EDITOR=vi           ; Mac OS/X
Conventions
This post uses the following convention to substitute "$DEMO" for root node of all demo code samples:
$DEMO = https://svn/Demo       ; Subversion
$DEMO = C:\svn\Demo            ; Windows PC
$DEMO = /svn/Demo              ; Mac OS/X

Subversion
Create top level Demo node in Subversion SVN. Add 1x sub-node for XNA library and 4x sub-nodes for each client: WP7, Windows, Android, iOS. Ensure all sub-nodes have branches, tags and trunk folders:
 Alias  Platform  Development  Framework  Description  Source Code
 XNA  Windows PC  Visual Studio 2010  XNA 4.0  Game library  Download
 WP7  Windows PC  Visual Studio 2010  XNA 4.0  Game client  Download
 Win  Windows PC  Visual Studio 2012  MonoGame 3.4  Game client  Download
 And  Mac OS/X  Xamarin Studio  MonoGame 3.5  Game client  Download
 iOS  Mac OS/X  Xamarin Studio  MonoGame 3.5  Game client  Download

Tagging
Before beginning new development, it's often best practice to tag your current release build from trunk.

Note: when you create a tag in Subversion, you are not tagging the SVN Externals repository, you are tagging your working copy. If you do not specify the revision then SVN Update will always get latest!

Therefore, you should always explicitly set the revision of svn:externals property when you create a tag:
svn propset svn:externals 'Common -r2276 $DEMO/XNA/trunk/XNA.Common' .

If you have Tortoise SVN 1.9.4 installed then you can use the new --pin-externals option for svn copy. This will automatically set the SVN revision in the tag for you without manual lookup in the SVN logs.
svn copy --pin-externals svn:externals $DEMO/trunk $DEMO/tags/1.0.0.0 -m "1.0.0.0"

For completeness, here are all TAGS 1.0.0.0 cut from previous SVN Externals Application blog post:
 Alias  Command
 XNA  svn copy --pin-externals $DEMO/XNA/trunk $DEMO/XNA/tags/1.0.0.0-XNA -m "1.0.0.0-XNA"
 WP7  svn copy --pin-externals $DEMO/WP7/trunk $DEMO/WP7/tags/1.0.0.0-WP7 -m "1.0.0.0-WP7"
 Win  svn copy --pin-externals $DEMO/Win/trunk $DEMO/Win/tags/1.0.0.0-XNA -m "1.0.0.0-Win"
 And  svn copy --pin-externals $DEMO/And/trunk $DEMO/And/tags/1.0.0.0-And -m "1.0.0.0-And"
 iOS  svn copy --pin-externals $DEMO/iOS/trunk $DEMO/iOS/tags/1.0.0.0-iOS -m "1.0.0.0-iOS"

SVN Upgrade
On Mac OS/X it is most likely that you cannot use the new --pin-externals option for svn copy as the svn version is too low. Here are some basic instructions to upgrade to, for example, SVN 1.8 on Mac OS/X.

However, upgrading may cause svnx incompatibility. Also, higher versions may require an upgrade to serf. A better approach may be to cut all tags on Windows PC and SVN Update all tags on Mac OS/X.

Branching
Larger features usually require longer development time and it's often best practice to cut feature branch from trunk. Applying SVN Externals to branching and merging back into trunk may result in a similar flow:

 1. Cut branches: XNA library and Win client (and other clients)
 2. Update SVN Externals in Win client to XNA branch (not trunk)
 3. Make all code feature changes in XNA library and Win client
 4. Merge XNA library [trunk down to branch + branch up to trunk]
 5. Merge Win client [trunk down to branch + branch up to trunk]
 6. Delete dead branches cut from above accordingly

Implementation
1. Cut branches: XNA library and Win client (and other clients)
svn copy $DEMO/XNA/trunk $DEMO/XNA/branches/FeatureX -m "FeatureX"
svn copy $DEMO/Win/trunk $DEMO/Win/branches/FeatureX -m "FeatureX"

2. Update SVN Externals in Win client to XNA branch (not trunk)
Launch command prompt, navigate to $DEMO\Win\branches\FeatureX\$FOLDER where $FOLDER is the parent folder that hosts Windows Game project. Common branched XNA library code will be linked here.
cd $DEMO/Win/branches/FeatureX
svn propget -R svn:externals

cd $FOLDER
svn propedit svn:externals .
Edit SVN Externals Subversion Properties from previous to current:
 Previous  Current
 $DEMO/XNA/trunk/XNA.Common Common  $DEMO/XNA/branches/FeatureX/XNA.Common Common
svn update
svn commit -m "Update branch"

3. Make all code feature changes in XNA library and Win client
After making all code changes to feature branch, ensure you increment the build number for next release. Navigate to game client AssemblyInfo.cs file. Increment AssemblyVersion + AssemblyFileVersion values:

For example increment version from previous "1.0.0.0" to current "1.1.0.0"
 Platform  File  Property
 Android  AndroidManifest.xml  Increment Version number
 iOS  Info.plist  Increment Version
Note: updated version number should be synch'd in Xamarin Studio Project Options | Application tab


4. Merge XNA library [trunk down to branch + branch up to trunk]
First, merge trunk down to branch (as changes may have been checked-in on trunk prior to the merge)
cd $DEMO/XNA/branches/FeatureX
svn update
svn merge $DEMO/XNA/trunk
svn commit -m "Merge trunk down to branch"

Next, merge branch up to trunk to (re-)integrate changes from shared XNA library to all upstream clients
cd $DEMO/XNA/trunk
svn update
svn merge --reintegrate $DEMO/XNA/branches/FeatureX
svn commit -m "Merge branch up to trunk"

5. Merge Win client [trunk down to branch + branch up to trunk]
Important: first revert SVN Externals in Win client to XNA trunk as XNA trunk and branch are now synch'd
cd $DEMO/Win/branches/FeatureX
svn propget -R svn:externals

cd $FOLDER
svn propedit svn:externals .
Edit SVN Externals Subversion Properties from previous to current:
 Previous  Current
 $DEMO/XNA/branches/FeatureX/XNA.Common Common  $DEMO/XNA/trunk/XNA.Common Common
svn update
svn commit -m "Revert branch"

Next, merge trunk down to branch
cd $DEMO/Win/branches/FeatureX
svn update
svn merge $DEMO/Win/trunk
svn commit -m "Merge trunk down to branch"

Finally, merge branch up to trunk
cd $DEMO/Win/trunk
svn update
svn merge --reintegrate $DEMO/Win/branches/FeatureX
svn commit -m "Merge branch up to trunk"

6. Delete dead branches cut from above accordingly
svn delete $DEMO/XNA/branches/FeatureX -m "Delete branch"
svn delete $DEMO/Win/branches/FeatureX -m "Delete branch"

For completeness, here is one way to remove the SVN Externals property from working copy folder:
svn propdel svn:externals $DEMO/Win/branches/FeatureX/$FOLDER

Tagging
When it is appropriate, tag the new build as per updated build version number 1.1.0.0 from above:
 Alias  Command
 XNA  svn copy --pin-externals $DEMO/XNA/trunk $DEMO/XNA/tags/1.1.0.0-XNA -m "1.1.0.0-XNA"
 WP7  svn copy --pin-externals $DEMO/WP7/trunk $DEMO/WP7/tags/1.1.0.0-WP7 -m "1.1.0.0-WP7"
 Win  svn copy --pin-externals $DEMO/Win/trunk $DEMO/Win/tags/1.1.0.0-XNA -m "1.1.0.0-Win"
 And  svn copy --pin-externals $DEMO/And/trunk $DEMO/And/tags/1.1.0.0-And -m "1.1.0.0-And"
 iOS  svn copy --pin-externals $DEMO/iOS/trunk $DEMO/iOS/tags/1.1.0.0-iOS -m "1.1.0.0-iOS"


Summary
To summarize, here code has been shared from a single external library across multiple game clients; However, SVN Externals could be used to scale out shared data + content across multiple clients too!

Wednesday, June 1, 2016

SVN Externals Application

In 2015, Candy Kid was written in XNA as a simple maze chase video game. The majority of game code was written in an external library and scaled out across multiple game clients including Android and iOS. In order to avoid problems with Copy + paste programming to multiple clients, SVN Externals was used.
Let's check it out!

SVN Externals allow an Subversion repository to be checked out within a directory in that working copy. Here all common code in external repository linked through "Common" directory across multiple clients.

Pre Requisites
This post assumes you already have Tortoise SVN installed on Windows and svnx installed on Mac OS/X.
Also, consider configuring the $SVN_EDITOR on Windows and Mac OS/X in order to edit SVN properties:
set SVN_EDITOR=notepad.exe     ; Windows PC
export SVN_EDITOR=vi           ; Mac OS/X
Conventions
This post uses the following convention to substitute "$DEMO" for root node of all demo code samples:
$DEMO = https://svn/Demo       ; Subversion
$DEMO = C:\svn\Demo            ; Windows PC
$DEMO = /svn/Demo              ; Mac OS/X
Example
As an example, let's scale the XNA and System Testing snake simulation to demonstrate SVN Externals. Create top level Demo node in Subversion SVN. Add 1x sub-node for XNA library and 4x sub-nodes for each client: WP7, Windows, Android, iOS. Ensure all sub-nodes have branches, tags and trunk folders:
 Alias  Platform  Development  Framework  Description  Source Code
 XNA  Windows PC  Visual Studio 2010  XNA 4.0  Game library  Download
 WP7  Windows PC  Visual Studio 2010  XNA 4.0  Game client  Download
 Win  Windows PC  Visual Studio 2012  MonoGame 3.4  Game client  Download
 And  Mac OS/X  Xamarin Studio  MonoGame 3.5  Game client  Download
 iOS  Mac OS/X  Xamarin Studio  MonoGame 3.5  Game client  Download

Sample
The following code sample builds the snake simulation initially as an XNA solution. After the code sample has be fully tested in isolation, additional clients are added to share "Common" code using SVN Externals.

XNA Game library [PC]
Launch Visual Studio 2010. Create blank solution. Add the following 4x new C#/.NET projects to solution:
 Project  Type  Dependencies  Description
 XNA  XNA 4.0 Game  XNA.Common  Entry point and game specific code
 XNA.Common  XNA 4.0 Game Library  log4net | Ninject  Generic game library for all clients
 XNA.SystemTests  Windows Class Library  NUnit [only]  Used for game library system tests
 XNA.UnitTests  Windows Class Library  NUnit | Rhino Mocks  Used for game library unit tests
Important: create a directory symbolic link using mklink to Content folder in order to run system tests.
// mklink /D C:\SnakeDemo.XNA.Content C:\SnakeDemo.XNA\bin\x86\Debug\
protected const String CONTENT_ROOT = @"C:\SnakeDemo.XNA.Content\";

Notes
Common project properties include: Treat warnings as errors "All" + Release version Debug Info "none".
Manually edit system and unit test projects in Notepad and add following XML to mitigate MSIL warning:
<PropertyGroup>
  <ResolveAssemblyWarnOrErrorOnTargetArchitectureMismatch>None</ResolveAssemblyWarnOrErrorOnTargetArchitectureMismatch>
</PropertyGroup>

WP7 Game client [PC]
Launch Visual Studio 2010. Create Windows Phone Game 4.0 project. Include all relevant game content.
Use SVN Externals to link common XNA library game code (above) through "Common" directory in client:

In Windows Explorer, navigate to $DEMO\WP7\trunk\$FOLDER where $FOLDER is the parent folder that hosts Windows Phone Game 4.0 project. This is where SVN Externals will link common XNA library code.

Right click $FOLDER | Tortoise SVN | Properties | New... | Externals. In popup window click New button:
 Local path:  Common
 URL:  $DEMO/XNA/trunk/XNA.Common
 HEAD revision  Checked
 Peg:  empty
Note: an optional SVN revision number can be entered in "Peg:" textbox to pin to static code check-in.

Right click $DEMO\WP7\trunk | Tortoise SVN | Check for modifications. Commit change made from SVN Externals. SVN Update to download "Common" directory from $DEMO\XNA\trunk\XNA.Common in WP7.
cd $DEMO\WP7\trunk
svn propget -R svn:externals
svn commit -m "Add SVN Externals"
svn update
Finally, in Visual Studio 2010 click "Show All Files" button. Right click "Common" directory | Include In Project. Build project. Right click $DEMO\WP7\trunk | Check for modifications. Commit changes made. Done!

iOS Game client [Mac]
Launch Xamarin Studio. Create MonoGame iPhone/iPad Application. Include all the relevant game content.
Use SVN Externals to link common XNA library game code (above) through "Common" directory in client:

Launch terminal prompt, navigate to $DEMO/iOS/trunk/$FOLDER where $FOLDER is the parent folder that hosts MonoGame iPhone/iPad Application. This is where SVN Externals will link common XNA library code.

Type in the following SVN commands:
cd $DEMO/iOS/trunk/$FOLDER
svn propget svn:externals

svn propset svn:externals 'Common $DEMO/XNA/trunk/XNA.Common' .
svn propget svn:externals

svn status
cd $DEMO/iOS/trunk
svn commit -m "Add SVN Externals"
svn update
Finally, in Xamarin Studio right click solution | Display Options | Show All Files. Right click "Common" directory | Include To Project. Build project. In svnX, Check for modifications. Commit changes made. Done!

Repeat this process for the remaining projects: Windows Game client [PC] + Android Game client [Mac]

Jenkins
Don't forget to uncheck "Ignore externals" under Subversion modules on all the automated client builds!

Summary
To summarize, SVN Externals has proved effective to scale common game code linked to multiple clients. However, all code here is in trunk; larger scale development requires release tags and feature branches.

This will be topic in the next post.

Thursday, March 17, 2016

3D City Code Complete

3D City is a simple "Shoot 'em up" video game originally programmed StevePro Studios in New Zealand, in January 1988. The game was written using BASIC programming language built on the Sega SC-3000.

Inspired from previous posts on Sega Console Programming and z88dk Programming Setup, 3D City was the impetus to build an 8-bit video game in C / Z80 assembler to target the Sega Master System (SMS).

Let's check it out!
Download source code here.

Sega Retro Gaming post documents how to play video games like 3D City on PC using Fusion emulator.
z88dk Programming Setup post documents development environment required to build C / Z80 source.
Instructions
Simple! Move target and shoot all enemy ships before they kill you. 4x misses and it is Game Over.
Hint: hold controller Button2 down while moving target slows target down for more focused attack.

ROM Hacking
You can hack this ROM! Download and dump 3Dcity.sms into Hex Editor, e.g. HxD, and modify the bytes:
 ADDRESS  VARIABLE  DESCRIPTION
 0x00C0  Death  Non-zero = invincibility!
 0x00C1  Level  0=easy (default) 1=hard.
 0x00C2  Enemy  0=3x enemies else 1 or 2.
 0x00C3  Music  0=music on otherwise off.
 0x00C4  Sound  0=sound on otherwise off.
 0x00C5  Tiles  0=tiles scroll yes else no.
 0x00C6  Stars  0=stars flash yes else no.
#ifndef _HACK_MANAGER_H_
#define _HACK_MANAGER_H_

#define PEEK(addr)   (*(unsigned char *)(addr))
#define POKE(addr, data) (*(unsigned char *)(addr) = (data))

#define HACKER_START  0x00C0

extern unsigned char hacker_death, hacker_level, hacker_enemy, hacker_music;
extern unsigned char hacker_sound, hacker_tiles, hacker_stars;

void engine_hack_manager_init()
{
  hacker_death = PEEK(HACKER_START + 0);  // 0x00C0
  hacker_level = PEEK(HACKER_START + 1);  // 0x00C1
  hacker_enemy = PEEK(HACKER_START + 2);  // 0x00C2
  hacker_music = PEEK(HACKER_START + 3);  // 0x00C3
  hacker_sound = PEEK(HACKER_START + 4);  // 0x00C4
  hacker_tiles = PEEK(HACKER_START + 5);  // 0x00C5
  hacker_stars = PEEK(HACKER_START + 6);  // 0x00C6
}

#endif//_HACK_MANAGER_H_
Credits
StevePro Studios would like to thank the following, esp. at SMS Power, for making this project possible:
 haroldoop  Adapt z88dk (C cross-compiler) for Z80 systems + generate SMS ROMs
 Maxim  BMP2Tile  Converts BMP images into 8x8 SMS tile data
 Martin  Mod2PSG2  Music tracker software for SMS sound chip
 vhelin  WLA-DX  Z80 multi platform cross Assembler package
 Martin  SMS Examine  Z80 disassembler recompilable by WLA-DX
 Bock  Meka  SMS emulator (excellent debugging features)
 Steve Snake  Fusion  SMS emulator used for general play testing
Important: the psgmod.asm file (Mod2PSG2) was customized thus ASM could be invoked from C code.

Summary
In fact, the Homebrew community at SMS Power celebrates Sega 8-bit preservation and fanaticism each year with its annual competitions. Therefore, this is an opportunity to enter 3D City for 2016. Good luck!

Friday, January 1, 2016

Retrospective VII

Last year, I conducted a simple retrospective for 2014. Therefore, here is a retrospective for 2015.

2015 Achievements
  • Consolidate numerous "XNA" ideas from this blog into single game project
  • Write C# / XNA game code linked to multiple MonoGame / Xamarin clients
  • Use 2D Independent Rendering to target a multitude of screen resolutions
  • Employ better Indie dev. source control systems + continuous integration
  • Commit to Retro Games: more active on social media Facebook + Twitter
  • Salvage ITIN acquired from "XNA and TAX" required for mobile publishing
  • Write WiX / XNA Installer seamlessly download + install PC game version
  • Self-publish Retro Candy Kid mobile platforms: iOS, Android, Kindle + PC
Note: complete game project in C# / XNA published on non-XBLIG platforms is an achievement!

2016 Objectives
  • Expand XNA / MonoGame topics to include localization, custom shaders
  • Apply similar XNA / MonoGame techniques to transition XNA / Unity3D
  • Research additional Indie portals to publish including Steam Greenlight
  • Publish more source code. Checkout sources other than CodePlex (Git)

In 2015, StevePro Studios consolidated many ideas from this Indie game development blog to produce game project to be self-published on PC (outside XBLIG) but also on mobile platforms: iOS and Android.

The game project "Retro Candy Kid" was inspired by the original 8-bit title Candy Kid: a "type-in" video game published by New Zealand's Sega Computer Magazine in the September 1984 issue, pages 17-18.

"Retro Candy Kid" was re-written in C#/XNA 4.0 and employed many techniques discussed in this blog:
 Agile Software Development  Data Driven Design
 Dependency Injection  System Testing
 IoC Container (Ninject)  Level Validation
 Unit Testing  
 Test Driven Development  

However, now that XNA is "dead", this was also an opportunity to transition away from XNA 4.0 to other options e.g. MonoGame and use Xamarin for iOS / Android port. TODO: future project may use Unity3D.

Quality vs. Velocity
Finally, by leveraging techniques (above), 95% of all game code was written in an external library that was unit tested in isolation plus integration done via system testing with minimal client UI intervention.

This development style facilitates high level of code quality written extremely fast to get the best of both worlds: Game finished in short timeframe with low (zero) bug count: critical for Indie game development!

Summary
To summarize, "Retro Candy Kid" proved successful game project because of all points outlined above.
As such, this type of game project is perfect candidate for 8-bit console port e.g. Sega Master System!