Sunday, November 15, 2020

SGDK Programming Sample

In the previous post, we checked out SGDK Programming Setup. The SGDK is a free development kit which provides code and tools to compile resources and support homebrew development for the Sega Mega Drive.

Using the SGDK, it is possible to write game code using the C language rather than pure 68000 assembly. Therefore, we would now like to extend this knowledge and write more detailed programming sample code. Let's check it out!
Software
Follow all instructions from the previous post: this documents how to setup the pre-requisite software.
Note: ensure you have downloaded and installed the SGDK and the GNU Compiler Collection [GCC].

Library
Ultimately, we would like to build + debug step thru the C source code during SGDK development from in Visual Studio. Therefore, we need to build custom version of SGDK library to replace functions with stubs.

Launch Visual Studio 2015. File | New | Project... | Visual C++ | Win32 | Win32 Project | Static Library:
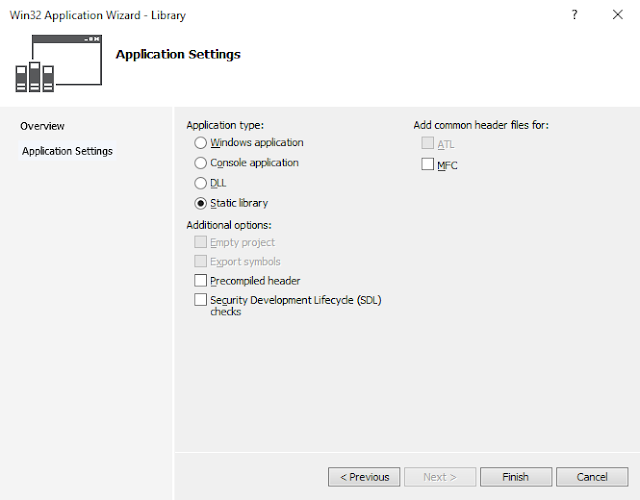
Create two folders lib and src. Copy all SGDK header files from %GDK_WIN%\inc and %GDK_WIN%\res beneath the lib folder. For each header file create corresponding translation unit [*.c] file in the src folder.

Finally, implement each header file function as stub function in each translation unit. Build custom library. Copy _genesis.lib and _genesis.pdb binaries to the lib folder. This will be used to link sample source code. Download custom library here.

Usage
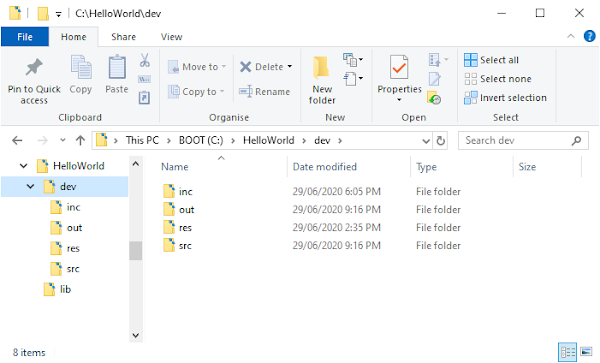
SGDK uses a generic makefile to compile projects. In order to be properly recognized by the makefile you need to organize your project folder structure as following: Project root add sub folders: inc, out, res, src
 inc   include files  *.h [C include file] or *.inc [assembly include file]
 out   output files  rom.bin to be created automatically by makefile when SGDK project is built
 res   resource files  *.res [resource definition file compiled by rescomp tool see bin/rescomp.txt]
 src   source files  *.c [C source file], *.s [68000 asm source file] or *.s80 [Z80 asm source file]


Hello World
Create folder C:\HelloWorld. Copy new SGDK custom library lib folder [above] here. Create sub-folder: dev. Change directory to dev folder and create the following sub-folders as indicated per Usage: inc, out, res, src
Launch Visual Studio 2015. File | New | Project... | Visual C++ | Win32 | Win32 Project
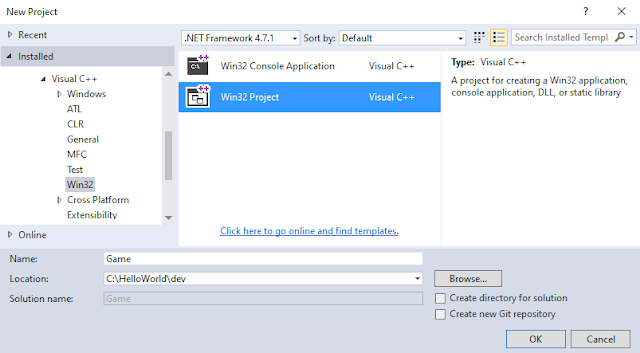
 Name:  Game
 Location:  C:\HelloWorld\dev
 Create directory for solution  UNCHECKED
OK

 Application type:  Console application
 Additional options:  Empty project CHECKED
Finish

First, remove x64 build configuration! Right click Solution | Properties. Click Configuration Manager button. Click Active solution platform drop down | Edit. Click x64 option | Remove. Now will have only Win32 build.

Add the main.h source code to Header Files using the inc folder. Add main.c to Source Files using src folder:
 main.h  main.c
 #ifndef __MAIN__
 #define __MAIN__

 #ifdef _CONSOLE
   #include "_genesis.h"
 #else
   #include <genesis.h>
 #endif

 #endif//__MAIN__
 #include "main.h"
 int main()
 {
 	VDP_drawText( "Hello Genny World!", 10, 13 );
 	while( 1 )
 	{
 		VDP_waitVSync();
 	}
 	return 0;
 }

Right click Project | Properties | Configuration Properties | General. Set Output and Intermediate directories:
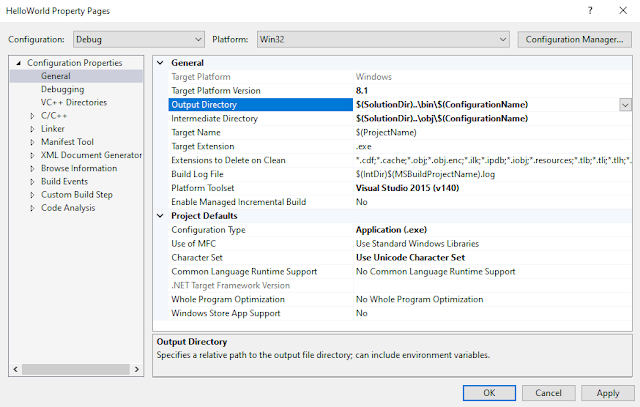
 Output Directory:  $(SolutionDir)..\bin\$(ConfigurationName)
 Intermediate Directory:  $(SolutionDir)..\obj\$(ConfigurationName)

Right click Project | Properties | Configuration Properties | C++ | General. Set Additional Include Directories:
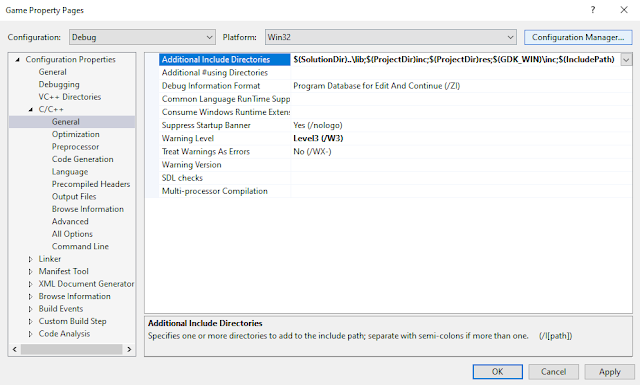
 Value:   $(SolutionDir)..\lib;$(ProjectDir)inc;$(ProjectDir)res;$(GDK_WIN)\inc;$(IncludePath)

Right click Project | Properties | Configuration Properties | Linker | General | Additional Library Directories:
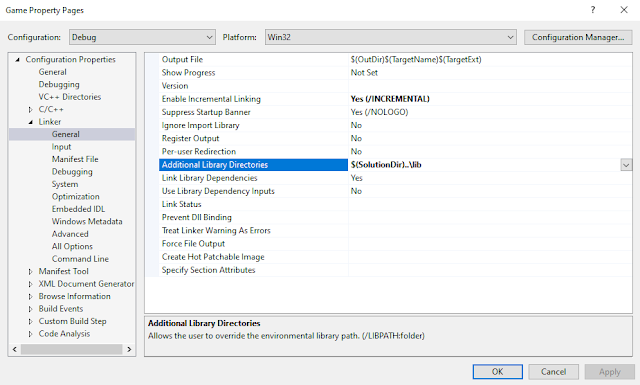
 Value:   $(SolutionDir)..\lib

Right click Project | Properties | Configuration Properties | Linker | Input. Set the Additional Dependencies:
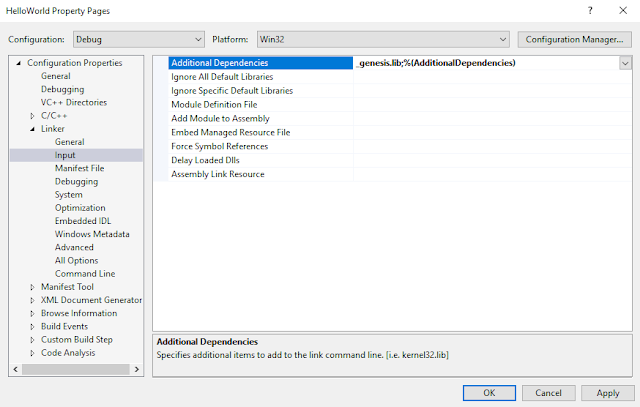
 Value:   _genesis.lib;%(AdditionalDependencies)
Press Ctrl + Shift + B or [F7] to build source code. Pressing F5 will now debug step through C source code!

IMPORTANT
The first time you F5 debug step through C source code you may be prompted to navigate to src directory.

Add the following build.bat script to the dev folder to automate process to build + run the ROM output file:
@echo off
cls
echo Building...

:: Time build START
set _time=%time: =0%
set /a _hours=100%_time:~0,2%%%100,_min=100%_time:~3,2%%%100,_sec=100%_time:~6,2%%%100,_cs=%_time:~9,2%
set /a _started=_hours*60*60*100+_min*60*100+_sec*100+_cs

:: Build
%GDK_WIN%\bin\make -f %GDK_WIN%\makefile.gen > NUL

:: Time build -END-
set _time=%time: =0%
set /a _hours=100%_time:~0,2%%%100,_min=100%_time:~3,2%%%100,_sec=100%_time:~6,2%%%100,_cs=%_time:~9,2%
set /a _duration=_hours*60*60*100+_min*60*100+_sec*100+_cs-_started
set /a _hours=_duration/60/60/100,_min=100+_duration/60/100%%60,_sec=100+(_duration/100%%60%%60),_cs=100+_duration%%100
echo.
echo Time taken: %_sec:~-2%.%_cs:~-2% secs
echo.

:: Run
C:\SEGA\Fusion\fusion.exe out\rom.bin
::C:\SEGA\gens\gens.exe %~dp0\out\rom.bin
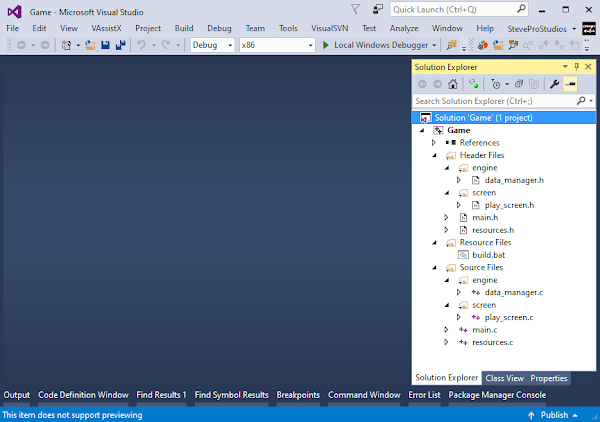
Here we measure the build execution time. Also, suppress the output of the build script to keep things clean. The final solution should look like this:
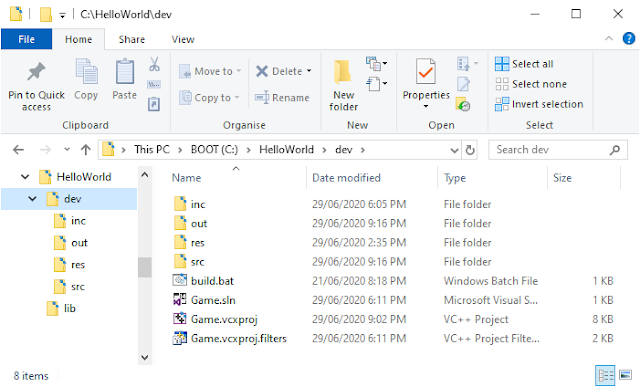
In Visual Studio, add the build.bat script to Resource Files. Connect the build.bat script to Ctrl + 1 keyboard shortcut as per this post. Press Ctrl + 1 to build + run the ROM output file all from within Visual Studio 2015.

Congratulations! You have just written your first Mega Drive program using the SGDK.

Hello Resources
Import all resources into your project as media files that your game will use such as images for background tiles + sprites, audio for music + sound effects etc. Clone the "Hello World" project and follow these steps;

Change directory to res folder under dev folder. Copy resource here. Create resources.res here for example:
resources.res
IMAGE splash "splash.bmp" 0

Next execute build.bat script to compile resource and generate corresponding header file e.g. resources.h. In Visual Studio add resources.h to Header Files. Update main.h to include new resources.h header file in code:
main.h
#ifndef __MAIN__
#define __MAIN__
// ...
#include "resources.h"
#endif//__MAIN__

IMPORTANT
If resources.h does not auto generate or the contents do not change then delete the out folder try again!

Create folder gfx at same level as dev folder. Create sub folder res. Add dummy corresponding translation unit resources.c under res sub folder. In Visual Studio add resources.c to Source Files with following code:
resources.c
#ifdef _CONSOLE
  #include "_genesis.h"
  const Image splash = { NULL, NULL, NULL };
#endif

Update main.c to render image. Leverage conditional compilation to inject resource palette data at runtime:
main.c
#include "main.h"
int main()
{
	u16 *data = NULL;
#ifndef _CONSOLE
	data = splash.palette->data;
#endif
	VDP_setPalette( PAL1, data );
	VDP_drawImageEx( BG_A, &splash, TILE_ATTR_FULL( PAL1, 0, 0, 0, 1 ), 4, 2, 0, CPU );
	while( 1 )
	{
		VDP_waitVSync();
	}
	return 0;
}

Press F5 to build + debug step through C source code. Press Ctrl + 1 to build + run the new ROM output file.
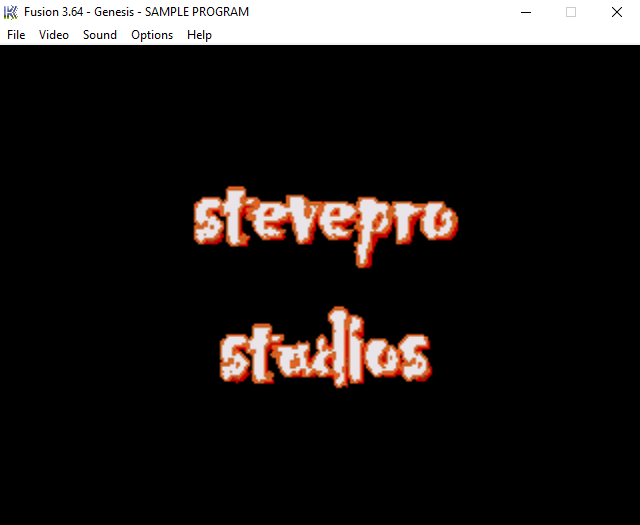

REMEMBER
More information about all SGDK resources found here. Also, compile resources directly using this command:
cd C:\HelloWorld\dev\res
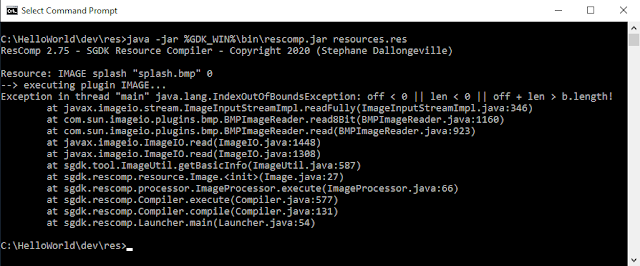
java -jar %GDK_WIN%\bin\rescomp.jar resources.res

Ensure an up-to-date version of Java is installed, e.g. version "12.0.2" 2019-07-16 otherwise builds may fail!
Exception in thread "main" java.lang.IndexOutOfBoundsException: off < 0 || len < 0 || off + len > b.length!

Hello Folders
Up until now, there have been no nested folders in the inc or src directories. As projects expand, it makes sense to group common code together in its own folder. Therefore, add subfolders and update the makefile.

Clone the "Hello World" project and follow these steps: Update any resources similar to "Hello Resources". Build initial project using the build.bat script to generate resources.h. Add the gfx folder and resources.c

Launch Visual Studio and include resource files as before. Next, scale out engine and screen code but now organize into subfolders. Create as New Filters under Visual Studio Header Files and Source Files solution: Create corresponding engine and screen subfolders beneath inc folder under dev. Add header files. Create engine and screen subfolders beneath src folder under dev. Add all the corresponding translation unit code.
Right click Project | Properties | Configuration Properties | C++ | General. Set Additional Include Directories:

 Value:   $(SolutionDir)..\lib;$(ProjectDir)inc;$(ProjectDir)res;$(GDK_WIN)\inc;$(IncludePath);
 $(ProjectDir)inc\engine;$(ProjectDir)inc\screen

Customize the makefile.gen file to include the new subfolders accordingly. Copy %GDK_WIN%\makefile.gen to local dev folder. Update makefile: Add new $(wildcard $(SRC)/ and -I$(INCLUDE) entries per folder. makefile.gen
SRC_C= $(wildcard *.c)
SRC_C+= $(wildcard $(SRC)/*.c)
SRC_C+= $(wildcard $(SRC)/engine/*.c)
SRC_C+= $(wildcard $(SRC)/screen/*.c)
:: ...
INCS= -I$(INCLUDE) -I$(INCLUDE)/engine -I$(INCLUDE)/screen -I$(SRC) -I$(RES) -I$(LIBINCLUDE) -I$(LIBRES)
:: ...
pre-build:
	$(MKDIR) -p $(SRC)/boot
	$(MKDIR) -p out
	$(MKDIR) -p out/res
	$(MKDIR) -p out/src
	$(MKDIR) -p out/src/engine
	$(MKDIR) -p out/src/screen

Update dev built.bat file to use new local custom makefile.gen instead of de-facto %GDK_WIN% version. build.bat
:: Build
::%GDK_WIN%\bin\make -f %GDK_WIN%\makefile.gen > NUL
%GDK_WIN%\bin\make -f makefile.gen > NUL
For completeness, strip out any unnecessary steps in the makefile especially if you are not building *.s files! If you remove pre-build step to speed up makefile build then don't forget to create out subfolders manually.


Troubleshooting
Here is a short list of issues found when installing SGDK, setting up custom library + building new projects:

sprintf
If you have downloaded an older version of SGDK then you may get error Varargs warning on sprintf. The solution is git clone latest master as the fix is only available through direct repository content not in 1.51.

libres
If you have downloaded an older version of SGDK then you may get libres warning. Again upgrade to latest!


Input
Launch Gens KMod and define keys choosing Option menu | Joypads | Redefine Keys. However, some older builds of "gens" may crash while redefining keys. If this happens then build gens from source and redefine keys there. Afterwards copy Gens.cfg + GensKMod.cfg from bin directory to directory where gens.exe lives. PS: don't forget to choose Graphics menu in Gens KMod emulator then Render | Double.


Code Samples
Here are links to some Wiki code currently in Sega Genesis development kit built using our custom library:
 CUSTOM: Hello World  SOURCE: Hello World
 CUSTOM: Input  SOURCE: Input
 
 CUSTOM: Tile Basic  SOURCE: Tile Basic
 CUSTOM: Tile Bitmap  SOURCE: Tile Bitmap

Here are links to all Tutorials currently hosted at Ohsat Games website and built using our custom library:
 CUSTOM: Mega Pong  SOURCE: Mega Pong
 CUSTOM: Mega Runner  SOURCE: Mega Runner
 
 CUSTOM: Mega Galaga  SOURCE: Mega Galaga
 CUSTOM: Miscellaneous  SOURCE: Miscellaneous

Here are links to all samples included in the Sega Genesis development kit built using our custom library:
 CUSTOM: astrofra  SOURCE: astrofra
 CUSTOM: bench  SOURCE: cube_flat
 CUSTOM: cube_flat  SOURCE: cube_flat
 CUSTOM: hs_effect  SOURCE: hs_effect
 CUSTOM: image  SOURCE: image
 
 CUSTOM: joytest  SOURCE: joytest
 CUSTOM: partic  SOURCE: partic
 CUSTOM: sound  SOURCE: sound
 CUSTOM: sprite  SOURCE: sprite
 CUSTOM: xgmplayer  SOURCE: xgmplayer


68000 assembly
The SGDK bench code sample has an example of inline 68000 assembly with math_test_a.s. However, there is an active thriving community that focuses Sega Genesis development in pure 68000 assembly by default!

Some notable resources include:
 Matt Philips  Mega Drive Tutorials
 Matt Philips  Mega Drive Code Samples
 Hugues Johnson  Genesis Programming
 Nameless Algorithm  Genesis Development
 
 Wiki Books  Genesis Programming Info
 mode5.net  Genesis Programming Tutorials
 Markey Jester  Motorola 68000 Starter Tutorial
 ChibiAkumas  68000 Assembly Programming


Summary
Armed with all this knowledge, we are now in an excellent position to build complete video games for the Sega Mega Drive that should be able to execute on real 16-bit hardware using C language and the SGDK!

Tuesday, September 15, 2020

SGDK Programming Setup

In 2013, we checked out Sega Retro Gaming, specifically 8-bit hardware manufactured by Sega such as the SG-1000, SC-3000 and Sega Master System. Now, we turn our attention to the 16-bit Mega Drive [Genesis].

In 2017, we checked out devkitSMS Programming Setup to build 8-bit game code for the Master System. As we upgrade to the 16-bit MD we would like to replicate this process now using Sega Genesis Dev Kit [SGDK].
Let’s check it out!

SGDK
The SGDK is a free development kit allowing you to develop software in C language for the Sega Mega Drive. Note that SGDK also requires Java (custom tools need it) so you need to have Java installed on your system.

IMPORTANT
Ensure an up-to-date version of Java is installed, e.g. version "12.0.2" 2019-07-16 otherwise builds may fail!

Software
Follow most instructions from the previous post: this documents how to setup some pre-requisite software.

Here is a summary of some of the software to be installed:
 Name Version
 C IDE Editor Visual Studio 2015
 Emulators Fusion, Gens KMod
 
 Name Version
 Cross compiler GCC
 Make files Cygwin

Gens KMod "gens" can also be built from source. Add gens.exe to Gens folder similar to Fusion in this post. Note: you may already have gcc configured on you computer if you previously installed cygwin or Git Bash

SGDK
Navigate to the SGDK repository on github: @MegadriveDev has full instructions here. Download the latest release from SGDK archive e.g. 1.51 or simply git clone the latest source code. Extract code into C:\SGDK.

Setup the following environment variables for GDK + GDK_WIN to be used throughout SGDK development. Add the following two environment variables: System | Advanced system settings | Environment Variables:
 Variable  Value  Description
 GDK  C:/SGDK  UNIX path format
 GDK_WIN  C:\SGDK  Windows path format

Next, Stephane advises to add the %GDK_WIN%\bin to your PATH variable being careful if you have another GCC installation as you may have conflicts. I have multiple GCC installs but have not experienced any issues.

Finally, generate the SGDK library %GDK%/lib/libmd.a by entering the following command Start | run | cmd.
%GDK_WIN%\bin\make -f %GDK_WIN%\makelib.gen

Example
As an example, let's write a simple program that prints "Hello World" using SGDK. Create new directory: C:\HelloWorld. Create main.c file + enter the following code similar to the Hello World tutorial program.

main.c
#include <genesis.h>
int main()
{
	VDP_drawText( "Hello Genny World!", 10, 13 );
	while( 1 )
	{
		VDP_waitVSync();
	}
	return 0;
}

Build
Manually compile, link and execute the Hello World program. Launch command prompt: Start | Run | cmd.

Change directory cd C:\HelloWorld. Next, execute the following make command to produce the output ROM:
 ACTION  COMMAND  OUTPUT
 Compile  %GDK_WIN%\bin\make -f %GDK_WIN%\makefile.gen  out\rom.bin

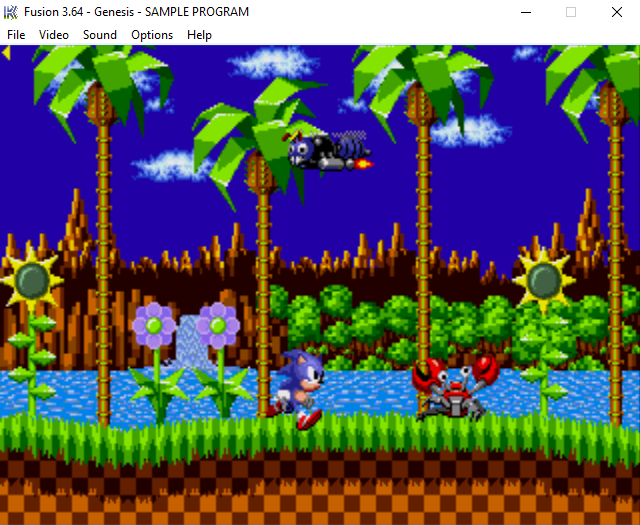
Finally, type out\rom.bin. The Hello World program should launch in the Fusion emulator.
Congratulations! You have just written your first Mega Drive program using the SGDK.

Automate
Let's automate the build process: create C:\HelloWorld\build.bat script file that contains the commands:
@echo off
%GDK_WIN%\bin\make -f %GDK_WIN%\makefile.gen
out\rom.bin

Code Blocks
Follow all instructions here to setup SGDK with CodeBlocks. @matteusbeus has great video on how to setup SGDK using CodeBlocks also. Check out his YouTube channel for other interesting videos with SGDK topics.

Eclipse
Follow all instructions here to setup SGDK with Eclipse. @SpritesMind has a great tutorial on how to remote debug SGDK code using Gens KMod with Eclipse also. Follow all instructions here to complete debug setup:

Launch Eclipse. Choose Run menu | Debug Configurations | C/C++ Remote Application | New Configuration
 Name  Remote Debugging
 Project  HelloWorld
 C/C++ Application  C:\HelloWorld\out\rom.out
 Disable auto build  CHECKED
IMPORTANT ensure "Using GDB (DSF) Manual Remote Debugging Launcher" is preferred launcher selected!

 Stop on startup as: main  CHECKED
 GDB debugger  C:SGDK\bin\gdb.exe
 GDB command line  .gdbinit

 Type  TCP
 Host name or IP address  localhost
 Port number  6868
Build project. Load rom.bin in gens. Set breakpoints. Click debug. Hit Tab in gens to refresh + debug code!

Visual Studio Code
@ohsat_games has a great tutorial on how to setup SGDK using Visual Studio Code. You can even install the Genesis Code extension for code auto completion and to streamline the build process all from within the IDE.

Further SGDK tutorials from @ohsat_games can be found here. All projects have a similar build batch script:
%GDK_WIN%\bin\make -f %GDK_WIN%\makefile.gen

Visual Studio 2015
Retro Mike has a great video on how to setup SGDK using Visual Studio 2015. Launch Visual Studio 2015. File | New | Project... | Visual C++ | General | Makefile Project. Enter the following name + location info:
 Name:  HelloWorld
 Location:  C:\
 Create directory for solution  UNCHECKED

Choose Next. Enter the following Build command: %GDK_WIN%\bin\make -f %GDK_WIN%\makefile.gen

Choose Finish. Enter the previous "Hello World" code as above. Finally, right click Project | Properties | VC++ Directories | Include Directories. Enter the following in order to include SGDK header files: $(GDK_WIN)\inc

Press Ctrl + Shift + B to build source code and produce out\rom.bin. Launch Fusion emu + load ROM file! Alternatively, setup "Remote" debugging configuration in Visual Studio and Press Ctrl + F5 to build and run.

Right click Project | Properties | Debugging | Remote Windows Debugger. Update in the following properties:
 Remote Command  C:\SEGA\Fusion\Fusion.exe
 Remote Command Arguments  out\rom.bin
 Connection  Remote with no authentication
 Debugger Type  Native Only
 Attach  Yes


Summary
To summarize, there are multiple IDE setups available to use the SGDK. However, despite VS2015 being the most applicable to our previous devkitSMS process, we're still not able to debug step thru the C source code.

Ultimately, we would like to build + debug step thru the C source code during SGDK development whilst also being able to build + run the ROM output file all from in Visual Studio. This will be the topic of the next post.

Monday, August 31, 2020

Python Setup Cheat Sheet II

In the previous post we checked out Python Setup Cheat Sheet to download and install Python and setup an integrated development environment for Python programming. We installed open source Python distribution Anaconda used for data science. Let's continue setup to build artificial intelligence + machine learning apps.

Let's check it out!


Install VS Code
VS Code is an integrated development environment with useful plugins for Python and Data Science. Install VS Code from Anaconda navigator. Otherwise install VS Code for Windows and Mac OS/X and Linux directly.

Launch VS Code. Install Python extension for Visual Studio Code. Install other plugins for example Remote SSH to connect to Linux VM or Code Runner. Install VS Code Insiders to try pre-release version of VS Code.

Update global settings.json file to your particular preferences. Here are some common VS Code examples:
 SYSTEM  LOCATION
 Windows  %APPDATA%/Code/User/settings.json
 Mac OS/X  ~/Library/Application Support/Code/User/settings.json
 Linux  ~/.config/Code/User/settings.json
Note: VS Code Insiders location replace Code/User/settings.json with Code - Insiders/User/settings.json

settings.json
 {
    "workbench.colorTheme": "Visual Studio Light",
    "window.zoomLevel": 0,
    "editor.trimAutoWhitespace": false,
    "editor.renderIndentGuides": false,
    "editor.roundedSelection": false,
    "editor.suggestSelection": "first",
    "python.dataScience.sendSelectionToInteractiveWindow": true,
    "python.jediEnabled": false,
    "code-runner.clearPreviousOutput": true,
    "code-runner.runInTerminal": true,
    "code-runner.showExecutionMessage": false,
    "code-runner.respectShebang": false,
    "code-runner.defaultLanguage": "python3",
 }

 Windows  Mac OS/X + Linux
 {
    "python.pythonPath": "%USERPROFILE%/Anaconda3/python.exe",
    "code-runner.executorMap": {
        "python": "python.exe",
        "python.pythonPath": "%USERPROFILE%/Anaconda3",
    },
 }
 {
    "python.pythonPath": "/anaconda3/bin/python",
    "code-runner.executorMap": {
        "python": "python",
        "python.pythonPath": "/anaconda3/bin",
    },
 }


Hello VS Code
Create folder "HelloVScode". Launch VS Code. File | Open Folder | HelloVScode | Select Folder. Create simple "HelloWorld.py" file. Enter simple code print('Hello World'). Press F5 to debug Python script. Customize Run + Debug click "create a launch.json file". Click Python File: Debug the currently active Python file. Press F5.

IMPORTANT
Press Ctrl + Shift + P | Python: Select Interpreter. If creates new workspace settings.json + override Python interpreter user settings.json then do not check python.pythonPath into source control when deploying cross platform.

Virtual Environment
Unlike PyCharm, VS Code does not automagically create an isolated Python environment for new projects. Therefore, follow all instructions here to setup and activate virtual environment for Python using VS Code.

CommandNotFoundError
When running Python script using Anaconda you may get error CommandNotFoundError: Your shell has not been properly configured to use 'conda activate'. Terminal | Click "+" | Spawn new Terminal default "Conda".

Code Runner
Automate process by installing Code Runner plugin. Press F1 | Run Code first time to set Output to "Code". Ensure entries above in user settings.json for fast turnaround. Press Ctrl + Alt + N for each subsequent run!

IMPORTANT
On Mac OS/X if Ctrl + Alt + N does not work then you may have to swap Ctrl for Cmd in keybindings.json:
~/Library/Application Support/Code/User/keybindings.json
// Place your key bindings in this file to override the defaultsauto[]
[
    {
        "key": "cmd+alt+n",
        "command": "code-runner.run"
    },
    {
        "key": "cmd+alt+n",
        "command": "-code-runner.run"
    }
]


Code Sample
Let's test drive develop a simple code sample as a Python module that could be deployed as Python package.

IMPORTANT
A module is a single Python script file whereas a package is a collection of modules. A package is a directory of Python modules containing an additional __init__.py file to distinguish from a directory of Python scripts.

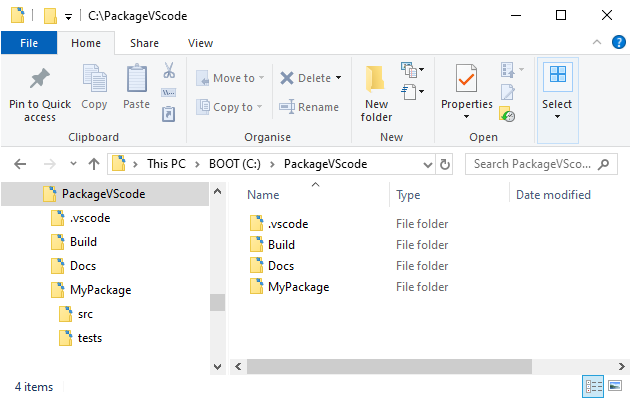
Create folder "PackageVScode". Launch VS Code. File | Open Folder | PackageVScode. Create New Folder "MyPackage". Create other top level folders, for example, Build + Docs etc. Create hidden .vscode folder.

Create sub folders src and tests beneath "MyPackage". Create requirements.txt file + setup.py beneath "MyPackage" also. Finally, create module.py and __init__.py under src and test_module.py under tests.

 test_module.py  module.py
 import unittest
 from MyPackage.src.module import add_one

 class TestSimple(unittest.TestCase):

    def test_add_one(self):
        result = add_one(5)
        self.assertEqual(result, 6)

 if __name__ == '__main__':
    unittest.main()
 def add_one(number):
    return number + 1

Add launch.json to .vscode folder. Accept default to launch current Python file from integrated terminal:
launch.json
 {
    "version": "0.2.0",
    "configurations": [
        {
            "name": "Python: Current File",
            "type": "python",
            "request": "launch",
            "program": "${file}",
            "console": "integratedTerminal"
        }
    ]
 }

Open test_module.py. Press F5 to debug. Output ModuleNotFoundError: No module named 'MyPackage'. In VS Code you must correctly set PYTHONPATH in order to debug step through and run local source code!

Add settings.json to .vscode folder. Configure Python source folders by configuring the env PYTHONPATH:
settings.json
 {
    "terminal.integrated.env.windows": {
        "PYTHONPATH": "${env:PYTHONPATH};${workspaceFolder}"
    },
    "terminal.integrated.env.osx": {
        "PYTHONPATH": "${env:PYTHONPATH}:${workspaceFolder}",
    },
    "terminal.integrated.env.linux": {
        "PYTHONPATH": "${env:PYTHONPATH}:${workspaceFolder}",
    },
    "python.envFile": "${workspaceFolder}/.env"
    ]
 }

Finally, you must add "hidden".env file beneath "PackageVScode" that sets workspace folder per platform:
 WORKSPACE_FOLDER=/Absolute/Path/to/PackageVScode/
 PYTHONPATH=${WORKSPACE_FOLDER}

IMPORTANT
The "hidden".env file "lives" locally to project and should NOT be checked into source code version control! It may also be necessary to close VS Code and re-open after configuring .env file. Windows must use "/".

Now press F5 to debug test code or press Ctrl + Alt + N for Code Runner. Alternatively, Terminal command:

python -m unittest discover MyPackage

IMPORTANT
If the Terminal reveals Run 0 tests then ensure package has __init__.py setup in every relevant sub folder. Finally, enter dependencies for requirements.txt file and setup.py e.g. numpy. Install package at terminal:
 setup.py  requirements.txt
 import setuptools

 with open("README.md", "r") as fh:
    LONG_DESCRIPTION = fh.read()

 setuptools.setup(
    name='MyPackage',
    version='0.1.2',
    description="My test package.",
    long_description=LONG_DESCRIPTION,
    long_description_content_type="text/markdown",
    packages=setuptools.find_packages(),
    install_requires=[
        "numpy>=1.17.1",
    ]
 )
 numpy>=1.17.1
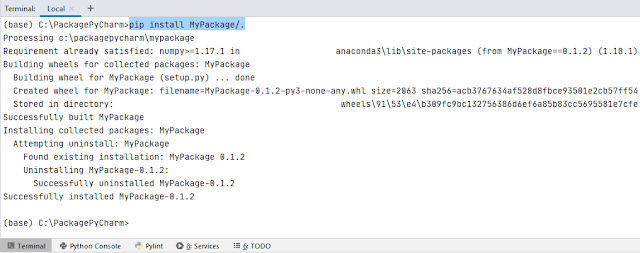
pip install MyPackage/.

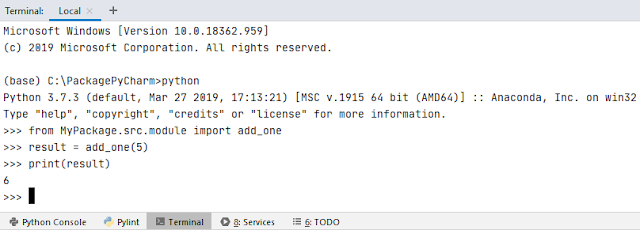
Finally, we could also replicate the unit test code directly on the REPL. Select Terminal tab. Enter commands:

 python
 >>> from MyPackage.src.module import add_one
 >>> result = add_one(5)
 >>> print(result)

Code Linting
Linting highlights syntactical and stylistic problems in Python source code which helps identify and correct subtle programming errors. In VS Code, navigate to Python script via Terminal e.g. Pylint test_module.py.

Alternatively, select Terminal and type specific linter like flake8 to check Python source code against PEP8 coding style programming errors. If flake8 is not installed then simply type pip install flake8 at Terminal.


Jupyter Notebooks
Notebooks are becoming the standard for prototyping and analysis for data scientists. Many cloud providers and Anaconda navigator offer machine learning and deep learning services in the form of Jupyter notebooks.

Launch Anaconda navigator | Choose Jupyter Notebook | Launch. After the browser launches create a New | Python 3 | Jupyter notebook. Follow tutorial. Change browser from Google Chrome to Firefox if any issues! Alternatively, create notebook in VS Code | Ctrl + Shift + P | Python: Create New Blank Jupyter Notebook.


Remote SSH
Often machine learning AI projects may require remote development in VS Code to use Windows to develop in a Linux-based environment. Install Remote SSH to run and debug Linux-based applications on Windows. Start | run | cmd. ssh username@linux_server. Enter passphrase. Enter verification code if setup for MFA.

SSH Keys
Use SSH key authentication and setup SSH keys to connect local Windows host and remote Linux VM server.
 Windows  Linux
 cd %USERPROFILE%
 cd .ssh
 ssh-keygen -C "username@emailaddress.com"
 ssh username@linux_server
 cd ~/.ssh
 ssh-keygen -C "username@emailaddress.com"

Dump the contents of id_rsa.pub file from local Windows host to authorized_keys file on Linux VM server:
cd ~/.ssh
echo "contents_of_Windows_id_rsa.pub_file" >> authorized_keys

Finally, configure %USERPROFILE%\.ssh\config file with Linux VM server information to alias connection.
 Host ENVIRONMENT
     HostName linux_server
     User username
     IdentityFile ~/.ssh/id_rsa

SSH Tunnel
Port forwarding via SSH Tunnel creates a secure connection between the local computer and remote machine through which services can be relayed. SSH Tunnel is useful for transmitting data over encrypted connection.
 ssh -N -L localhost:8787:LoadBalancer_External-IP:8000 username@linux_server

The same technique can be uesd to access Jupyter Notebook on Linux VM server. Launch terminal and enter:
 ssh username@linux_server
 cd ~/
 jupyter notebook --no-browser --port=8889
 ssh -N -L localhost:8889:localhost:8889 username@linux_server

WinSCP
Install WinSCP as popular SFTP client to navigate + copy files between local Windows and remote Linux VM. Launch WinSCP. Enter Host Name, Port number, User name, Password and verification code if setup for MFA.


Summary
To summarize, we have setup Python distribution Anaconda on Windows, Mac OS/X and Linux to now build artificial intelligence and machine learning apps. We are now set to develop machine learning models then deploy using Flask API. Apps can then be containerized using Docker and orchestrated using Kubernetes to significantly increase the efficiency of a Continuous Integration / Continuous Deployment infrastructure J

Saturday, July 4, 2020

Python Setup Cheat Sheet

Python is an interpreted high-level and general purpose programming language. Python 2.0 was released in 2000 but officially discontinued in 2020. Python 3.x is now the preferred version for most projects e.g. v3.7.

Python is commonly used in artificial intelligence and machine learning projects with the help of libraries like TensorFlow, Keras, Pytorch and Scikit-learn. There is also open source Python distribution Anaconda used for data science and machine learning applications that aims to simplify package management and deployment.

Let's check it out!


Install Python
Install Python on Windows, Mac OS/X and Linux. Install pip as the de facto standard package-management system. Install Anaconda for future AI projects. Finally, install + configure an IDE for Python programming.

Windows
Follow instructions here how to install Python 3 on Windows. Download latest version of Python for Windows including IDLE pip + documentation. Add Python to PATH variable making it easier to configure your system.

Mac OS/X
Python is installed by default on most Mac OS/X systems. Launch terminal + type python and pip to confirm.

Linux
Python is installed by default on most Linux systems. Launch terminal + type python. However you may also need to install pip. Update your ~/.bashrc file as necessary to use Python 3.7 by default instead of Python 2.
 Install + Update + Aliases Python3  Ubuntu Linux unable to locate package python-pip
 sudo apt install python3-pip
 python -m pip install --upgrade pip
 echo "alias python=python3" >> ~/.bashrc
 echo "alias pip=pip3" >> ~/.bashrc
 sudo apt-get install software-properties-common
 sudo apt-add-repository universe
 sudo apt-get update
 sudo apt-get install python3-pip

IMPORTANT
Verify which python version and which pip version are installed and location where these are both installed:
 python --version  which python
 pip --version  which pip


Install Anaconda
Follow instructions to install open source Python distribution Anaconda for Windows and Mac OS/X and Linux
 SYSTEM  LOCATION
 Windows  %USERPROFILE%\Anaconda3
 Mac OS/X  /anaconda3
 Linux  /anaconda3

Windows
Add the following four environment variables: System | Advanced system settings | Environment Variables:
 %USERPROFILE%\Anaconda3  %USERPROFILE%\Anaconda3\libs
 %USERPROFILE%\Anaconda3\Scripts  %USERPROFILE%\Anaconda3\Library\bin

Mac OS/X
Follow all prompts from the install wizard. Anaconda should install at /anaconda3 by default with aliases set.

Linux
Launch terminal as root user. Type bash ~/Downloads/Anaconda3-2020.02-Linux-x86_64.sh. For consistency with the Mac set install location to /anaconda3. After install launch Anaconda navigator. Enter the following:
 source ~/anaconda*/bin/activate root
 anaconda-navigator

Update your ~/.bashrc file as necessary to prefer Anaconda Python especially for data science AI + ML work.
 alias python=/anaconda3/bin/python
 alias pip=/anaconda3/bin/pip

Finally, create Anaconda desktop shortcut: create the following Anaconda.desktop at /usr/share/applications/ Add the text below. Enter sudo echo "PATH=$PATH:/anaconda3/bin" >> /etc/environment at the terminal.

Anaconda.desktop
[Desktop Entry]
Type=Application
Name=Anaconda
Exec=anaconda-navigator
Terminal=false
Icon=/anaconda3/lib/python3.7/site-packages/anaconda_navigator/static/images/anaconda-icon-256x256.png
Restart Linux. From settings type "Anaconda" to prompt Anaconda Navigator + resume projects from there.

IMPORTANT
Verify which Anaconda version is installed using conda --version command and where installed where conda.


Install PyCharm
PyCharm is an integrated development environment used specifically for Python. Install PyCharm during the Anaconda install or from navigator. Otherwise install PyCharm for Windows and Mac OS/X and Linux directly.

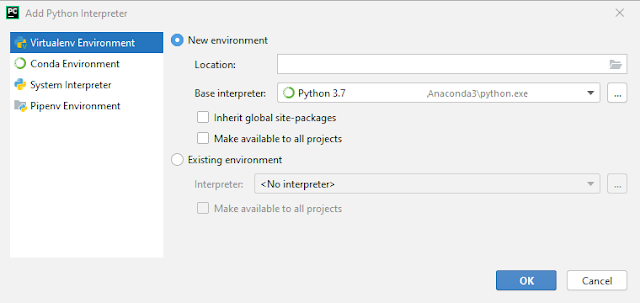
Launch PyCharm. Click "Configure" cog drop down | Settings. Set the base interpreter to match the Python location for Anaconda. Click cog | Show All | Click "+" | Virtualenv Environment. Enter the following details:

 SYSTEM  LOCATION
 Windows  %USERPROFILE%\Anaconda3\python.exe
 Mac OS/X  /anaconda3/bin/python
 Linux  /anaconda3/bin/python

Plugins
Configure cog | Plugins. Install pylint as a code analysis tool that follows the recommended PEP8 style guide. Restart IDE. Pylint is handy tool to check Python code especially for developers used to static code compiler!

Shortcuts
Track active item in solution explorer similar to Visual Studio: Click cog to right of Project and Always Select Opened File. Hit shift key twice for quick search. Remember Rename files and folder is in the Refactor menu!
 Ctrl + F12  Prompt popup to list all the methods in the class
 Ctrl + Shift + N  Prompt popup to search for text found in all files
 Ctrl + Shift + I  View definition of function or method in the class
 Ctrl + Click function  Navigate to function definition or method in class
 Ctrl + Alt + Left arrow  Navigate backwards to previous location
 Ctrl + Alt + Right arrow  Navigate forwards to the next location

IMPORTANT
On Linux navigate may actually be Shift + Alt + arrow keys instead of Ctrl due to keymap shortcut conflicts!


Hello PyCharm
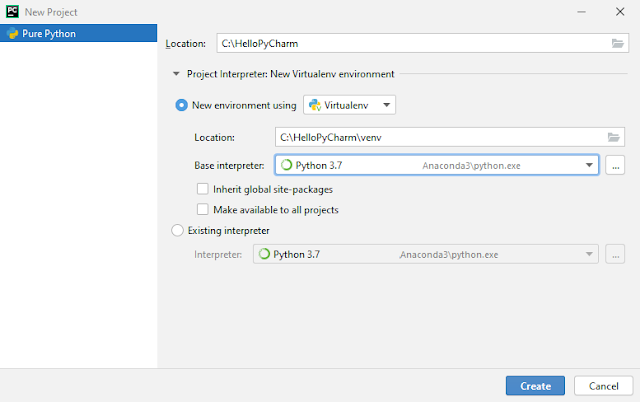
Launch PyCharm. Create New Project | "HelloPyCharm". Enter the following details as Anaconda interpreter:

PyCharm uses virtualenv tool to create an isolated Python environment. Virtualenv creates venv folder in the current directory with Python executable files and a copy of pip to install other modules and packages.

Create simple "HelloWorld.py". Enter Python code print('Hello World'). Right click file | Run ""HelloWorld".

Module Not Found
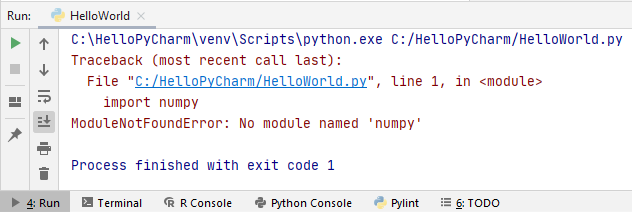
Update script | Import module not currently installed e.g. import numpy. Run script: ModuleNotFoundError


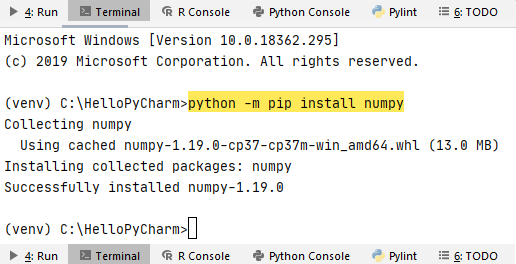
Launch PyCharm terminal. Enter python -m pip install numpy to install module. Re-run script with success.


Alternatively, execute pip freeze to dump all required modules for project into requirements.txt and install:
 pip freeze > requirements.txt
 pip install -r requirements.txt


Code Sample
Let's test drive develop a simple code sample as a Python module that could be deployed as Python package.

IMPORTANT
A module is a single Python script file whereas a package is a collection of modules. A package is a directory of Python modules containing an additional __init__.py file to distinguish from a directory of Python scripts.

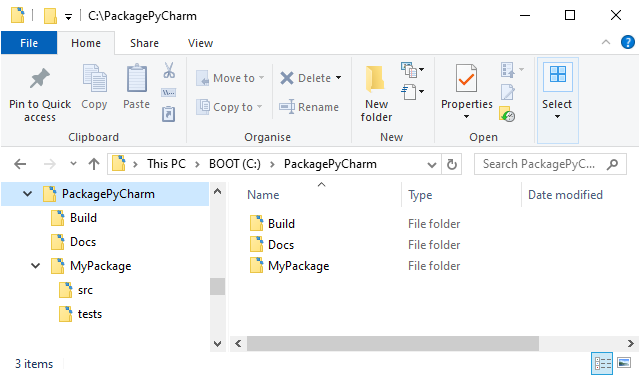
Launch PyCharm. Create New Project | "PackagePyCharm". Configure Python Anaconda interpreter above. Right click PackagePyCharm project | New | Python Package | "MyPackage". Create other top level folders.

Create sub folders src and tests beneath "MyPackage". Create requirements.txt file + setup.py beneath "MyPackage" also. Finally, create module.py and __init__.py under src and test_module.py under tests.

 test_module.py  module.py
 import unittest
 from MyPackage.src.module import add_one

 class TestSimple(unittest.TestCase):

    def test_add_one(self):
        result = add_one(5)
        self.assertEqual(result, 6)

 if __name__ == '__main__':
    unittest.main()
 def add_one(number):
    return number + 1

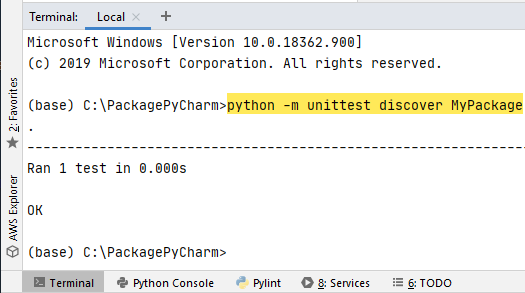
Right click inside test_module.py | Debug 'Unittests for test_module.py'. Alternatively, Terminal command:

python -m unittest discover MyPackage

IMPORTANT
If the Terminal reveals Run 0 tests then ensure package has __init__.py setup in every relevant sub folder. Finally, enter dependencies for requirements.txt file and setup.py e.g. numpy. Install package at terminal:
 setup.py  requirements.txt
 import setuptools

 with open("README.md", "r") as fh:
    LONG_DESCRIPTION = fh.read()

 setuptools.setup(
    name='MyPackage',
    version='0.1.2',
    description="My test package.",
    long_description=LONG_DESCRIPTION,
    long_description_content_type="text/markdown",
    packages=setuptools.find_packages(),
    install_requires=[
        "numpy>=1.17.1",
    ]
 )
 numpy>=1.17.1

pip install MyPackage/.

Finally, we could also replicate the unit test code directly on the REPL. Select Terminal tab. Enter commands:

 python
 >>> from MyPackage.src.module import add_one
 >>> result = add_one(5)
 >>> print(result)

Code Linting
Linting highlights syntactical and stylistic problems in Python source code which helps identify and correct subtle programming errors. In PyCharm, choose Pylint tab and click Play button to list any errors in code.

Alternatively, select Terminal and type specific linter like flake8 to check Python source code against PEP8 coding style programming errors. If flake8 is not installed then simply type pip install flake8 at Terminal.


Summary
To summarize, we have a simple setup for Python programming on Windows, Mac OS/X and Linux. There is much to explore e.g. Python 3.8. However, we'd like to setup Python more for AI machine learning projects. This will be topic of the next post.

Tuesday, June 30, 2020

Candy Kid Code Complete

Candy Kid is a simple maze chase video game originally programmed by Grandstand Leisure from New Zealand in September 1984. The game was written in BASIC programming language on Sega SC-3000.

In 2015, Candy Kid was re-written in C#/.NET and XNA for Windows PC and ported to iOS / Android using MonoGame. After finding the original source code on SMS Power!, Candy Kid was re-written again in 8-bit.

Inspired from previous posts on Sega Console Programming and devkitSMS Programming Setup + Sample, Candy Kid is my fifth 8-bit video game written in C / Z80 assembler to target Sega Master System (SMS).

Let's check it out!

Note: previous titles published for the Master System include 3D City, Simpsons Trivia + Platform Explorer.
Download source code here.

Sega Retro Gaming post documents how to play video games like Candy Kid SMS using the Fusion emulator.
devkitSMS Programming Setup post documents development environment required to build C / Z80 source.
Instructions
Eat all the candy to pass each level. Eat all bonuses to maximize your score! The 3x Candy "Mama" enemies Pro / Adi / Suz have different passive and aggressive personalities and alternate between scatter and attack.

Tools
Here is a list of Tools and frameworks that were used in the development of this project:
 KEY  VALUE
 Programming  devkitSMS
 Compiler  sdcc 3.6
 Assembler  WLA-DX
 IDE  Visual Studio 2015
 Languages  C / Z80
 Graphics  BMP2Tile 0.43 / GIMP 2 / paint.net
 Music  Mod2PSG2 / vgm2psg
 Emulators  Emulicious / Fusion / Meka

ROM Hacking
You can hack this ROM! Download + dump CandyKid into Hex Editor, e.g. HxD, and modify bytes:
 ADDRESS  VARIABLE  DESCRIPTION
 0x004F  Debugger  Used to show debugging info for game.
 0x0050  Invincible  Non-zero value enables invincibility.
 0x0051  FullBoost  Non-zero value enables maximum boost.
 0x0052  Trees Type  Set value to 1=Show otherwise 2=Kill.
 0x0053  Exits Type  Set value to 1=Open otherwise 2=Shut.
 0x0054  Difficulty  Set value to 1=Easy otherwise 2=Hard.
 0x0055  Game Speed  Set value to 1=Slow otherwise 2=Fast.
 0x0056  World No.  Set start World no currently 1 to 10.
 0x0057  Round No.  Set start Round no currently 1 to 10.
 0x0058  Music Off  Set 0=Music to play otherwise silent.
 0x0059  Sound Off  Set 0=Sound to play otherwise silent.

Bonuses
  • There are 4x different bonuses: 100 / 200 / 400 / 800 pts. Double bonus points after level 70.
  • Player will receive extra 2,000 pts after eating all the candy and collecting all bonuses in level.

Cheats
  • Press button 2 five times during Title screen and you'll be invincible each game this is actioned.
  • Press and hold button 2 during game play to action Game Over and force quit out of the game.
  • Press and hold button 2 on Splash screen to reset High score and all options previously saved.

Credits
Extra special thanks goes to sverx for the devkitSMS. Plus StevePro Studios would like to thank eruiz00 and haroldoop for sharing source code from SMS Homebrew projects. Many ideas here were used in this project!

Promotion
Thanks to SMS Power! for making this video. Here is the official Candy Kid Facebook page and Blogger label.

Summary
To summarize, Candy Kid has had a very interesting journey after first appearing on the Sega SC-3000 in 1984 to being ported to Windows PC, iOS + Android in 2015 and finally the Sega Master System in 2020.

In fact, after porting the original game in 2015 the ultimate goal was always to eventually back port Candy Kid to the Master System. Thanks to the awesome Indie game dev scene this goal has now been achieved!