Using the SGDK, it is possible to write game code using the C language rather than pure 68000 assembly. Therefore, we would now like to extend this knowledge and write more detailed programming sample code.
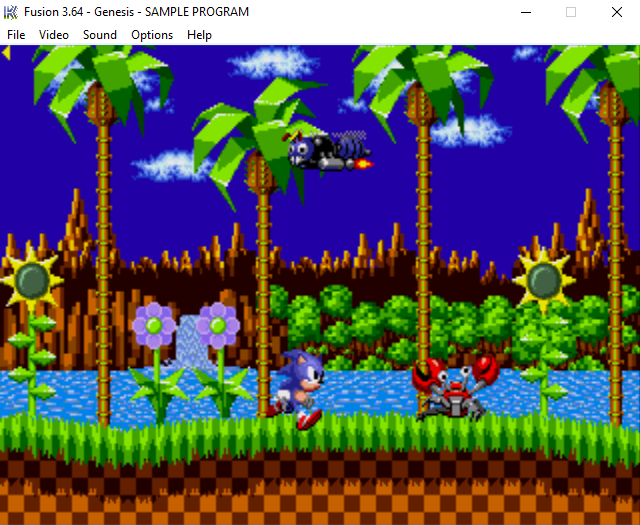 Let's check it out!
Software
Follow all instructions from the previous post: this documents how to setup the pre-requisite software.
Note: ensure you have downloaded and installed the SGDK and the GNU Compiler Collection [GCC].
Library
Ultimately, we would like to build + debug step thru the C source code during SGDK development from in Visual Studio. Therefore, we need to build custom version of SGDK library to replace functions with stubs.
Launch Visual Studio 2015. File | New | Project... | Visual C++ | Win32 | Win32 Project | Static Library:
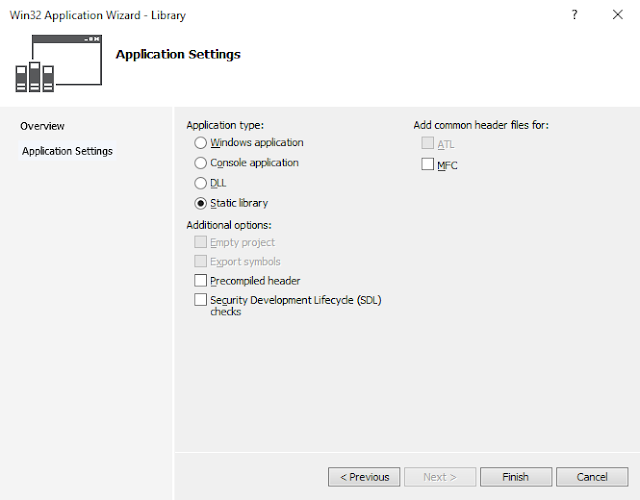
Create two folders lib and src. Copy all SGDK header files from %GDK_WIN%\inc and %GDK_WIN%\res beneath the lib folder. For each header file create corresponding translation unit [*.c] file in the src folder.

Finally, implement each header file function as stub function in each translation unit. Build custom library. Copy _genesis.lib and _genesis.pdb binaries to the lib folder. This will be used to link sample source code. Download custom library here.
Usage
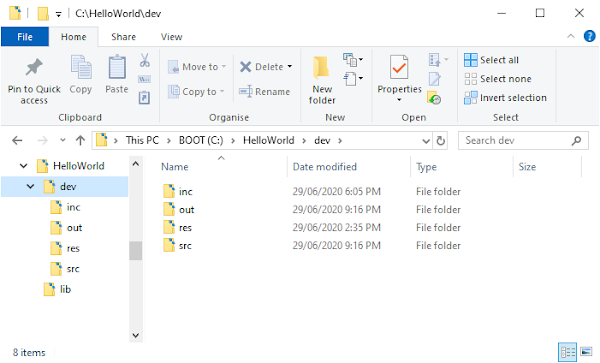
SGDK uses a generic makefile to compile projects. In order to be properly recognized by the makefile you need to organize your project folder structure as following: Project root add sub folders: inc, out, res, src
| inc | include files | *.h [C include file] or *.inc [assembly include file] |
| out | output files | rom.bin to be created automatically by makefile when SGDK project is built |
| res | resource files | *.res [resource definition file compiled by rescomp tool see bin/rescomp.txt] |
| src | source files | *.c [C source file], *.s [68000 asm source file] or *.s80 [Z80 asm source file] |
Hello World
Create folder C:\HelloWorld. Copy new SGDK custom library lib folder [above] here. Create sub-folder: dev. Change directory to dev folder and create the following sub-folders as indicated per Usage: inc, out, res, src
Launch Visual Studio 2015. File | New | Project... | Visual C++ | Win32 | Win32 Project
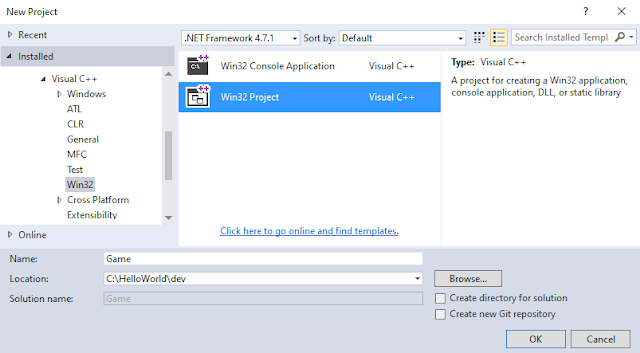
| Name: | Game |
| Location: | C:\HelloWorld\dev |
| Create directory for solution | UNCHECKED |
| Application type: | Console application |
| Additional options: | Empty project CHECKED |
First, remove x64 build configuration! Right click Solution | Properties. Click Configuration Manager button. Click Active solution platform drop down | Edit. Click x64 option | Remove. Now will have only Win32 build.
Add the main.h source code to Header Files using the inc folder. Add main.c to Source Files using src folder:
| main.h | main.c | ||
|
|
Right click Project | Properties | Configuration Properties | General. Set Output and Intermediate directories:
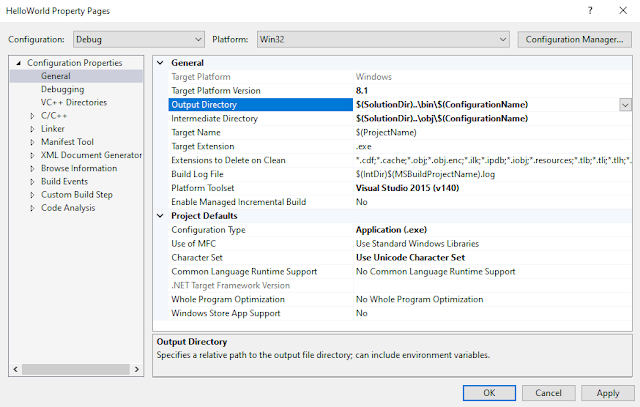
| Output Directory: | $(SolutionDir)..\bin\$(ConfigurationName) |
| Intermediate Directory: | $(SolutionDir)..\obj\$(ConfigurationName) |
Right click Project | Properties | Configuration Properties | C++ | General. Set Additional Include Directories:
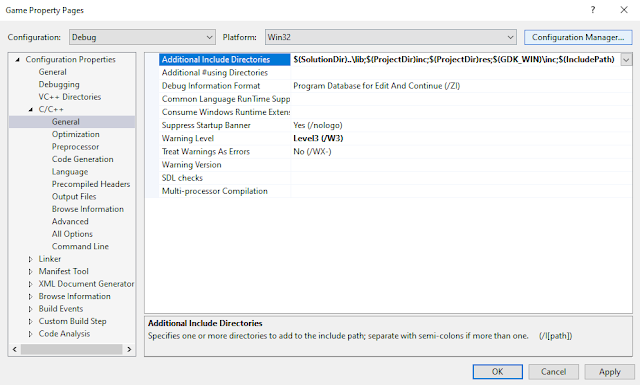
| Value: | $(SolutionDir)..\lib;$(ProjectDir)inc;$(ProjectDir)res;$(GDK_WIN)\inc;$(IncludePath) |
Right click Project | Properties | Configuration Properties | Linker | General | Additional Library Directories:
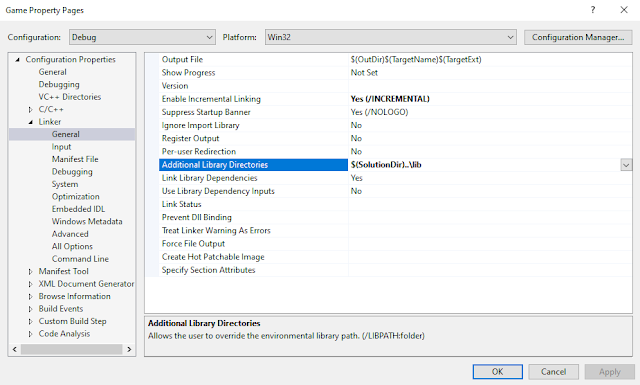
| Value: | $(SolutionDir)..\lib |
Right click Project | Properties | Configuration Properties | Linker | Input. Set the Additional Dependencies:
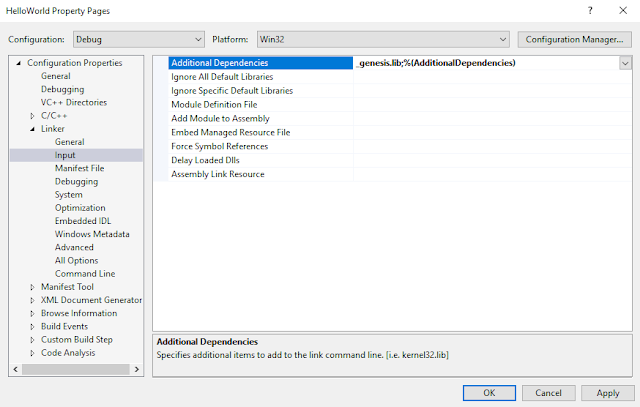
| Value: | _genesis.lib;%(AdditionalDependencies) |
IMPORTANT
The first time you F5 debug step through C source code you may be prompted to navigate to src directory.
Add the following build.bat script to the dev folder to automate process to build + run the ROM output file:
@echo off
cls
echo Building...

:: Time build START
set _time=%time: =0%
set /a _hours=100%_time:~0,2%%%100,_min=100%_time:~3,2%%%100,_sec=100%_time:~6,2%%%100,_cs=%_time:~9,2%
set /a _started=_hours*60*60*100+_min*60*100+_sec*100+_cs

:: Build
%GDK_WIN%\bin\make -f %GDK_WIN%\makefile.gen > NUL

:: Time build -END-
set _time=%time: =0%
set /a _hours=100%_time:~0,2%%%100,_min=100%_time:~3,2%%%100,_sec=100%_time:~6,2%%%100,_cs=%_time:~9,2%
set /a _duration=_hours*60*60*100+_min*60*100+_sec*100+_cs-_started
set /a _hours=_duration/60/60/100,_min=100+_duration/60/100%%60,_sec=100+(_duration/100%%60%%60),_cs=100+_duration%%100
echo.
echo Time taken: %_sec:~-2%.%_cs:~-2% secs
echo.

:: Run
C:\SEGA\Fusion\fusion.exe out\rom.bin
::C:\SEGA\gens\gens.exe %~dp0\out\rom.bin
Here we measure the build execution time. Also, suppress the output of the build script to keep things clean. The final solution should look like this:
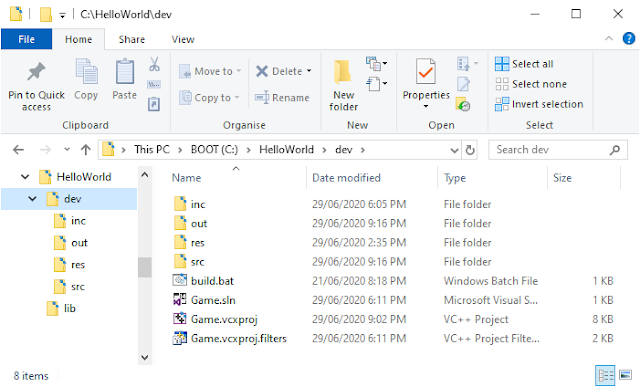
In Visual Studio, add the build.bat script to Resource Files. Connect the build.bat script to Ctrl + 1 keyboard shortcut as per this post. Press Ctrl + 1 to build + run the ROM output file all from within Visual Studio 2015.
Congratulations! You have just written your first Mega Drive program using the SGDK.

Hello Resources
Import all resources into your project as media files that your game will use such as images for background tiles + sprites, audio for music + sound effects etc. Clone the "Hello World" project and follow these steps;
Change directory to res folder under dev folder. Copy resource here. Create resources.res here for example:
resources.res
IMAGE splash "splash.bmp" 0
Next execute build.bat script to compile resource and generate corresponding header file e.g. resources.h. In Visual Studio add resources.h to Header Files. Update main.h to include new resources.h header file in code:
main.h
#ifndef __MAIN__
#define __MAIN__
// ...
#include "resources.h"
#endif//__MAIN__
IMPORTANT
If resources.h does not auto generate or the contents do not change then delete the out folder try again!
Create folder gfx at same level as dev folder. Create sub folder res. Add dummy corresponding translation unit resources.c under res sub folder. In Visual Studio add resources.c to Source Files with following code:
resources.c
#ifdef _CONSOLE
  #include "_genesis.h"
  const Image splash = { NULL, NULL, NULL };
#endif
Update main.c to render image. Leverage conditional compilation to inject resource palette data at runtime:
main.c
#include "main.h"
int main()
{
	u16 *data = NULL;
#ifndef _CONSOLE
	data = splash.palette->data;
#endif
	VDP_setPalette( PAL1, data );
	VDP_drawImageEx( BG_A, &splash, TILE_ATTR_FULL( PAL1, 0, 0, 0, 1 ), 4, 2, 0, CPU );
	while( 1 )
	{
		VDP_waitVSync();
	}
	return 0;
}
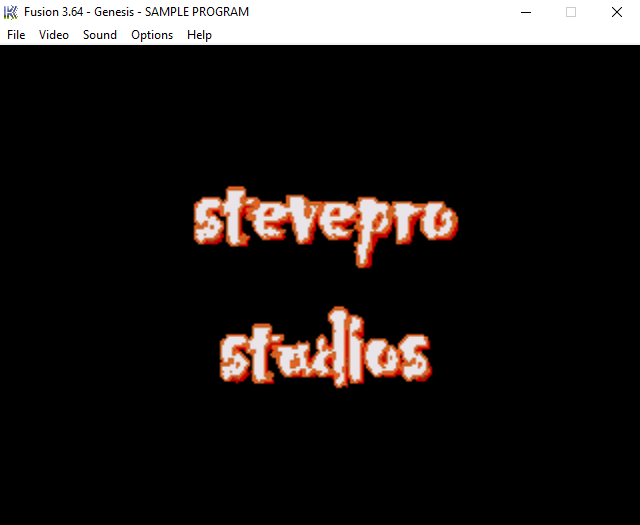
Press F5 to build + debug step through C source code. Press Ctrl + 1 to build + run the new ROM output file.
REMEMBER
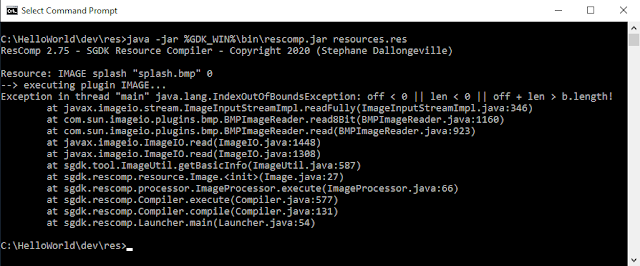
More information about all SGDK resources found here. Also, compile resources directly using this command:
cd C:\HelloWorld\dev\res
java -jar %GDK_WIN%\bin\rescomp.jar resources.res
Ensure an up-to-date version of Java is installed, e.g. version "12.0.2" 2019-07-16 otherwise builds may fail!
Exception in thread "main" java.lang.IndexOutOfBoundsException: off < 0 || len < 0 || off + len > b.length!
Hello Folders
Up until now, there have been no nested folders in the inc or src directories. As projects expand, it makes sense to group common code together in its own folder. Therefore, add subfolders and update the makefile.
Clone the "Hello World" project and follow these steps: Update any resources similar to "Hello Resources". Build initial project using the build.bat script to generate resources.h. Add the gfx folder and resources.c
Launch Visual Studio and include resource files as before. Next, scale out engine and screen code but now organize into subfolders. Create as New Filters under Visual Studio Header Files and Source Files solution:
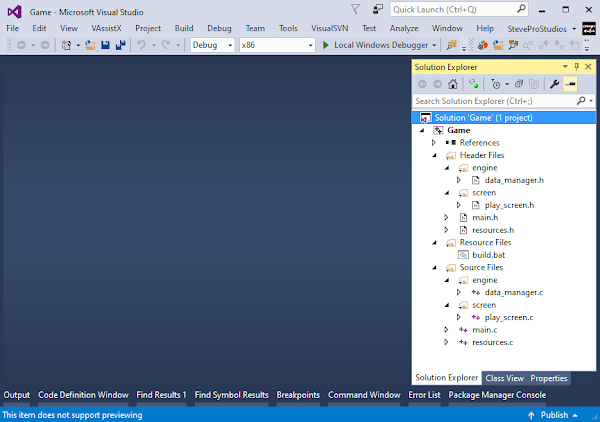 Create corresponding engine and screen subfolders beneath inc folder under dev. Add header files. Create engine and screen subfolders beneath src folder under dev. Add all the corresponding translation unit code.
Right click Project | Properties | Configuration Properties | C++ | General. Set Additional Include Directories:

| Value: | $(SolutionDir)..\lib;$(ProjectDir)inc;$(ProjectDir)res;$(GDK_WIN)\inc;$(IncludePath); $(ProjectDir)inc\engine;$(ProjectDir)inc\screen |
Customize the makefile.gen file to include the new subfolders accordingly. Copy %GDK_WIN%\makefile.gen to local dev folder. Update makefile: Add new $(wildcard $(SRC)/ and -I$(INCLUDE) entries per folder. makefile.gen
SRC_C= $(wildcard *.c)
SRC_C+= $(wildcard $(SRC)/*.c)
SRC_C+= $(wildcard $(SRC)/engine/*.c)
SRC_C+= $(wildcard $(SRC)/screen/*.c)
:: ...
INCS= -I$(INCLUDE) -I$(INCLUDE)/engine -I$(INCLUDE)/screen -I$(SRC) -I$(RES) -I$(LIBINCLUDE) -I$(LIBRES)
:: ...
pre-build:
	$(MKDIR) -p $(SRC)/boot
	$(MKDIR) -p out
	$(MKDIR) -p out/res
	$(MKDIR) -p out/src
	$(MKDIR) -p out/src/engine
	$(MKDIR) -p out/src/screen
Update dev built.bat file to use new local custom makefile.gen instead of de-facto %GDK_WIN% version. build.bat
:: Build
::%GDK_WIN%\bin\make -f %GDK_WIN%\makefile.gen > NUL
%GDK_WIN%\bin\make -f makefile.gen > NUL
For completeness, strip out any unnecessary steps in the makefile especially if you are not building *.s files! If you remove pre-build step to speed up makefile build then don't forget to create out subfolders manually.
Troubleshooting
Here is a short list of issues found when installing SGDK, setting up custom library + building new projects:
sprintf
If you have downloaded an older version of SGDK then you may get error Varargs warning on sprintf. The solution is git clone latest master as the fix is only available through direct repository content not in 1.51.
libres
If you have downloaded an older version of SGDK then you may get libres warning. Again upgrade to latest!

Input
Launch Gens KMod and define keys choosing Option menu | Joypads | Redefine Keys. However, some older builds of "gens" may crash while redefining keys. If this happens then build gens from source and redefine keys there. Afterwards copy Gens.cfg + GensKMod.cfg from bin directory to directory where gens.exe lives. PS: don't forget to choose Graphics menu in Gens KMod emulator then Render | Double.
Code Samples
Here are links to some Wiki code currently in Sega Genesis development kit built using our custom library:
|
|
Here are links to all Tutorials currently hosted at Ohsat Games website and built using our custom library:
|
|
Here are links to all samples included in the Sega Genesis development kit built using our custom library:
|
|
68000 assembly
The SGDK bench code sample has an example of inline 68000 assembly with math_test_a.s. However, there is an active thriving community that focuses Sega Genesis development in pure 68000 assembly by default!
Some notable resources include:
|
|
Summary
Armed with all this knowledge, we are now in an excellent position to build complete video games for the Sega Mega Drive that should be able to execute on real 16-bit hardware using C language and the SGDK!


4 comments:
Thankyou for this wondrous post, I am happy I watched this site on yippee.ExcelR Data Science Courses
How to display PDF file in PHP from database
How to read CSV file in PHP and store in MySQL
Create and Download Word document PHP
NodeJS Introduction
NodeJS REPL
NodeJS Data Types
NodeJS Events
NodeJS Callback
Data Science Training in Pune
Good article, Thanks for sharing.
Post a Comment