Python is commonly used in artificial intelligence and machine learning projects with the help of libraries like TensorFlow, Keras, Pytorch and Scikit-learn. There is also open source Python distribution Anaconda used for data science and machine learning applications that aims to simplify package management and deployment.
Let's check it out!
Install Python
Install Python on Windows, Mac OS/X and Linux. Install pip as the de facto standard package-management system. Install Anaconda for future AI projects. Finally, install + configure an IDE for Python programming.
Windows
Follow instructions here how to install Python 3 on Windows. Download latest version of Python for Windows including IDLE pip + documentation. Add Python to PATH variable making it easier to configure your system.
Mac OS/X
Python is installed by default on most Mac OS/X systems. Launch terminal + type python and pip to confirm.
Linux
Python is installed by default on most Linux systems. Launch terminal + type python. However you may also need to install pip. Update your ~/.bashrc file as necessary to use Python 3.7 by default instead of Python 2.
| Install + Update + Aliases Python3 | Ubuntu Linux unable to locate package python-pip |
sudo apt install python3-pip python -m pip install --upgrade pip echo "alias python=python3" >> ~/.bashrc echo "alias pip=pip3" >> ~/.bashrc |
sudo apt-get install software-properties-common sudo apt-add-repository universe sudo apt-get update sudo apt-get install python3-pip |
IMPORTANT
Verify which python version and which pip version are installed and location where these are both installed:
| python --version | which python |
| pip --version | which pip |
Install Anaconda
Follow instructions to install open source Python distribution Anaconda for Windows and Mac OS/X and Linux
| SYSTEM | LOCATION |
| Windows | %USERPROFILE%\Anaconda3 |
| Mac OS/X | /anaconda3 |
| Linux | /anaconda3 |
Windows
Add the following four environment variables: System | Advanced system settings | Environment Variables:
| %USERPROFILE%\Anaconda3 | %USERPROFILE%\Anaconda3\libs |
| %USERPROFILE%\Anaconda3\Scripts | %USERPROFILE%\Anaconda3\Library\bin |
Mac OS/X
Follow all prompts from the install wizard. Anaconda should install at /anaconda3 by default with aliases set.
Linux
Launch terminal as root user. Type bash ~/Downloads/Anaconda3-2020.02-Linux-x86_64.sh. For consistency with the Mac set install location to /anaconda3. After install launch Anaconda navigator. Enter the following:
 source ~/anaconda*/bin/activate root
 anaconda-navigator
Update your ~/.bashrc file as necessary to prefer Anaconda Python especially for data science AI + ML work.
 alias python=/anaconda3/bin/python
 alias pip=/anaconda3/bin/pip
Finally, create Anaconda desktop shortcut: create the following Anaconda.desktop at /usr/share/applications/ Add the text below. Enter sudo echo "PATH=$PATH:/anaconda3/bin" >> /etc/environment at the terminal.
Anaconda.desktop
[Desktop Entry]
Type=Application
Name=Anaconda
Exec=anaconda-navigator
Terminal=false
Icon=/anaconda3/lib/python3.7/site-packages/anaconda_navigator/static/images/anaconda-icon-256x256.png
Restart Linux. From settings type "Anaconda" to prompt Anaconda Navigator + resume projects from there.
IMPORTANT
Verify which Anaconda version is installed using conda --version command and where installed where conda.
Install PyCharm
PyCharm is an integrated development environment used specifically for Python. Install PyCharm during the Anaconda install or from navigator. Otherwise install PyCharm for Windows and Mac OS/X and Linux directly.
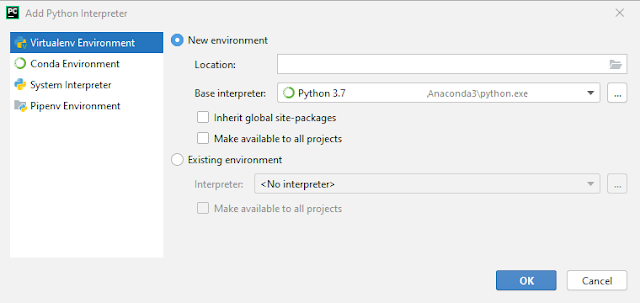
Launch PyCharm. Click "Configure" cog drop down | Settings. Set the base interpreter to match the Python location for Anaconda. Click cog | Show All | Click "+" | Virtualenv Environment. Enter the following details:
| SYSTEM | LOCATION |
| Windows | %USERPROFILE%\Anaconda3\python.exe |
| Mac OS/X | /anaconda3/bin/python |
| Linux | /anaconda3/bin/python |
Plugins
Configure cog | Plugins. Install pylint as a code analysis tool that follows the recommended PEP8 style guide. Restart IDE. Pylint is handy tool to check Python code especially for developers used to static code compiler!
Shortcuts
Track active item in solution explorer similar to Visual Studio: Click cog to right of Project and Always Select Opened File. Hit shift key twice for quick search. Remember Rename files and folder is in the Refactor menu!
| Ctrl + F12 | Prompt popup to list all the methods in the class |
| Ctrl + Shift + N | Prompt popup to search for text found in all files |
| Ctrl + Shift + I | View definition of function or method in the class |
| Ctrl + Click function | Navigate to function definition or method in class |
| Ctrl + Alt + Left arrow | Navigate backwards to previous location |
| Ctrl + Alt + Right arrow | Navigate forwards to the next location |
IMPORTANT
On Linux navigate may actually be Shift + Alt + arrow keys instead of Ctrl due to keymap shortcut conflicts!
Hello PyCharm
Launch PyCharm. Create New Project | "HelloPyCharm". Enter the following details as Anaconda interpreter:
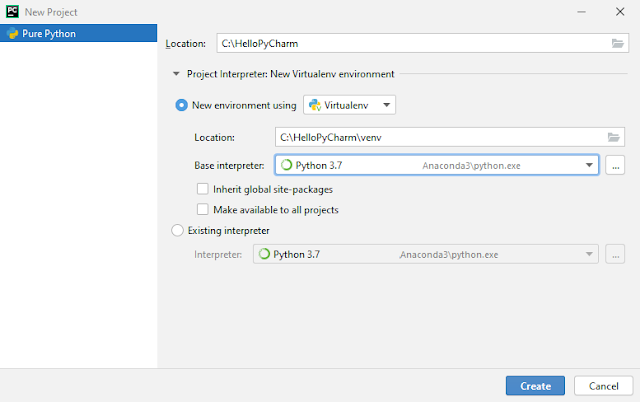
PyCharm uses virtualenv tool to create an isolated Python environment. Virtualenv creates venv folder in the current directory with Python executable files and a copy of pip to install other modules and packages.
Create simple "HelloWorld.py". Enter Python code print('Hello World'). Right click file | Run ""HelloWorld".
Module Not Found
Update script | Import module not currently installed e.g. import numpy. Run script: ModuleNotFoundError
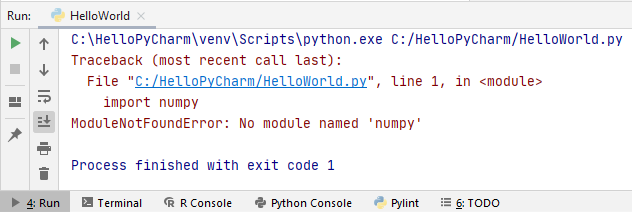
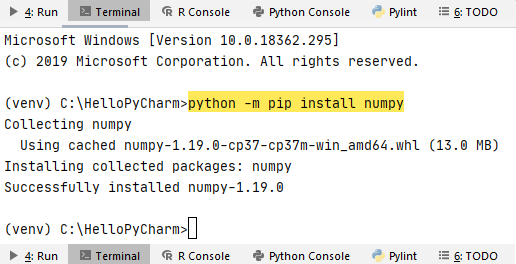
Launch PyCharm terminal. Enter python -m pip install numpy to install module. Re-run script with success.
Alternatively, execute pip freeze to dump all required modules for project into requirements.txt and install:
 pip freeze > requirements.txt
 pip install -r requirements.txt
Code Sample
Let's test drive develop a simple code sample as a Python module that could be deployed as Python package.
IMPORTANT
A module is a single Python script file whereas a package is a collection of modules. A package is a directory of Python modules containing an additional __init__.py file to distinguish from a directory of Python scripts.
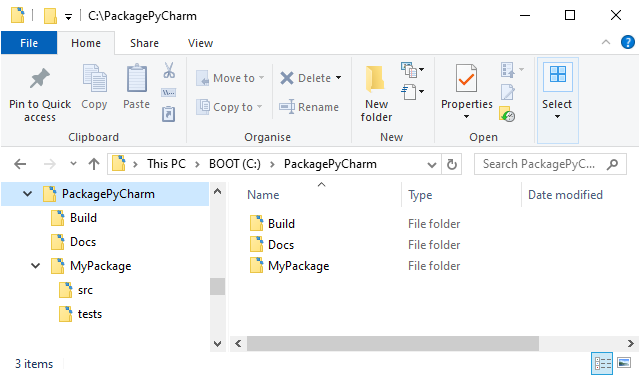
Launch PyCharm. Create New Project | "PackagePyCharm". Configure Python Anaconda interpreter above. Right click PackagePyCharm project | New | Python Package | "MyPackage". Create other top level folders.
Create sub folders src and tests beneath "MyPackage". Create requirements.txt file + setup.py beneath "MyPackage" also. Finally, create module.py and __init__.py under src and test_module.py under tests.
| test_module.py | module.py |
 import unittest
 from MyPackage.src.module import add_one

 class TestSimple(unittest.TestCase):

    def test_add_one(self):
        result = add_one(5)
        self.assertEqual(result, 6)

 if __name__ == '__main__':
    unittest.main()
|
 def add_one(number):
    return number + 1
|
Right click inside test_module.py | Debug 'Unittests for test_module.py'. Alternatively, Terminal command:
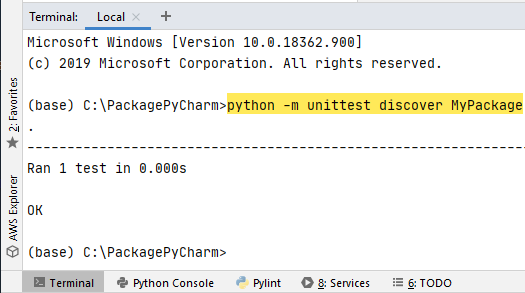
python -m unittest discover MyPackage
IMPORTANT
If the Terminal reveals Run 0 tests then ensure package has __init__.py setup in every relevant sub folder. Finally, enter dependencies for requirements.txt file and setup.py e.g. numpy. Install package at terminal:
| setup.py | requirements.txt |
 import setuptools

 with open("README.md", "r") as fh:
    LONG_DESCRIPTION = fh.read()

 setuptools.setup(
    name='MyPackage',
    version='0.1.2',
    description="My test package.",
    long_description=LONG_DESCRIPTION,
    long_description_content_type="text/markdown",
    packages=setuptools.find_packages(),
    install_requires=[
        "numpy>=1.17.1",
    ]
 )
|
numpy>=1.17.1 |
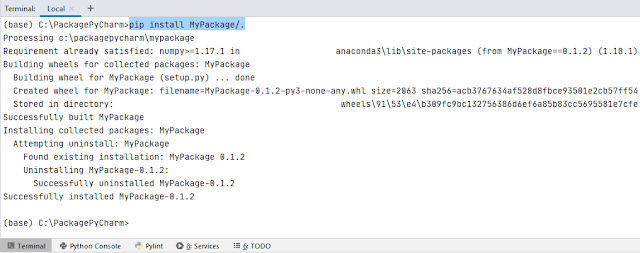
pip install MyPackage/.
Finally, we could also replicate the unit test code directly on the REPL. Select Terminal tab. Enter commands:
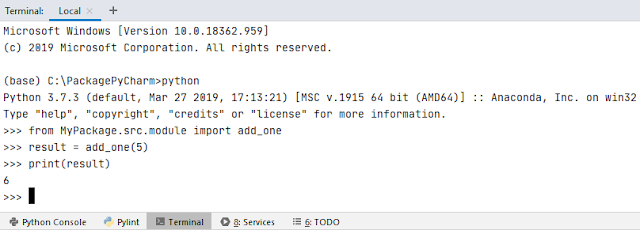
 python
 >>> from MyPackage.src.module import add_one
 >>> result = add_one(5)
 >>> print(result)
Code Linting
Linting highlights syntactical and stylistic problems in Python source code which helps identify and correct subtle programming errors. In PyCharm, choose Pylint tab and click Play button to list any errors in code.
Alternatively, select Terminal and type specific linter like flake8 to check Python source code against PEP8 coding style programming errors. If flake8 is not installed then simply type pip install flake8 at Terminal.
Summary
To summarize, we have a simple setup for Python programming on Windows, Mac OS/X and Linux. There is much to explore e.g. Python 3.8. However, we'd like to setup Python more for AI machine learning projects. This will be topic of the next post.

