
Let's check it out!
GitLab
As per previous post assumes an account setup on github.com. Create an account on gitlab.com if you have not already done so. As GitLab also uses underlying git we setup the following on localhost for development:
SSH Keys
An SSH key is an access credential for the SSH network protocol. Git supports both RSA and ED25519 keys. Launch Terminal. Issue the following commands to generate new SSH key and adding SSH key to ssh-agent:
| RSA | ED25519 |
| cd ~/.ssh | cd ~/.ssh |
| ssh-keygen -t rsa -b 4096 -C "steven_boland@hotmail.com" | ssh-keygen -t ed25519 -C <email> |
| Passphrase <redacted> | Passphrase <redacted> |
| eval "$(ssh-agent -s)" | eval "$(ssh-agent -s)" |
| ssh-add ~/.ssh/id_rsa | ssh-add ~/.ssh/id_ed25519 |
| xclip -selection clipboard < ~/.ssh/id_rsa.pub | xclip -selection clipboard < <key> |
IMPORTANT:
If xclip is not installed then issue 2x commands: sudo apt-get update and sudo apt-get install xclip. Finally, navigate to github.com Settings | SSH and GPG keys | New SSH key | Paste contents from id_rsa.pub here.
Personal Access Token
If you favor HTTPS then Personal Access Tokens offer security benefits over password-based authentication. Launch gitlab.com. Navigate to Edit Profile | Access Tokens | Add new token. Create personal access token.
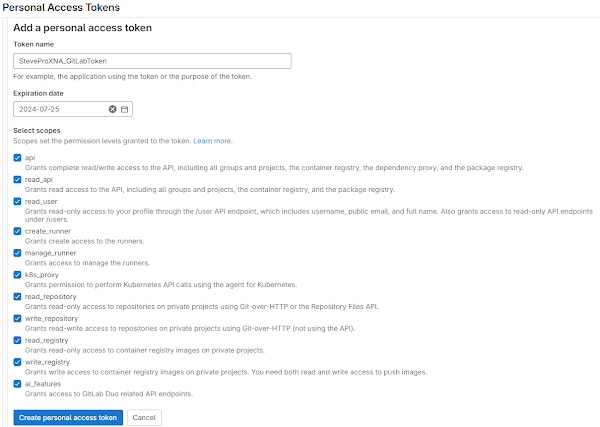
After new Personal Access Token is created upload into source control software for example Source Tree on Windows and Mac OS/X and JetBrains products on Linux that integrate Git like PyCharm for Python etc etc.
Source Tree
Launch Source Tree | Settings | Accounts Add... | Enter the following details | Paste personal access token:
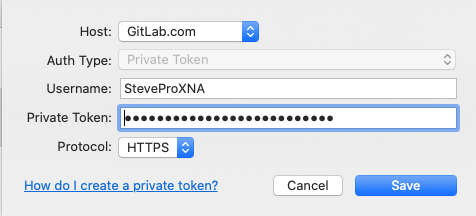
JetBrains IDE
Launch PyCharm | File | Settings... | Version Control | GitLab. Click "+" button | Enter GitLab token | Log In:
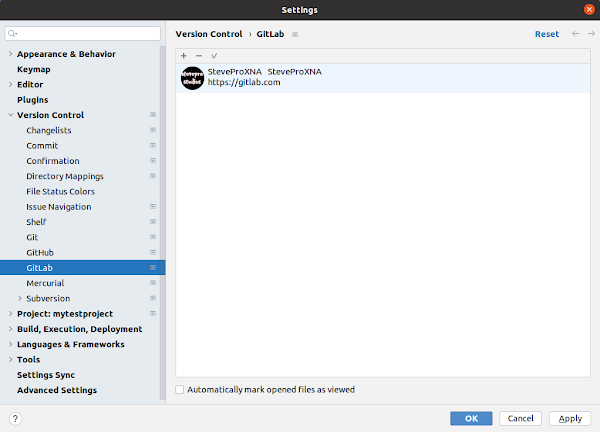
Example
In 2021, we coded an example from scratch as full end-to-end Web API demo on local host, in Docker and Kubernetes. Let's replicate with Python Flask API but this time include Gitlab CI/CD deployment pipelines.
Navigate to gitlab.com. Create blank project. Launch PyCharm. Create the new project gitlabcheatsheet.

|

|
Enter main.py code. Install packages. Press F5 to debug. Launch Terminal | curl http://localhost:8080
| main.py | Dockerfile |
 from flask import Flask
 app = Flask(__name__)
 @app.route('/')
 def root():
     return "Hello World (Python)!\n"
 if __name__ == "__main__":
     app.run(host="0.0.0.0", port=8080)
|
FROM python:3-alpine WORKDIR /service COPY requirements.txt . RUN pip install -r requirements.txt COPY . ./ EXPOSE 8080 ENTRYPOINT ["python3", "main.py"] |
Code Dockefile. Launch Terminal | Enter the following Docker commands | curl http://localhost:8080
|
docker build --pull --rm -f "Dockerfile" -t flask-api:latest "." docker run --rm -d -p 8080:8080/tcp flask-api:latest --name "flask-api" |
Create local KinD cluster. Enter all the following Kubernetes Deployment and Service YAML configuration:
| Kubernetes.yaml | |
--- Deployment apiVersion: apps/v1 kind: Deployment metadata: name: flask-api-deployment namespace: test-ns spec: replicas: 1 selector: matchLabels: app: flask-api template: metadata: labels: app: flask-api spec: containers: - name: flask-api image: flask-api:latest imagePullPolicy: Never ports: - containerPort: 8080 |
--- Service apiVersion: v1 kind: Service metadata: name: flask-api-service namespace: test-ns spec: selector: app: flask-api type: NodePort ports: - protocol: TCP port: 80 targetPort: 8080 |
Finally test: Launch Terminal | Enter the following Kubernetes commands | curl http://localhost:8080
|
kubectl config set-context --current --namespace=test-ns kind load docker-image flask-api:latest --name flask-cluster kubectl apply -f Kubernetes.yaml kubectl port-forward service/flask-api-service 8080:80 curl http://localhost:8080 |
Cluster
Extend example but this time include Gitlab CI/CD deployment pipelines. Ensure you have all Pre-Requisites:
|
Python 3.8 GitLab account [CI/CD] Microsoft Azure subscription [AZ CLI] VS Code Docker + Kubernetes |
Docker Hub account Kubernetes in Docker [KinD] docker [CLI] kubectl [CLI] |
Azure AKS
Launch Terminal | Login to Azure portal. Enter commands to extract Service Principal and generate SSH key:
|
az login az ad sp create-for-rbac --name ${USER}-sp cd ~/.ssh |
ssh-keygen -t rsa -b 4096 -N '' -f master_ssh_key eval $(ssh-agent -s) ssh-add master_ssh_key |
Export the following environment variables. Note: use the Service Principal information for first 3x ENV VARs
|
export AZ_SP_ID=<value_from_appId> export AZ_SP_PASSWORD=<value_from_password> export AZ_TENANT_ID=<value_from_tenant> export CLUSTER_NAME=stevepro-dev-cluster export CLUSTER_NODES=3 export MASTER_SSH_KEY=~/.ssh/master_ssh_key.pub |
export AZ_NETWORK_MODE=transparent export AZ_CREATE_MODE=AKS export AZ_LB_SKU=standard export AZ_VM_SIZE=Standard_D2s_v3 export AZ_LOCATION=northeurope export KUBERNETES_VERSION=1.28 |
Create the Azure resource group then finally create the AKS cluster. Note: this process can take few minutes
| az group create --name ${CLUSTER_NAME} --location ${AZ_LOCATION} --debug |
|
az aks create --name ${CLUSTER_NAME} --resource-group ${CLUSTER_NAME} \ --dns-name-prefix ${CLUSTER_NAME} --node-count ${CLUSTER_NODES} \ --node-vm-size ${AZ_VM_SIZE} --kubernetes-version ${KUBERNETES_VERSION} \ --ssh-key-value ${MASTER_SSH_KEY} --service-principal ${AZ_SP_ID} \ --client-secret ${AZ_SP_PASSWORD} --load-balancer-sku ${AZ_LB_SKU} \ --network-plugin azure --debug |
Finally, execute following commands to download + export KUBECONFIG file on localhost and setup context
|
export KUBECONFIG=~/.kube/config az aks get-credentials --name ${CLUSTER_NAME} \ --resource-group ${CLUSTER_NAME} --file ${KUBECONFIG} kubectl create ns test-ns kubectl config set-context --current --namespace=test-ns |
Pipeline
Follow this tutorial to create and run your first GitLab CI/CD pipeline. Create .gitlab-ci.yml file at root the of the project directory. Refactor all YAML configuration in files beneath the cicd directory. Automate CI/CD to the Kubernetes cluster using helm charts. This way, multiple environments can be targeted and customized.
Variables
Navigate to gitlab.com | Settings | CI/CD | Variables. Enter all GitLab Variables here e.g. Docker registry host and username. Secure sensitive information like Docker password using Base64. Add KUBECONFIG:
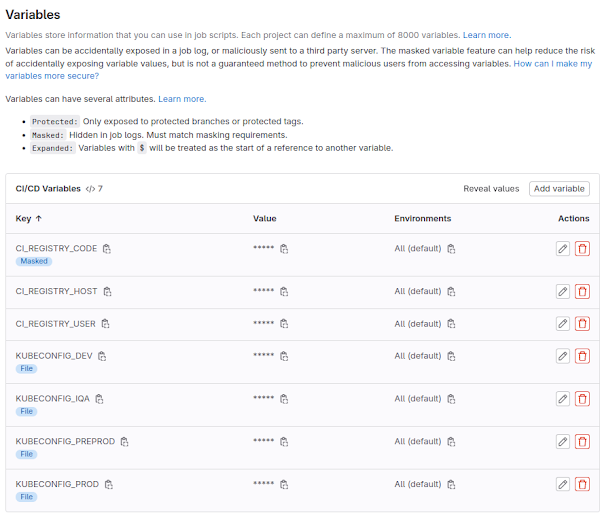
Deployment
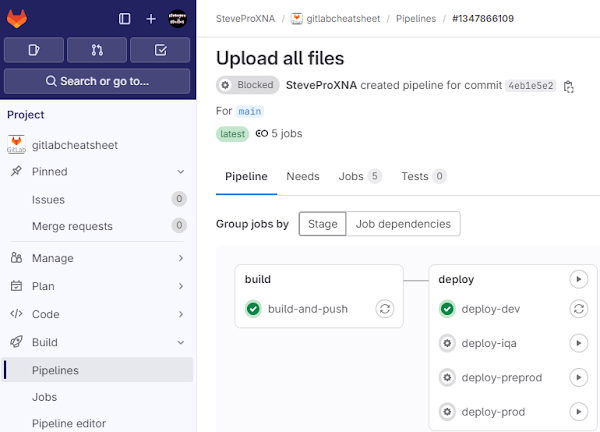
Trigger CI/CD pipeline. Launch Terminal | Repeat kubectl port-forward. Test: curl http://localhost:8080
|
kubectl port-forward service/flask-api-service 8080:80 curl http://localhost:8080 |
GitFlow
Gitflow is an alternative Git branching model that involves the use of feature branches and multiple primary branches. Here is practical guide to implement GitFlow using GitLab with the corresponding git commands.
Launch gitlab.com. Create new project. Default branch will be main. Git clone repository to localhost. For completeness cut initial Tag 0.1. In SourceTree setup GitFlow: Repository | Git-flow | Initialize Repository:
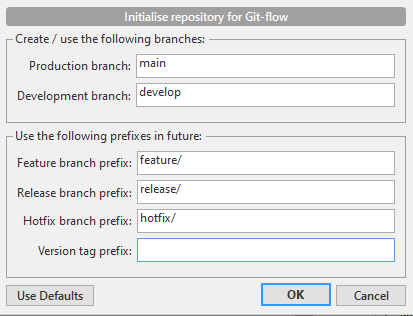
In gitlab.com set develop as default branch: GitLab | Setttings | Repository | Branch defaults | develop.
|
IMPORTANT - you can compare two branches [source vs. target] anytime issuing the following commands:
|
Summary
To summarize, now that we have discussed the differences between GitHub and GitLab, we have extended our previous end-to-end Web API demo on local host, in Docker and Kubernetes but now leveraged GitLab CI/CD pipelines to automate deployments to the cloud. Our next steps would be more GitFlow integration: Replicate deployments across multiple environments and complete the full Software Development LifeCyle!

