
Now we would like to extend our game development environment to Windows and Mac OS/X and Linux for cross platform development and also add better support for automated builds with debugging functionality.
 Let's check it out!
Assembler
Recommended is the WLA-DX assembler. Git clone the wla-dx repository and follow OS specific instructions.
Windows
Clone wla-dx repository to C:\GitHub\vhelin. Instructions on GitHub describe how to build WLA-LX for Linux whereas WLA-DX can be built for Windows directly from Visual Studio 2017 from the wla-dx\windows folder.
| 1. Start | run | cmd | 5. Launch WLA DX.sln in Visual Studio 2017 |
| 2. cd C:\GitHub\vhelin | 6. Build solution as Release | x86 configuration |
| 3. git clone https://github.com/vhelin/wla-dx.git | 7. WLA DX compiler wla-z80.exe built |
| 4. cd C:\GitHub\vhelin\wla-dx\windows | 8. WLA DX linker wlalink.exe built |
After build complete wla-z80.exe and wlalink.exe files can be copied out from newly created Release folder.
 If you have followed z88dk Programming Setup tutorial and you already have ConTEXT installed then copy the updated binaries wla-z80.exe and wlalink.exe built from previous step to output folder C:\wlaz80win32.
Also, tweak the original Compile.bat file as all main entry points will now be via main.asm thus align main.o object file during wla-z80 compilation. Finally, it seems -drvs wlalink linker flag is now no longer required.
|
|
Mac OS/X
Instructions on GitHub describe how to build WLA-LX for Linux whereas WLA-DX can be built for Mac OS/X using brew. Install brew as per instructions. Then follow all instructions here to install wla-dx on Mac OS/X.
Launch Terminal. Enter the following commands below. Accept all prompts to install the latest Xcode tools:
ruby -e "$(curl -fsSL https://raw.githubusercontent.com/Homebrew/install/master/install)" < /dev/null 2> /dev/null
Accept prompt to install the latest Xcode tools
brew install wla-dx
 IMPORTANT
During installation, you may encounter the following error: homebrew-core is a shallow clone. To `brew update`, first run: git -C /usr/local/Homebrew/Library/Taps/homebrew/homebrew-core fetch --unshallow
At the terminal, type brew update or brew update --force. If you still get errors then type the following:
git -C /usr/local/Homebrew/Library/Taps/homebrew/homebrew-core fetch --unshallow
brew update --force
brew install wla-dx
Linux
Clone wla-dx repo to ~/GitHub/vhelin. Follow all instructions on GitHub which describes how to build WLA-LX for Linux. Launch Terminal | enter commands. After completion, wla-z80 and wlalink should work universally.
| 1. cmake --version | 5. mkdir build && cd build |
| 2. cd ~/GitHub/vhelin | 6. cmake .. |
| 3. git clone https://github.com/vhelin/wla-dx.git | 7. cmake --build . --config Release |
| 4. cd ~/GitHub/vhelin/wla-dx | 8. sudo cmake -P cmake_install.cmake |

Visual Studio Code
Install VS Code for Windows + Mac OS/X + Linux. Install the following extensions for Z80 ASM development:
| ASM Code Lens | Enables code lens, references, hover info, symbol renaming + assembler outline |
| Z80 Assembly | Z80 Assembly support for Visual Studio Code |
| Z80 Macro Assembler | Support for Z80 macro-assemblers in Visual Studio Code |
| WLA-DX for VSCode | VSCode language support for WLA-DX assembler |
Hello World
Download and extract the obligatory "Hello World" to C:\HelloWorld or ~/HelloWorld. Rename file main.asm. Launch VS Code. Open HelloWorld folder. Some things to remember when coding Z80 source cross platform:
- Ensure forward slash "/" used at all times for cross platform development
- Ensure case sensitive folders + files are used at all times for include files
- Ensure carriage returns is used between variables to avoid wla-dx errors
Add build.bat file to compile, link and run souce code on Windows and build.sh file to compile, link and run souce code on Mac OS/X + Linux. Don't forget to grant execute permission chmod +x build.sh command:
| build.bat | build.sh | ||
|
|
Press Ctrl + Shift + B to execute build script. If/when promted to add tasks.json file: Configure Build Task... Create tasks.json file from template | Others. This will create .vscode hidden folder and tasks.json file here. tasks.json
{
    "version": "2.0.0",
    "label": "build",
    "type": "shell",
    "linux": {
        "command": "./build.sh"
    },
    "osx": {
        "command": "./build.sh"
    },
    "windows": {
        "command": "./build.bat"
      },
    "presentation": {"echo": true, "reveal": "always", "focus": false, "panel": "shared", "showReuseMessage": false, "clear": true},
    "group": {"kind": "build", "isDefault": true},
}
Press Ctrl + Shift + B to execute build script => compile, link and run output.sms launched from Emulicious!
IMPORTANT
Assumption Emulicious installed C:\SEGA\Emulicious on Windows or ~/SEGA/Emulicious Mac OS/X + Linux.
Emulicious Debugger
Now that we are able to compile, link and run Z80 assembler directly within Visual Studio Code the final step is to configure debugging. In VS Code, install Emulicious Debugger extension. Click the Run icon and "create a launch.json file". Choose Emulicious Debugger from the drop down. Complete launch.json file accordingly:
 launch.json
{
    "version": "0.2.0",
    "configurations": [
        {
            "type": "emulicious-debugger",
            "request": "launch",
            "name": "Launch in Emulicious",
            "program": "${workspaceFolder}/output.sms",
            "port": 58870,
            "stopOnEntry": true
        }
    ]
}
Launch Emulicious. Configure the options below. Open Tools menu | Debugger. Configure these options also:
| Tools menu | Remote Debugging | Enabled | CHECK | Debugger | File menu | Load Sources automatically |
| Tools menu | Reopen Tools | CHECK | Debugger | Run menu | Suspend On Open |
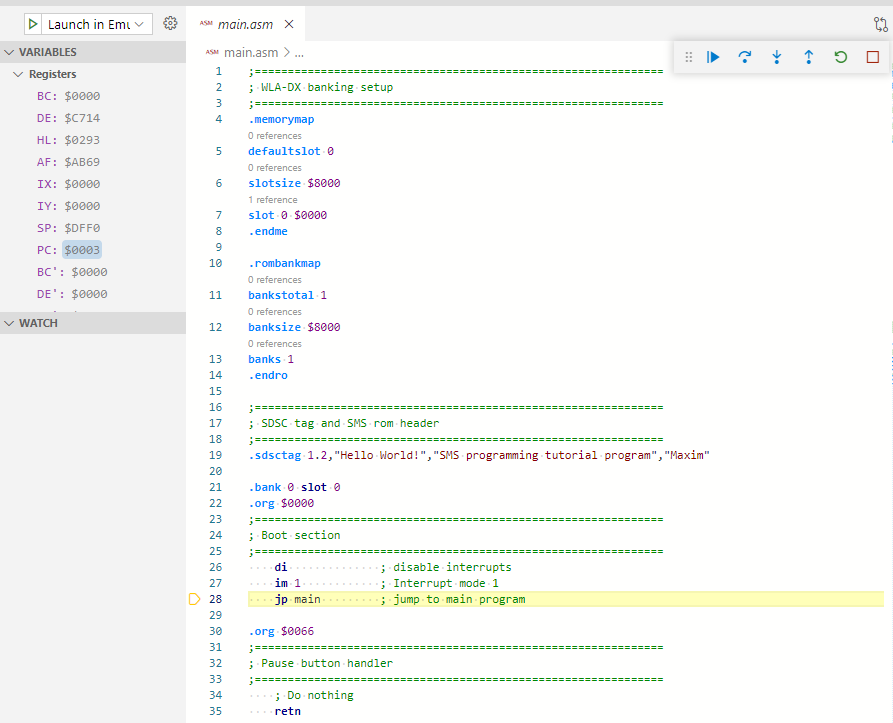
In Visual Studio Code, open main.asm and set breakpoints. Press F5. Emulicious debugger should now break and debug step through Z80 assembly source code! Access register variables, watch window, call stack etc.
Emulicious Debugger II
For completeness, to better understand relationship between Sega Master System source code written in C and Z80 assembly code, let's debug step through "Hello World" program written in C using the devkitSMS.
Follow the Hello World main.c program in devkitSMS Programming Setup. Open C:\HelloWorld folder in VS Code. Modify build.bat script ever so slightly that is add --debug flag to the SDCC commands for example:
  sdcc --debug -c -mz80 --std-sdcc99 main.c
  sdcc --debug -mz80 --no-std-crt0 --data-loc 0xC000 -o output.ihx crt0_sms.rel main.rel SMSlib.lib
Fortunately, we can leverage the same launch.json and tasks.json files as before. Launch Emulicious | Press F5. Emulicious debugger should now break and debug step through C source code! In the external debugger navigate the Z80 assembly code wrapped in C functions via output.map to better understand C / Z80 code!

TROUBLESHOOTING
If you see popup "connect ECONNREFUSED 127.0.0:58870" then this is because Emulicious is not running. Also, if F5 does not launch the debugger from VS Code then click output.sms and choose Debug File icon.
Summary
Now that we have a productive Z80 assembler development environment we are in a great spot to analyze existing Indie game projects directly from the SMS Power! Homebrew section and 8-bit commercial games! This will be the topic of the next post.
