
As an example, we wrote the main loop of a simple "Shoot 'em up" game that simply moves a target sprite around the screen based on user input; preferably the joystick.
However, games written in BASIC suffer from the disadvantage that they are too slow for applications such as sprite movement; these may be sped up by increasing the step but precision of control is lost.
This can be resolved by using machine code routines for parts of the program where BASIC is too slow.
Goal: apply machine code routines to target Sega hardware directly for speed, efficiency and power.
Setup
Follow all instructions from previous post to get setup with Sega programming before continuing.
Launch Sega BASIC Level 3 ROM, that is, double click Sega BASIC Level 3 V1 (SC-3000) [b1].sc.
Activate keyboard to begin typing: Inputs menu, Sega Keyboard. Next, open the Memory Editor:
|
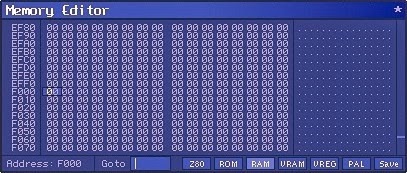 Note: all machine code written during this post will commence at 16-bit memory address: &HF000.
Tutorial
Type in the following BASIC code:
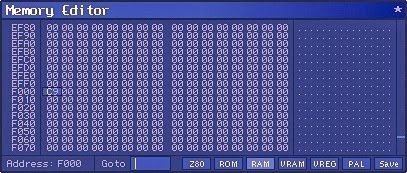
10 POKE &HF000, &HC9
RUN
Inspect the 16-bit memory address &HF000; the hexadecimal &HC9 will now be stored in RAM there.
 Next, add the following line of code:
20 PRINT PEEK(&HF000)
RUN
The value 201 will be printed, which is the corresponding decimal value of &HC9, of course.
Finally, change line 20 of code to the following:
20 CALL &HF000
RUN
On the surface, nothing appears to happen! Therefore, let's delve into fundamentals of machine code:
Fundamentals
Machine code is a set of instructions executed directly by the computer Central Processing Unit (CPU). Each instruction performs a specific operation on a unit of data contained in CPU register, or memory.
In this post, we target the Sega SC-3000 hardware: an 8-bit home computer based on the Z80 chip.
Typically, machine code instructions are stored in memory and invoked from a BASIC driver program. Once invoked, machine code instructions are then executed one by one, similar to BASIC commands.
However, unlike BASIC, machine code will not automatically stop when it reaches the end of program. Machine code must execute the RET instruction to return to BASIC; very similar to RETURN in BASIC.
Opcodes
Each machine code instruction has a unique numerical code called an operation code, or an Opcode.
In the example above, the opcode for the RET instruction is 201 or &HC9 in hexadecimal.
Mnemonics
For completeness, RET is the called the Mnemonic; that is, the symbolic name for the instruction.
Dissection
Therefore, let's dissect the short code sample from above:
10 POKE &HF000, &HC9
20 CALL &HF000
RUN
|
Check out here for the Z80 instruction set. Check out here for full (undocumented) Z80 Opcode list.
Many more tutorials can be found in magazine scans from Sega Survivors web site and SMS Power.
Books: the authoritative Programming the Z80 by Rodney Zaks and Mastering Machine Code (Z80).
Debugging
Before progressing with thorough machine code example, let's setup our environment for debugging: Make the change to the mekaw.cfg file: find debug_mode = 0 and replace with debug_mode = 1.
Launch Sega BASIC Level 3 ROM as before; there should now be additional DEBUG menu available. Choose: Debug menu, Enabled. Meka will break at the memory address at current code execution.
 Type "B F000" to set breakpoint at &HF000
 Type "C" to continue
 Type RUN as before
 Program now invokes CALL &HF000 as before but this time breaks at breakpoint set above.
Hit the Enter key to step through the machine code: executes RET which returns to BASIC.
Note: for full list of Debugger commands choose: Help menu, Debugger.
Also, enter Up / Down arrow keys to scroll through command history.
Example
As an example, let's write the main loop of a simple "Shoot 'em up" style game, similar to the previous post, that simply moves a target sprite around the screen based on user input; preferably the joystick.
However, write the main loop in machine code for increased speed + performance, rather than BASIC.
Sample
The following code sample is reminiscent of the tutorial Joystick Operation using Machine Code Routine. Follow the tutorial closely to better understand what machine code instructions are required and why.
Type in the following program. Important: ensure you save state before RUN: Main menu, Save State.
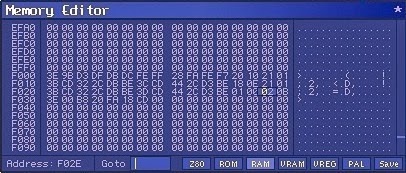
10 REM SEGA MACHINE CODE PROGRAMMING
20 GOSUB 300:GOSUB 400
40 SZ=16:MAG1
60 MR=256-SZ:MD=192-SZ
70 TX=MR/2:TY=MD/2
80 SCREEN 2,2:CLS
90 COLOR,1,(0,0)-(255,191),1
100 REM MAIN LOOP
110 SPRITE 0,(TX,TY),0,9
120 CALL &HF000
130 STOP
300 RESTORE 350
310 FOR S=0 TO 3:READ S$:PATTERN S#S,S$:NEXT S
320 RETURN
350 DATA 000039202100012A, 2A01002120390000
360 DATA 00009C0484008054, 54800084049C0000
400 RESTORE 450
410 FOR X=&HF000 TO &HF036
420 READ A$:A=VAL(“&H”+A$):POKE X,A
430 NEXT X
440 RETURN
450 DATA 3E,9B,D3,DF,DB,DC,FE,FF,28,FA,FE,F7,20,10,21,01
460 DATA 3B,CD,32,2C,DB,BE,3C,CD,44,2C,D3,BE,18,0E,21,01
470 DATA 3B,CD,32,2C,DB,BE,3D,CD,44,2C,D3,BE,01,00,03,0B
480 DATA 3E,00,B8,20,FA,18,CD
RUN
The graphics screen clears black and positions a red target sprite. Use the joystick to move target sprite.
Note: de-activate the keyboard to ensure the joystick takes precedence: Inputs menu, Sega Keyboard.
In this example, moving joystick right moves target sprite right; moving any other direction moves left.
Important: if joystick not configured then try these keys: "J" = left, "M" = right, "7" = up, "U" = down.
 Note: the machine code here actually does not RET to BASIC; press the "Scroll lock" key to soft reset.
As you can see, the machine code version of the program is much smoother than its BASIC counterpart. In fact, machine code is so fast that a delay is required: without it, the sprite would simply flash across!
Experiment with different delay speeds at runtime by manipulating memory directly:
Note: original time delay is 0300 but is stored in memory as 00 03 (Little-endian).
|
 For completeness, here is the disassembled machine code from the tutorial in its entirety:
--------------------------------------------------
Z80    DISASSEMBLER     LISTING
Line   Addr Opcodes     Label   Instruction
--------------------------------------------------
0000   0000             .ORG    0F000H
0001   F000 3E 9B       START:  LD A,09BH
0002   F002 D3 DF               OUT (0DFH),A
0003   F004 DB DC       CHECK:  IN A,(0DCH)
0004   F006 FE FF               CP 0FFH  ; any movement?
0005   F008 28 FA               JR Z,CHECK
0006   F00A FE F7       RIGHT:  CP 0F7H  ; move right?
0007   F00C 20 10               JR NZ,OTHER
0008   F00E 21 01 3B            LD HL,03B01H
0009   F011 CD 32 2C            CALL 02C32H
0010   F014 DB BE               IN A,(0BEH)
0011   F016 3C                  INC A
0012   F017 CD 44 2C            CALL 02C44H
0013   F01A D3 BE               OUT (0BEH),A
0014   F01C 18 0E               JR DELAY
0015   F01E 21 01 3B    OTHER:  LD HL,03B01H
0016   F021 CD 32 2C            CALL 02C32H
0017   F024 DB BE               IN A,(0BEH)
0018   F026 3D                  DEC A
0019   F027 CD 44 2C            CALL 02C44H
0020   F02A D3 BE               OUT (0BEH),A
0021   F02C 01 00 03    DELAY:  LD BC,0300H
0022   F02F 0B          LOOP:   DEC BC
0023   F030 3E 00               LD A,00H
0024   F032 B8                  CP B
0025   F033 20 FA               JR NZ,LOOP
0026   F035 18 CD               JR CHECK
Important: machine code programs will crash if there are errors; they are not as forgiving as BASIC. Therefore, ensure you save state before you RUN machine code programs: Main menu, Save State.
Summary
In this post, machine code was introduced to target Sega hardware for increased speed + performance.
However, a machine code program suffers from the disadvantage that it is tedious and cumbersome to manually translate each mnemonic to the corresponding opcode plus calculate all jump relative offsets.
This can be resolved by using assembly language and an assembler to generate machine code routines. This will be the topic in the next post.

No comments:
Post a Comment