Tuesday, September 15, 2015

Candy Kid iOS Port

In the previous post, we introduced Candy Kid: a simple maze chase video game re-written in XNA 4.0.
We outlined the tasks to port Candy Kid to Android platform using MonoGame. Now we will focus on iOS.

Let's check it out!

Setup
This post assumes you have Mac OS/X and XCode installed. Also, that you have an Apple Developer account and relevant Certificate(s) and Provisioning Profiles installed to deploy code to iOS devices.

MonoGame
Download and install MonoGame for MacOS. Here is tutorial to create cross platform MonoGame.

Xamarin Studio
Download and install Xamarin Studio. Setup an account; a trial version can be used just to get started!
Launch Xamarin Studio | Click Login. Enter your email + password and click the "Create Account" link.

From here you will be prompted to create a Xamarin account: enter name, email address and password. Check "Start 30-day Xamarin trial immediately". Click Accept. Log in to Xamarin Studio to activate a/c.

Choose File menu | New | Solution. Expand Other | Miscellaneous | MonoGame iPhone/iPad Application.
Project Name: CandyKid.iOS. Choose project Location. Click Create button. Update changes to Main.cs
using System;
using Foundation;
using UIKit;

namespace WindowsGame
{
  [Register ("AppDelegate")]
  class Program : UIApplicationDelegate 
  {
    private WindowsGame.AnGame game;

    public override void FinishedLaunching (UIApplication app)
    {
      game = new WindowsGame.AnGame();
      game.Run();
    }

    static void Main (string [] args)
    {
      UIApplication.Main (args,null,"AppDelegate");
    }
  }
}
Before writing any new code or porting any existing, ensure the following tasks are completed:
  • Rename Game1.cs to AnGame.cs
  • Rename all references from Game1 to AnGame
  • Use default root namespace of WindowsGame
  • Delete Default.png and GameThumbnail.png
Build solution. Error: Entitlements.plist template 'Entitlements.plist' not found
Right click CandyKid.iOS project | Options | Build | iOS Bundle Signing. Remove "Entitlements.plist"
Build solution. Error: The minimum deployment for Unified application is 5.1.1, current target is '4.2'
Right click CandyKid.iOS project | Options | Build | iOS Application. Change Deployment Target to 5.2.
Rebuild solution fine. Attach iOS device. Click Play button. The default template code should deploy ok.

Libraries
Candy Kid references the following libraries: Ninject for IoC Container and Xml.Linq for Serialization.
Right click References | Edit References... "All" tab | Scroll to bottom. Check "System.Xml.Linq". OK.

Packages
Right click Packages folder. Right click "MonoGame.Framework.iOS" node. Choose Update as necessary.

Update: at the time of this writing the latest MonoGame.Framework.iOS package is version 3.4.0.459.
However, if you would like to target iOS 9.0 then you can manually download version 3.5.0.628 here.

Right click Packages folder | Add Packages... Enter "Portable Ninject" into Search bar on top right.
Select "Ninject for Portable Class Libraries" | Add Package. Portable Ninject reference also added.

Project Properties
Right click CandyKid.iOS project. Choose Options. Ensure the following options are set on sub tabs:

iOS Application
 Application Name Candy Kid
 Bundle Identifier Enter bundle identifier
 Version 1.0.0
 Build 1.0.0
 Devices Universal
 Deployment Target 5.2
 Device Orientation Landscape Left | Landscape Right
 Status Bar Style Hide during application launch
Also, update AssemblyInfo.cs file under Properties folder. Synchronize "1.0.0" as the AssemblyVersion.

Compiler
 Define Symbols IOS
Repeat all settings for both Debug and Release build configurations!

Code
Import all C#/.NET code from original XNA 4.0 project. Here are some options to exit game on iOS:
// Option #1. P/Invoke exit().
#if IOS
  [DllImport("__Internal", EntryPoint = "exit")]
  public static extern void exit(int status);

  exit(0);
#endif

// Option #2. NSThread.exit().
#if IOS
  Foundation.NSThread.exit();
#endif

// Option #3. Throw an exception.
#if IOS
  throw new System.DivideByZeroException();
#endif
Also, if you'd like to upsell full version of your game to unlock then open the url in the native browser:
#if IOS
  string url = @"Enter URL to full version of game";
  UIKit.UIApplication.SharedApplication.OpenUrl(Foundation.NSUrl.FromString(url));
#endif
Content
MonoGame iPhone/iPad Application templates add a "Content" folder as default location for all Content.
Right click "Content" folder | Add New Folder. Candy Kid uses the 4x following subfolders (listed below):

Data
Contains flat TXT + XML data files to be consumed by the game. Do not need to be built as XNB files!
Right click each data file | Properties | Build action: Content | Copy to output directory: Copy if newer
Fonts
Font XNB files may need to be rebuilt for Mac OS/X using the MonoGame Pipeline; instructions below:
Right click each font file | Properties | Build action: Content | Copy to output directory: Copy if newer

Sound
Sound effect XNB files may need to be rebuilt for Mac OS/X using the MonoGame Pipeline; see below:
Right click sound effect | Properties | Build action: Content | Copy to output directory: Copy if newer

Song source MP3 files can usually be used as original format; should not need be rebuilt for Mac OS/X.
Right click song file | Properties | Build action: BundleResource | Copy to output directory: Do not copy
Note: there may be issues MP3 songs on low-end devices: MediaPlayer API may cause game to crash!
Also, it may be required to use alias with MediaPlayer API; for example, you may need to write code:
using Microsoft.Xna.Framework.Media;
using MediaPlayerX = Microsoft.Xna.Framework.Media.MediaPlayer;

public class SoundManager
{
  public void StartMusic()
  {
    if (MediaState.Playing != MediaPlayerX.State)
    {
      MediaPlayerX.Play(Assets.Song);
      MediaPlayerX.IsRepeating = true;
    }
  }
  public void PauseMusic()
  {
    if (MediaState.Playing == MediaPlayerX.State)
    {
      MediaPlayerX.Pause();
    }
  }
  public void ResumeMusic()
  {
    if (MediaState.Paused == MediaPlayerX.State)
    {
      MediaPlayerX.Resume();
    }
  }
  public void StopMusic()
  {
    if (MediaState.Playing == MediaPlayerX.State)
    {
      MediaPlayerX.Stop();
    }
  }
}
Finally, it has been noted that the MediaPlayer.Play(Song) API may cause delay when looping MP3 songs;
Alternative: replace MediaPlayer(Song) with SoundEffectInstance, however XNB file will be much larger!

Textures
Copy all source texture images, for example: BMP, JPG, PNG files from the original XNA game project.
Right click texture | Properties | Build action: BundleResource | Copy to output directory: Do not copy

Resources
Update all relevant Universal Icons, Launch Images and iTunes Artwork for iOS device compatibility.
Right click CandyKid.iOS project. Choose Options | iOS Application | Set all icons and images here:

App Icons
 iPhone iOS 5,6  57x57 Icon.png
 iPhone @2x iOS 5,6  114x114 Icon@2x.png
 iPhone @2x iOS 7  120x120 Icon-60@2x.png
 iPad iOS 5,6  72x72 Icon-72.png
 iPad @2x iOS 5,6  144x144 Icon-72@2x.png
 iPad iOS 7  76x76 Icon-76.png
 iPad @2x iOS 7  152x152 Icon-76@2x.png

Spotlight & Settings Icons
 iPhone Spotlight iOS 5,6  29x29 Icon-Small.png
 iPhone Spotlight @2x iOS 5,6  58x58 Icon-Small@2x.png
 iPad Spotlight iOS 5,6  50x50 Icon-Small-50.png
 iPad Spotlight @2x iOS 5,6  100x100 Icon-Small-50@2x.png
 Spotlight iOS 7  40x40 Icon-Small-40.png
 Spotlight @2x iOS 7  80x80 Icon-Small-40@2x.png

iPhone Launch Images
 Standard 320x480 Default.png
 Retina (3.5-inch) 640x960 Default.png
 Retina (4.0-inch) 640x1136 Default-568h@2x.png
Important: if Retina (4.0-inch) launch image is not set then iPhone 5 resolution will not be supported!

iPad Launch Images
 Portait 768x1024 Default-Portrait.png
 Landscape 1024x768 Default-Landscape.png
 Retina Portait 1536x2048 Default-Portrait@2x.png
 Retina Landscape 2048x1536 Default-Landscape@2x.png

iTunes Artwork
 Standard 512x512  iTunesArtwork.png
 Retina 1024x1024  iTunesArtwork@2x.png

MonoGame Pipeline
If you require MonoGame to build platform specific XNB content files then use the MonoGame Pipeline
Choose Finder | Applications | Pipeline. MonoGame Pipeline launches. Choose File | New. Save project.

Right click project | Add | Existing Item. Add an existing content file e.g. Emulogic.spritefont | Open.
Right click file | Rebuild. An exception may be thrown but the XNB file is still available in bin folder.

Right click project | Add | Existing Item. Add an existing content file e.g. Celebrate.wav file | Open.
Right click file | Rebuild. Assuming Pipeline is installed correctly, the XNB file available in bin folder.

Access Denied
When using MonoGame Pipeline tool, you may receive Access Denied error, especially with MP3 files.
This may be because the ffmpeg binary (and ffprobe binary) needs executable permissions to be set.

Launch Terminal window to manually change executable permissions. Type the following (as root):
cd /Applications/Pipeline.app/Contents/MonoBundle
chmod +x ffmpeg
chmod +x ffprobe

Deployment
Attach iOS device to Mac OS/X. Xamarin Studio, click arrow next to build configuration | Select device.
Click Play button. iOS device launches game as "Evaluation Software". Build will expire within 24 hours.

Alternative: right click CandyKid.iOS project | Archive for Publishing. Click Sign and Distribute button.
Select iOS Distribution Channel as "AdHoc" | Next. Select Signing Identity and Provisioning Profile.
Choose Next to Publish as Ad Hoc. Click Publish button. Choose Location | Save. Now reveal in Finder.
Double click IPA binary file. iTunes launches ok. Select device | Apps | Candy Kid. Click Install | Apply.
Summary
That concludes the Candy Kid port to iOS platform. Outstanding: Candy Kid published on iOS / Android!

Monday, August 31, 2015

Candy Kid Android Port

In the previous post, we introduced Candy Kid: a simple maze chase video game re-written in XNA 4.0.
The game targets WP7 by default but we would like to port to other mobile platforms e.g. iOS / Android.

MonoGame implements XNA 4.0 API and can be used to port C#/.NET code: On Windows PC, MonoGame integrates directly in Visual Studio 2012. On Mac OS/X, MonoGame integrates well with Xamarin Studio.
 Machine  Platform  IDE  Framework  Language 
 Windows PC WP7 Visual Studio 2010 XNA 4.0 C#/.NET
 Windows PC Android Visual Studio 2012 MonoGame C#/.NET
 Mac OS/X iOS Xamarin Studio MonoGame C#/.NET

This post outlines the main tasks to port Candy Kid to Android platform; the next post will focus on iOS.

Let's check it out!

Setup
This post assumes you have the Android SDK installed and C:\Android\sdk\platform-tools\ added to the Windows PC Environment path. Also, all Android devices should be setup for USB Debugging enabled.

MonoGame
Download and install MonoGame for Visual Studio. Here is tutorial to create cross platform MonoGame.

Xamarin Studio
Download and install Xamarin Studio. Setup an account; a trial version can be used just to get started!
Launch Xamarin Studio | Click Login. Enter your email + password and click the "Create Account" link.

From here you will be prompted to create a Xamarin account: enter name, email address and password. Check "Start 30-day Xamarin trial immediately". Click Accept. Log in to Xamarin Studio to activate a/c.

Visual Studio
Launch Visual Studio 2012. File | New | Project. Expand Templates | Visual C# | MonoGame.
Choose MonoGame Android Project. Name: CandyKid.Android. Choose project Location. OK.
Build solution. Error: Your app is too large to be developed with Xamarin Android Starter edition.
Choose Begin a Trial from popup. Xamarin then activates the trial version. Rebuild solution fine.

Before writing any new code or porting any existing, ensure the following tasks are completed:
  • Rename Game1.cs to AnGame.cs
  • Rename all references from Game1 to AnGame
  • Use default root namespace of WindowsGame
  • Update Activity1.cs to construct new AnGame
  • Update Activity attribute: set Label="Candy Kid"
Libraries
Candy Kid references the following libraries: Ninject for IoC Container and Xml.Linq for Serialization.
Note: MonoGame Android Project should automatically add reference to System.Xml.Linq by default.

In Visual Studio 2012, right click CandyKid.Android project References | Manage NuGet Packages
Enter "Portable Ninject" into Search bar top right | Select "Ninject for Portable Class Libraries"
Click Install button

Project Properties
Right click CandyKid.Android project. Choose Properties. Ensure the following options are set on tabs:

Application
 Assembly Name WindowsGame
 Default namespace WindowsGame
 Compile using Android version API Level 17 (Xamarin.Android v4.2 Support)
 Minimum Android to target Use Compile using SDK version
 Target Android version Use Compile using SDK version

Android Manifest
 Application name Candy Kid
 Package name Enter bundle identifier
 Application icon @drawable/Icon
 Version number 1
 Version name 1.0.0

Version number is the Version code on the Google Play Developer console. This value must be unique.
Version name is the build version. This value does not need to be unique but it's best practice to do so.

Why? Because Version name is visible on the Google Play Store whereas Version code is not (internal).
Also, update AssemblyInfo.cs file under Properties folder. Synchronize "1.0.0" as the AssemblyVersion.

Build
 Conditional compilation symbmols ANDROID
Repeat all settings for both Debug and Release build configurations!

Xamarin Studio
Note: if you are using Xamarin Studio to build and deploy then make subtle Project Properties changes:

Right click Project | Options | Build section | General | Set Target framework: Android 4.2 (Jelly Bean).
At the time of this writing, Android 4.2 (Jelly Bean) is the lowest API version that will build and deploy.
Also, right click Project | Options | Build section | Android Application. Set the following Android versions:
Minimum: Android 2.3 (API level 10) and also Target: Automatic - use target framework version (API 17)

Code
Import all C#/.NET code from original XNA 4.0 project. When game exits, ensure this code is added:
Otherwise Android process will not be killed when you close the game and therefore cannot re-launch.
#if ANDROID
  Android.OS.Process.KillProcess(Android.OS.Process.MyPid());
  System.Environment.Exit(0);
#endif
Also, if you'd like to upsell full version of your game to unlock then open the url in the native browser:
#if ANDROID
  string url = @"Enter URL to full version of game";
  var intent = new Android.Content.Intent(Android.Content.Intent.ActionView, Android.Net.Uri.Parse(url));

  intent.SetFlags(Android.Content.ActivityFlags.NewTask);
  Android.App.Application.Context.StartActivity(intent);
#endif
Finally, you may like to create a splash screen activity as the main launcher to override default activity.
The benefit of this is that as soon as the player taps the game icon, the splash launches immediately.

Therefore, add the following file: SplashActivity.cs:
[Android.App.Activity(
  Label = "Candy Kid",
  MainLauncher = true,
  NoHistory = true,
  Icon = "@drawable/icon",
  Theme = "@style/Theme.Splash",
  AlwaysRetainTaskState = true,
  LaunchMode = Android.Content.PM.LaunchMode.SingleInstance
)]
public class SplashActivity : Android.App.Activity
{
  protected override void OnCreate(Android.OS.Bundle bundle)
  {
    base.OnCreate(bundle);
    StartActivity(typeof(Activity1));
  }
}
Update the default Activity1.cs file accordingly:
[Android.App.Activity(
  Label = "Candy Kid",
  NoHistory = true,
  Icon = "@drawable/icon",
  Theme = "@style/Theme.Splash",
  AlwaysRetainTaskState = true,
  LaunchMode = Android.Content.PM.LaunchMode.SingleInstance,
  ScreenOrientation = Android.Content.PM.ScreenOrientation.SensorLandscape
)]
public class Activity1 : Microsoft.Xna.Framework.AndroidGameActivity
{
  protected override void OnCreate(Android.OS.Bundle bundle)
  {
    base.OnCreate(bundle);
    var g = new AnGame();
    SetContentView((Android.Views.View)g.Services.GetService(typeof(Android.Views.View)));
    g.Run();
  }
}
Content
MonoGame Android Project templates add both an "Assets" folder and a "Content" folder by default.
However, all Content must live in "Content" subfolder under "Assets" when RootDirectory="Content";

Right click "Assets" folder | Add New Folder | "Content". Candy Kid uses the 4x following subfolders:

Data
Contains flat TXT + XML data files to be consumed by the game. Do not need to be built as XNB files!
Right click data file | Properties | Build Action: AndroidAsset | Copy to Output Directory: Do not copy
Fonts
Copy output from content pipeline XNB file built from spritefont file in the original XNA game project.
Right click font file | Properties | Build Action: AndroidAsset | Copy to Output Directory: Do not copy

Sound
Copy source MP3 files for Songs and WAV files for Sound Effects from the original XNA game project.
Right click sound file | Properties | Build Action: AndroidAsset | Copy to Output Directory: Do not copy

Textures
Copy all source texture images, for example: BMP, JPG, PNG files from the original XNA game project.
Right click texture | Properties | Build Action: AndroidAsset | Copy to Output Directory: Do not copy

Resources
Replace default Icon and Splash images located in Resources / Drawable folder with custom images:
 Icon.png 72x72
 Splash.png 800x480

MonoGame Pipeline
If you require MonoGame to build platform specific XNB content files then use the MonoGame Pipeline:
Start | run | Type MonoGame Pipeline. MonoGame Pipeline launches. Choose File | New. Save project.

Right click project | Add | Existing Item. Add an existing content file e.g. Emulogic.spritefont | Open.
Choose "Copy the file to the directory" | OK. Right click file | Rebuild. XNB file available in bin folder!

Deployment
Attach Android device to Windows PC. Choose Start | Run | cmd. Type "adb devices" shows device listed.

In Visual Studio 2012, select Android device from drop down list next to "Play" button. Hit F5 to Start.
Android device launches game as Built with evaluation software (this build will only work for 24 hours)

Alternative: switch to Release build Configuration. Right click project | Export Android Package (.apk)
Start | run | cmd. Navigate to bin / Release folder. Type "adb install Package-Signed.apk" to install.

Note: install "standard" .apk file generates Failure [INSTALL_PARSE_FAILED_UNEXPECTED_EXCEPTION]

Deployment II
Attach Android device to Mac OS/X. Xamarin Studio, click arrow next to build configuration for device.
Click Play button. Android device launches game as "Evaluation Software". Build expires within 24hrs.

Alternative: right click CandyKid.Android project | Archive for Publishing. Click Sign + Distribute button.
Select Android Distribution Channel as "AdHoc" | Next. Create a New Key or Import an Existing Key.
Choose Next to Publish as Ad Hoc. Click Publish button. Choose Location | Save. Enter the key password.
Launch terminal window. Navigate to the saved folder. Type "adb install Package-Signed.apk" to install.

Summary
That concludes the Candy Kid port to Android platform. The next post will focus on Candy Kid port to iOS.

Saturday, July 4, 2015

Candy Kid Programmer Art

In the previous post, we introduced Candy Kid: a simple maze chase video game written by Grandstand Leisure from New Zealand in September 1984 using BASIC programming language on the Sega SC-3000.

Recently, Candy Kid was re-written in XNA using C#/.NET. However, in order to keep the super cool 80s retro arcade video game look and feel, all original programmer art in Candy Kid was used for the sprites.

Let's check it out! Note: in order to follow the code along first ensure you have your PC setup for Sega BASIC programming.
All code listed inspired from Sega Computer magazine Sprites tutorial, also published in September 1984.

Sprites
Think of a sprite as piece of transparent film over your television screen. Each individual sprite is made up of group of 64 dots (8 by 8 pixel block). Each dot may be turned "on" (made visible) or "off" (not visible).

To instruct the computer what 64 sprite dots look like, use binary notation to define each pixel as either turned "on" (value=1) or "off" (value=0). Hexadecimal notation is then used to group 4x pixels at a time.

Example
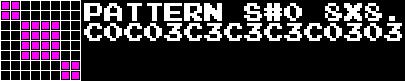
As an example, here are 64 dots (8 by 8 pixel block) that define the original candy pattern in Candy Kid:
Launch Meka emulator. Main menu | Load ROM | Sega BASIC Level 3 ROM. Type in the following code:
NEW
10 SCREEN 2,2:CLS
20 PATTERN S#0,"C0C03C3C3C3C0303"
30 SPRITE 1,(128,96),0,7
40 GOTO 40
RUN
Press the "End" key to break.
Now, let's dissect the program:

LINE 10 Switch to graphics screen and clear
LINE 20 Define 8x8 candy sprite in Pattern #0 (there can be 256 total patterns from 0-255)
LINE 30 Display sprite on-screen. Priority: 1, (X,Y)=(128,96), Pattern: 0, Color: 7 (Cyan)
LINE 40 Loop forever to keep sprite on-screen

Magnification
Now that sprite has been constructed, we are able to magnify it. There are four magnifications (0-3):
 Mag 0   Single 8x8 pixel sprite. This is used by default when no magnification is set
 Mag 1  Group sprite that uses four 8x8 pixel sprites treated as one 16x16 pixel sprite
 Mag 2  Exactly the same as Mag 0 except the sprite is twice the size i.e. 16x16 sprite
 Mag 3  Exactly the same as Mag 1 except the sprite is twice the size i.e. 32x32 sprite

Candy Kid
All sprites in Candy Kid use Mag 1. Therefore, four patterns are used to generate each 16x16 pixel sprite.

Let's break down the four 8x8 pixel sprites to determine the patterns to be typed into the Sega SC-3000:

Launch Meka emulator. Main menu | Load ROM | Sega BASIC Level 3 ROM. Type in the following code:
NEW
100 SCREEN 2,2:CLS
110 MAG3
120 REM CANDY KID FOREGROUND
130 PATTERN S#0,"030F1F3F33616173"
140 PATTERN S#1,"7F33381C8F53A050"
150 PATTERN S#2,"C0F0F8FCCC8686CE"
160 PATTERN S#3,"FECC1C38F1CA050A"
120 REM CANDY KID BACKGROUND
120 PATTERN S#4,"00000000000C0C00"
130 PATTERN S#5,"000C070300804020"
140 PATTERN S#6,"0000000000303000"
150 PATTERN S#7,"0030E0C000010204"
160 SPRITE 3,(128,96),0,2
170 SPRITE 2,(128,96),4,11
180 GOTO 180
RUN
Note: original source code used MAG1 because the screen resolution on the Sega SC-3000 was 256x192.
However, as Candy Kid is being re-written for higher screen resolution, e.g. 800x480, use MAG3 instead!

After running the code (above), take screen shot i.e. press Print Screen button and save the BMP image.
Crop image to required dimensions i.e. 32x32 pixels using MS Paint. Re-save. Make image transparent...

Paint.NET
Download, install and launch Paint.NET. Open the original 32x32 Candy Kid BMP image saved and processed above.

Choose Magic Wand. Click black image background.
Press delete. This makes background transparent.

Save new image as PNG file to include transparency.

Repeat process for the enemy sprite Candy Mama. Different colours could be used for multiple enemies:
NEW
100 SCREEN 2,2:CLS
110 MAG3
120 REM CANDY MAMA FOREGROUND
130 PATTERN S#8,"03070F1F193070F9"
140 PATTERN S#9,"FE9C0F0F0F3F7F73"
150 PATTERN S#10,"C0E0F0F8980C0E9F"
160 PATTERN S#11,"7F39F0F0F0FCFECE"
120 REM CANDY MAMA BACKGROUND
120 PATTERN S#12,"0000000000060600"
130 PATTERN S#13,"0003101010000000"
140 PATTERN S#14,"0000000000606000"
150 PATTERN S#15,"00C0080808000000"
160 SPRITE 1,(128,96),8,5
170 SPRITE 0,(128,96),12,6
180 GOTO 180
RUN
Animation
Duplicate sprites, tweak arms and/or legs and produce sprite sheets to be used for animation:

Summary
That concludes how the programmer art was created for the original title on Sega SC-3000 in BASIC and how the art has been re-used for an updated version; which has been re-written in XNA using C#/.NET.

However, ultimate goal would be to re-write Candy Kid in C / Z80 assembler for the Sega Master System!

The z88dk Programming Sample demonstrates how to convert the original 16x16 pixel sprites to a format the Sega Master System (SMS) understands. This includes the Palette, Tiles, Tilemap and the Sprite table.

Create 16x16 source sprite (as above). Save source sprite as BMP (bitmap) file. Load image in MS Paint:

Note: sprite / tile data on the SMS must be max. 4bpp (bits per pixel). Save as type 16 Color Bitmap:
BMP2Tile
Download and launch BMP2Tile. Drag n' drop 16x16 pixel source sprite onto open "Source" tab.

Choose "Tiles" tab. Ensure that "Remove duplicates" and "Planar tile output" are both checked.
Set "Index of first tile" to 1. It seems best practice to leave empty background tile at index 0.

Choose "Tilemap" tab. Leave "Use sprite palette" and "In front of sprites" options unchecked.

Choose "Palette" tab. Leave the "Output hex (SMS)" option checked for Sega Master System.
Click Save button on "Tiles", "Tilemap", "Palette" tabs. All data here is used in the game code.

Sample
Finally, write small program similar to the Target Sprite program in z88dk Programming Sample to test.
First, create new directory: C:\CandyKid. Next, add the following 3x files here: test.s, linkfile and test.c.

test.s
.MEMORYMAP
SLOTSIZE $8000
DEFAULTSLOT 0
SLOT 0 $0000
SLOT 1 $8000
.ENDME

.ROMBANKMAP
BANKSTOTAL 1
BANKSIZE $8000
BANKS 1
.ENDRO

.SDSCTAG 1.0, "Candy Kid", "Candy Kid sprite test", "StevePro Studios"

.EMPTYFILL $C9                ;ret.
.COMPUTESMSCHECKSUM           ;compute sms checksum for this rom.

.BANK 0 SLOT 0
.ORG 0

.INCBIN "test.bin"
linkfile
[objects]
test.o
Launch Crimson IDE. File | New file. Save test.c. Next, type in the following source code: test.c.

test.c
#include <sms.h>

unsigned char pal1[] = {0x00, 0x02, 0x08, 0x0A, 0x20, 0x22, 0x28, 0x2A, 0x3F, 0x03, 0x0C, 0x0F, 0x30, 0x33, 0x3C, 0x3F};
unsigned char pal2[] = {0x00, 0x02, 0x08, 0x0A, 0x20, 0x22, 0x28, 0x2A, 0x3F, 0x03, 0x0C, 0x0F, 0x30, 0x33, 0x3C, 0x00};

unsigned char all_tiles[] =
{
  // blank tile.
  0x00, 0x00, 0x00, 0x00, 0x00, 0x00, 0x00, 0x00, 0x00, 0x00, 0x00, 0x00, 0x00, 0x00, 0x00, 0x00, 0x00, 0x00, 0x00, 0x00, 0x00, 0x00, 0x00, 0x00, 0x00, 0x00, 0x00, 0x00, 0x00, 0x00, 0x00, 0x00,
 
  // target sprite.
  0x00, 0x03, 0x00, 0x03, 0x00, 0x0F, 0x00, 0x0F, 0x00, 0x1F, 0x00, 0x1F, 0x00, 0x3F, 0x00, 0x3F, 0x00, 0x33, 0x00, 0x33, 0x00, 0x61, 0x00, 0x6D, 0x00, 0x61, 0x00, 0x6D, 0x00, 0x73, 0x00, 0x73,
  0x00, 0xC0, 0x00, 0xC0, 0x00, 0xF0, 0x00, 0xF0, 0x00, 0xF8, 0x00, 0xF8, 0x00, 0xFC, 0x00, 0xFC, 0x00, 0xCC, 0x00, 0xCC, 0x00, 0x86, 0x00, 0xB6, 0x00, 0x86, 0x00, 0xB6, 0x00, 0xCE, 0x00, 0xCE,
  0x00, 0x7F, 0x00, 0x7F, 0x00, 0x33, 0x00, 0x3F, 0x00, 0x38, 0x00, 0x3F, 0x00, 0x1C, 0x00, 0x1F, 0x00, 0x8F, 0x00, 0x8F, 0x00, 0x53, 0x00, 0xD3, 0x00, 0xA0, 0x00, 0xE0, 0x00, 0x50, 0x00, 0x70,
  0x00, 0xFE, 0x00, 0xFE, 0x00, 0xCC, 0x00, 0xFC, 0x00, 0x1C, 0x00, 0xFC, 0x00, 0x38, 0x00, 0xF8, 0x00, 0xF1, 0x00, 0xF1, 0x00, 0xCA, 0x00, 0xCB, 0x00, 0x05, 0x00, 0x07, 0x00, 0x0A, 0x00, 0x0E,
};

void setSprite(int x, int y)
{
  // priority, x, y, tile.
  set_sprite(0, x+0, y+0, 1);
  set_sprite(1, x+8, y+0, 2);
  set_sprite(2, x+0, y+8, 3);
  set_sprite(3, x+8, y+8, 4); 
}

void main()
{
  int x, y; 
  set_vdp_reg(VDP_REG_FLAGS1, VDP_REG_FLAGS1_SCREEN);
 
  // array, start, count, bpp.
  load_tiles(all_tiles, 0, 5, 4);
 
  // array, start, count.
  load_palette(pal1,  0, 16);
  load_palette(pal2, 16, 16);
 
  x=120, y=88; 
  for (;;)
  {  
    setSprite(x, y);
  }
}
 
If you have C:\PerfomBuild.bat setup as per previous post then simply hit Ctrl+1 hot key to run the test. Outstanding: add remaining Candy Kid sprite graphics to program in order to complete SMS game code!

Sunday, May 31, 2015

Candy Kid Video Game

Candy Kid is a simple maze chase video game originally programmed by Grandstand Leisure from New Zealand in September 1984. The game was written in BASIC programming language on Sega SC-3000.

Inspired from previous posts on Sega Retro Gaming and Sega BASIC programming, Candy Kid was re-written in XNA. However, the goal is to keep the super cool 80s retro arcade video game look and feel!

The game is now more a Pacman clone and also has the following features / options to vary game play:
  • 100 levels initially (if I can design) to 250??
  • Open or closed exits for different game play
  • Avoid trees that block or Death trees that kill
  • 3x Candy Mamas "ghosts" more than original
  • God mode for invincibility to pass all levels
  • 4x speeds: Slower, Medium, Faster, Insane
  • Option for 1x, 2x, or 3x ghosts chase player
  • Unlimited continues, increased lives choices
Next step is to port game to mobile devices available for iOS App Store and Android Google Play store.
Ultimate goal would be to re-write Candy Kid in C / Z80 assembler to target the Sega Master System!

Thursday, January 1, 2015

Retrospective VI

Last year, I conducted a simple retrospective for 2013. Therefore, here is a retrospective for 2014.

2014 Achievements
  • Focus on cross platform mobile development; specifically Unity 3D
  • Integrate native plugins with Unity 3D using C++, Obj-C and Java
  • Administration of iOS apps includes certificates / devices / profiles
  • Complete SDLC using Jenkins for automated builds + deployments
  • Successful 3rd party integration of In App Purchases into software
  • Collaborate on F2P 3D MMO release to App Store and Google Play!
  • Explore additional engines / tech. like Unreal Engine and Cocos 2D
  • Retro game development extends C / Z80 integration using z88dk
Note: retro game development using C / Z80 with limited documentation is an achievement!

2015 Objectives
  • Continued focus on cross platform development with an interesting mix of technologies
  • Further 8-bit retro game development exploration with graphics, music + sound effects

2014 was described as the year that unlocked the game engine. New subscription models for two of the most powerful engines on the market: Unity 3D + Unreal Engine "tore down the walls" of development.

Increased competition has been a key driver in lowering the price of game engines and barriers to entry as smaller independent game studios are able to produce higher quality games with far lower budgets.

Celtic Heroes is a great example of this: the Free-to-Play 3D MMO fully leverages Unity 3D game engine. Sourced from single code base but targets cross-platform mobile available on App Store and Google Play.

Experience
In my experience, using an existing game engine like Unity 3D does provide interesting development opportunities: C# scripted game objects, C++ native plugins, Obj-C and Java for device specific code.

However, the downside appears that the game can become tightly coupled to the engine itself: it can prove difficult to write common / library code in isolation because of the lack of a main() entry point.

Despite diminishing costs, developers may feel less in control and choose to write everything anyway!

Homebrew
Outside commercial game development, homebrew projects continue to be very dominant underground.
Many developers like to explore ideas for 8-bit video games. For me, it's the Sega Master System (SMS).

Writing game code on 8-bit hardware is very challenging as the memory + storage is extremely limited; Algorithms must be written efficiently. Plus it is expensive to patch buggy code thus quality is improved.

These concepts attract well disciplined programmers + are very relevant in today's mobile environment.

Summary
It will interesting to see if developers continue to rely on game engines like Unity 3D and Unreal Engine. Especially in the mobile space. Sure, it reduces costs but many developers always like to build their own.

Finally, a key driver in maintaining engine popularity may be the community that supports the technology. This was apparent for XNA which attracted a rich + vibrant community excited about game development.

Homebrew communities like SMS Power are active since 1997 for Sega 8-bit preservation and fanaticism; Hopefully there won't ever be XNA is Dead equivalent as the technology is already considered obsolete J

Saturday, November 15, 2014

z88dk Programming Sample

In the previous post, we checked out z88dk Programming Setup. The z88dk is a portable Z80 / C cross compiler that targets hardware such as the 8-bit video games console: the Sega Master System (SMS).

Using z88dk, it is possible to write game code in high level C language rather than pure Z80 assembly.
Therefore, we would now like to extend this knowledge and write more detailed programming sample.

Let's check it out!

Software
Follow all instructions from the previous post: this documents how to setup the pre-requisite software.

Here is a summary of all required software to be installed:
 Name Version
 Z80 Editor ConTEXT
 Assembler WLA DX
 Emulators Fusion, Meka
 Disassembler SMS Examine
 
 Name Version
 C IDE Editor Crimson IDE
 Cross compiler Z88 Dev Kit
 Make files Cygwin
 Hex Editor HxD

Example
As an example, let's write the main loop of a simple "Shoot 'em up" style game, similar to the previous post, that simply moves a target sprite around the screen based on user input; preferably the joystick.

Graphics
Graphics on the Sega Master System are built up from four things: Palette, Tiles, Tilemap, Sprite table.
In our example, convert target sprite into a programming format the Sega Master System understands.

Here we will use the BMP2Tile utility from Maxim to convert the 16x16 pixel target sprite into SMS data.
Create 16x16 pixel target sprite (as above). Save target sprite as BMP (bitmap) file. Load in MS Paint:

Note: sprite / tile data on the SMS must be max. 4bpp (bits per pixel). Save as type 16 Color Bitmap:

BMP2Tile
Download and launch BMP2Tile. Drag n' drop 16x16 pixel target sprite onto open "Source" tab.

Choose "Tiles" tab. Ensure that "Remove duplicates" and "Planar tile output" are both checked.
Set "Index of first tile" to 1. It seems best practice to leave empty background tile at index 0.

Choose "Tilemap" tab. Leave "Use sprite palette" and "In front of sprites" options unchecked.

Choose "Palette" tab. Leave the "Output hex (SMS)" option checked for Sega Master System.
Click Save button on "Tiles", "Tilemap", "Palette" tabs. All data here is used in the game code.

Target Sprite
As an example, let's build on the existing test.c program found here at C:\z88dk\examples\sms.
First, create new directory: C:\TargetSprite. Next, add the following 2x files: test.s and linkfile.

test.s
.MEMORYMAP
SLOTSIZE $8000
DEFAULTSLOT 0
SLOT 0 $0000
SLOT 1 $8000
.ENDME

.ROMBANKMAP
BANKSTOTAL 1
BANKSIZE $8000
BANKS 1
.ENDRO

.SDSCTAG 1.0, "Target Sprite", "Shoot 'em up game main loop", "StevePro Studios"

.EMPTYFILL $C9                ;ret.
.COMPUTESMSCHECKSUM           ;compute sms checksum for this rom.

.BANK 0 SLOT 0
.ORG 0

.INCBIN "test.bin"
linkfile
[objects]
test.o
Launch Crimson IDE. File | New file. Save test.c. Next, type in the following source code: test.c.

test.c
#include <sms.h>

unsigned char pal1[] = {0x00, 0x02, 0x08, 0x0A, 0x20, 0x22, 0x28, 0x2A, 0x3F, 0x03, 0x0C, 0x0F, 0x30, 0x33, 0x3C, 0x3F};
unsigned char pal2[] = {0x00, 0x02, 0x08, 0x0A, 0x20, 0x22, 0x28, 0x2A, 0x3F, 0x03, 0x0C, 0x0F, 0x30, 0x33, 0x3C, 0x00};

unsigned char all_tiles[] =
{
  // blank tile.
  0x00, 0x00, 0x00, 0x00, 0x00, 0x00, 0x00, 0x00, 0x00, 0x00, 0x00, 0x00, 0x00, 0x00, 0x00, 0x00, 0x00, 0x00, 0x00, 0x00, 0x00, 0x00, 0x00, 0x00, 0x00, 0x00, 0x00, 0x00, 0x00, 0x00, 0x00, 0x00,
 
  // target sprite.
  0x00, 0x00, 0x00, 0x00, 0x00, 0x00, 0x00, 0x00, 0x39, 0x00, 0x00, 0x39, 0x20, 0x00, 0x00, 0x20, 0x21, 0x00, 0x00, 0x21, 0x00, 0x00, 0x00, 0x00, 0x01, 0x00, 0x00, 0x01, 0x2A, 0x00, 0x00, 0x2A,
  0x00, 0x00, 0x00, 0x00, 0x00, 0x00, 0x00, 0x00, 0x9C, 0x00, 0x00, 0x9C, 0x04, 0x00, 0x00, 0x04, 0x84, 0x00, 0x00, 0x84, 0x00, 0x00, 0x00, 0x00, 0x80, 0x00, 0x00, 0x80, 0x54, 0x00, 0x00, 0x54,
  0x2A, 0x00, 0x00, 0x2A, 0x01, 0x00, 0x00, 0x01, 0x00, 0x00, 0x00, 0x00, 0x21, 0x00, 0x00, 0x21, 0x20, 0x00, 0x00, 0x20, 0x39, 0x00, 0x00, 0x39, 0x00, 0x00, 0x00, 0x00, 0x00, 0x00, 0x00, 0x00,
  0x54, 0x00, 0x00, 0x54, 0x80, 0x00, 0x00, 0x80, 0x00, 0x00, 0x00, 0x00, 0x84, 0x00, 0x00, 0x84, 0x04, 0x00, 0x00, 0x04, 0x9C, 0x00, 0x00, 0x9C, 0x00, 0x00, 0x00, 0x00, 0x00, 0x00, 0x00, 0x00,
};

void setSprite(int x, int y)
{
  // priority, x, y, tile.
  set_sprite(0, x+0, y+0, 1);
  set_sprite(1, x+8, y+0, 2);
  set_sprite(2, x+0, y+8, 3);
  set_sprite(3, x+8, y+8, 4); 
}

void main()
{
  int idx, off, x, y; 
  set_vdp_reg(VDP_REG_FLAGS1, VDP_REG_FLAGS1_SCREEN);

  // array, start, count, bpp.
  load_tiles(all_tiles, 0, 5, 4);

  // array, start, count.
  load_palette(pal1,  0, 16);
  load_palette(pal2, 16, 16);

  x=120, y=88; 
  setSprite(x, y);
  for (;;)
  {
    off = 2;
    idx = read_joypad1();
    if (idx & JOY_FIREB) { off = 4; }
    if (idx & JOY_LEFT)
    {      
      x -= off;
      if (x < 0)      { x = 0; }
    }
    if (idx & JOY_RIGHT)
    {
      x += off;
      if (x > 240)    { x = 240; }
    }
    if (idx & JOY_UP)
    {      
      y -= off;
      if (y < 0)      { y = 0; }
    }
    if (idx & JOY_DOWN)
    {
      y += off;
      if (y > 176)    { y = 176; }
    }
    wait_vblank_noint();
    setSprite(x, y);
  }
}
 
If you have C:\PerfomBuild.bat setup as per previous post then simply hit Ctrl+1 hot key to run!
Note: move target sprite left, right, up or down. Press "Fire2" button to double movement speed.

Disassemble
Finally, disassemble the compiled binary file test.sms generated from the Crimson IDE batch script.
In directory C:\TargetSprite, copy the 2x files Opcodes.dat + smsexamine.exe from SMS Examine zip.

Launch command prompt, change directory cd C:\TargetSprite. Type: smsexamine.exe test.sms.
This action will generate test.sms.asm and any data files. Launch ConTEXT. Open test.sms.asm:

Follow instructions from the previous post to setup hotkeys: F9 (compile) F10 (run) F11 (debug).

Press F9 to compile and link "test.sms.asm". This generates the "output.sms" binary file.
Press F10 to run program in the Fusion emulator. Press F11 to debug in Meka emulator:

Compare machine code in the debugger with the raw binary output file from test.sms.

Summary
This simple programming sample creates building blocks necessary to produce an 8-bit video game for Sega Master System. The next steps would be to build an 8-bit Homebrew video game to completion!